Materials Workflow

Learn all about Materials in Lumion and how to make the best out of all the available settings to enrich the look and feel of textures in your Projects.
Here's how it works:

Now that you have an idea of the overall process, jump into a section below to find out more about that topic:
When a model is imported into Lumion, each surface becomes individually Selectable based on its Material name from the original 3D application.

While in Material Mode:
- Clicking on a highlighted surface will bring up the Materials Editor. From here you can select to create a new Material for that surface or select a pre-configured from Lumion's extensive Material Library.
- Double-clicking a highlighted surface will always take you directly to the settings for that Material.
The article below outlines all the types of Materials there are in Lumion and provides a detailed explanation of how the Materials Editor works:
- Knowledge Base: How do you use the Material Editor in Lumion 2023?
Note that Lumion can also detect surface names from your 3D application and automatically associate a Lumion Material from the corresponding category:

The following Materials will be auto-assigned to models when imported if the surfaces have no texture assigned:
See this article for more information on auto-converted Materials:
- Knowledge Base: How do Auto-Converted Materials work in Lumion?
However, if you would rather not have a Lumion Material, you can revert to the embedded texture at any time by assigning the Imported Material:

In the Standard Material settings window, click on the Load Map button to the right of the Texture slider:

Lumion can import .JPG, .PNG, .PSD, .BMP, .TGA, .TIF, .DDS and even .MP4 video textures at a maximum of 16,384x16,384 pixels. You can load additional texture Maps for other settings as well: Relief, Roughness, Reflectivity, Metalness, Emissiveness, Displacement and Opacity, allowing for full PBR Material control and quality.
To keep things running smoothly we recommend using 2K textures for general usage, and up to 4K textures for close-up shots or for Materials that you want to highlight in the Model.
After a Material is loaded, you can adjust its Map Scale, position, and rotation by adjusting the corresponding sliders in the UV Coordinates tab (these are only available when Map Scale is not set to Imported):
 Tip: hold Shift while moving a slider for more precise control.
If the Map Scale is set to 0, the scale will be set to the default imported model's UV texture scale.
To learn what each Map and setting does in a Standard Material, follow this article:
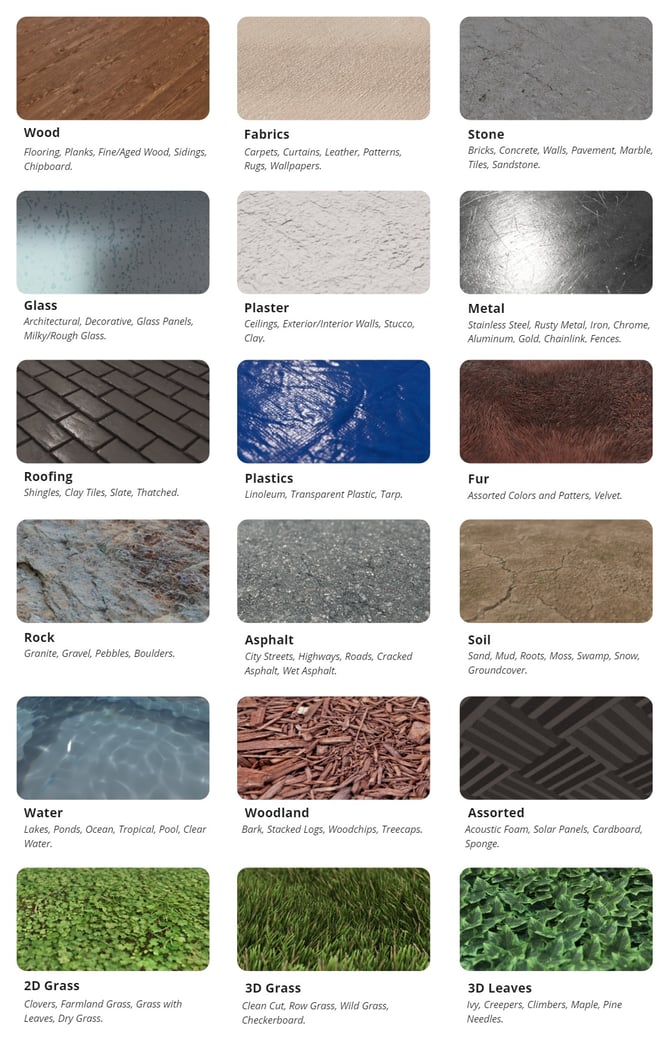
The Material Library in Lumion includes a collection of over 1,468 pre-configured materials, offering a wide variety of different types of textures, such as wood, concrete, glass, and more.
The vast majority of these are Standard Materials so you can fine-tune their properties.
Here's an overview of the Materials you can find in the Lumion Library :


Crafting realistic Material in Lumion is an art that revolves around the careful integration of high-quality texture Maps and precise adjustments of various settings. Each Material possesses its distinctive characteristics, demanding a tailored approach to control its appearance.
While default settings may offer a decent foundation, the true magic ultimately lies in your hands – and your input will determine the level of realism each Material will exhibit.
Tutorials
Start learning how to make use of PBR properties to create life-like Materials by following these Tutorials.
This short video covers assigning and customizing Materials using different texture Maps:
And, for a more advanced guide on how to create incredibly realistic-looking textures, follow this Tutorial by Architecture Inspirations:
Once you are done setting up a Materials, you can easily save it in your Custom Materials by clicking on this button:


It's a great way to store your fine-tuned Materials so that they can be quickly retrieved and reused in other models. You can customize the Thumbnail and choose a Category folder for the Custom Material.
The Custom Material file will be saved in a subfolder in the Documents/Lumion folder.
For example:
- C:\Users\[yourUserName]\Documents\Lumion\Materials\Custom\
If needed, Materials can also be saved as a single .LMAT file that can be loaded on a different PC. This can be done by clicking on the Save Material to Disk button:

More details on saving and loading Materials can be found in this article:
- Knowledge Base: How do you copy, paste, save and load Materials in Lumion 2023?
All the Materials in a model can be bundled and saved as a Material Set file (.LMS). You can then load this file to other models that have matching surface names.

You can learn more about Material Sets in section 3 of this article:
- Knowledge Base: How do you copy, paste, save and load Materials in Lumion 2023?
Getting more Textures
Can't find the Material you need in the Library? You can download textures from other sources:

Check out our official collection of Texture providers in the Lumion Community Resources section:
- Lumion Community: The official Lumion list of texture collections
See Also:
More Learning Pathways
Introduction to Lumion Importing and working with 3D Models Content Library Lighting Latest Features


