
1. Making a Proxy object
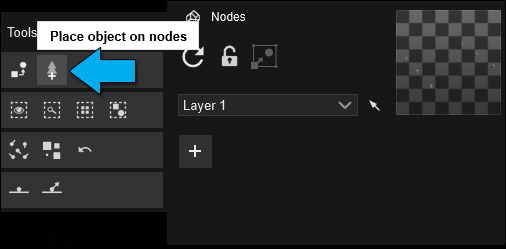
The Place item on nodes function lets you place objects of your choice at the same positions as imported proxy objects from your 3D/CAD software.
- Each proxy object should be a separate object, for example, simple duplicated boxes.
- Make sure that a single material is assigned to all faces of the proxy objects.
- The function works with Revit, SketchUp, ArchiCAD, AutoCAD, AllPlan, 3ds Max, Vectorworks, and Rhino.
- Spotlights and Area Lights are rotated by 90 degrees by default in Lumion (so they are pointing downwards). When wanting to replace with lights, you need to compensate for that by rotating your proxy object 90 degrees in the opposite direction in your 3D/CAD software before exporting the proxy objects. This might also be the case with other Library Objects.
See the steps and export requirements for each of these applications in section 4 below.
2. Newly placed Objects on Nodes
2.1: Lumion 9.0 and newer
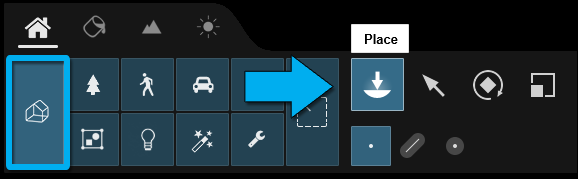
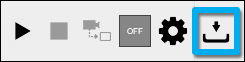
After importing a model with proxy objects and placing it in your Scene, use the Place item on nodes function to place an object of your choice on each of the imported proxy objects.
- The function is available in the Object Options panel for Imported Models.

- If a Windows Open File window pops up when you click on the Place item on nodes button, select the Imported Model file with the proxy objects, and click on the Open button.
- Please note that when you use the Place item on node function in Lumion after importing a model file, it will place additional objects at the Object Icon of the model. Simply delete those objects.
2.2: Lumion 8.5 and older
After importing a model with proxy objects and placing it in your Scene, use the Place item on nodes function to place a tree/plant or light of your choice on each of the imported proxy objects.
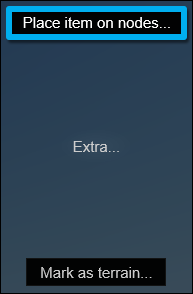
- The Place item on nodes function is available in the Extra menu in the Context Menu for Imported Models.

- If a Windows Open File window pops up when you click on the Place item on nodes option, select the Imported Model file with the proxy objects, and click on the Open button.
- Please note that when you use the Place item on node function in Lumion after importing a model file, it will place additional objects at the Object Icon of the model. Simply delete those objects.
3. How to make changes to previously placed Objects on Nodes
After using the Placing Objects on Nodes feature the proxy object will be removed from the Build Mode viewport. They will remain in the Lumion Imported Models Library.
If you need to make use of the nodes again in order to modify or change the placed objects you need to go through these steps:
3.1: Place the models:
Go to your Lumion Imported Models Library, in Build Mode, and to place them again, select Imported Models and then Place.
3.2: Align your models:
In order to align them with your main model you can place the Nodes manually by using the Move commands.
Alternatively, with the main model selected in the top right corner use the Lock Object and Make it unselectable feature.
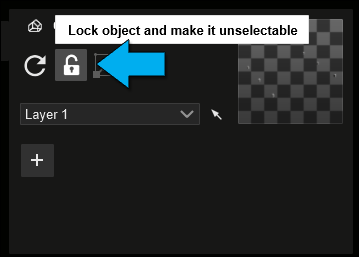
This will prevent the main model from moving.
With the main model and Nodes selected, click on Align Positions.
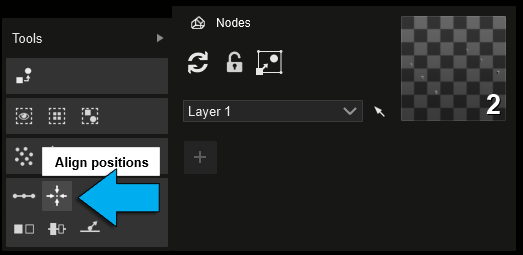
This will bring the nodes in line with the main model.
3.3: Replace:
To replace the Nodes with new Objects, deselect the main model and select the Place Object on Nodes.
3.4: Group:
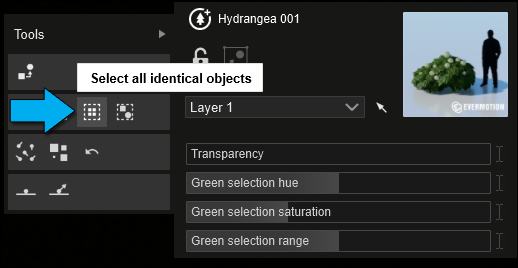
3.4.1: For ease of use it is recommended to group the new objects. This can be done by selecting an object and again under Advanced Options, clicking on Select All Identical Objects.
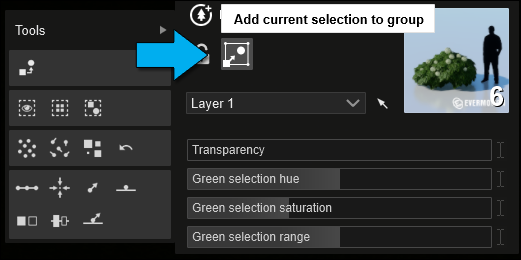
3.4.2: With the objects selected, use the Add Current Selection to a Group feature.
Please also refer to our Tutorial Video below for a more in-depth view of the Node placement and replacement:
- Lumion Tutorial: Lumion 9: Nodes & Node Replacement
4. 3D Modelling Guidelines
4.1: Guidelines for Revit
4.1.1: Install the Lumion LiveSync for Revit plug-in if you are using Revit 2015 or newer:
- Knowledge Base: Download Lumion LiveSync for Revit
4.1.2: In a 3D View, place some simple objects, e.g. columns or boxes (non-extruded shapes), to represent the proxy objects. Make sure that a single material is assigned to the objects.
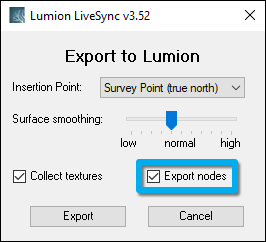
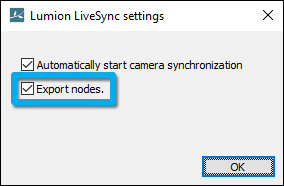
4.1.3: Tick the Export nodes button in the Export as Collada file settings before exporting a .DAE file to Lumion:
4.1.4: Follow step 2.1 or 2.2 above.
4.2: Guidelines for SketchUp
4.2.1: Create a box for use as a proxy object. Make sure that you have only assigned a single material to all faces of the object.
4.2.2: Right-click on the box and select Make component.
4.2.3: Duplicate the box as many times as you want. Do not group the duplicates.
4.2.4: Lumion 9.0 and newer versions:
Save the components to a separate .SKP file.
4.2.5: Lumion 8.5 and older versions:
Select File -> Export -> 3D Model, choose Collada file (*.DAE), click on Options and make sure that Preserve Component Hierarchies is ticked before exporting the .DAE file.
4.2.6: Follow step 2.1 or 2.2 above.
4.3: Guidelines for ArchiCAD
4.3.1: ArchiCAD 21 or newer: Install the Lumion plug-in for ArchiCAD:
- Knowledge Base: Download Lumion LiveSync for ArchiCAD
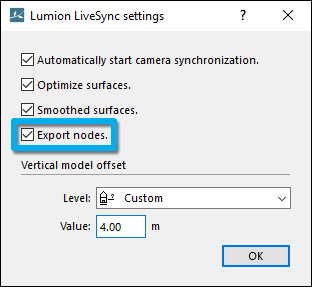
4.3.2: Export the proxy objects to .DAE format with the Export nodes tickbox ticked:

4.3.3: ArchiCAD 20 and older: Export the proxy objects to .3DS format with the default export settings:
File -> Save as... -> .3DS format
4.3.4: Follow step 2.1 or 2.2 above.
4.4: Guidelines for Autodesk AutoCAD
4.4.1: Lumion 8.5 and newer: The most reliable way to export proxy objects is to have block references in the places where Nodes should be exported. To do so, create a (proxy) box and turn it into a block reference by typing the command Block. Once that is done, you can copy and paste the box as many times as you need. Then install Lumion LiveSync for Autodesk AutoCAD and export the proxy objects via the Collada .DAE export method with 'Export Nodes' turned on in the export settings of the plug-in:
- Download Link: Download Lumion LiveSync for Autodesk AutoCAD
4.4.2: Lumion 8.3 and older: Make sure that your proxy objects are Mass Elements, not 3D Solids, and then save the proxy objects to .DWG format. Then quit Lumion and install the DWG plug-in for Lumion:
- Download Link: Download the Lumion DWG plug-in
4.4.3: Follow step 2.1 or 2.2 above.
4.5: Guidelines for Rhino
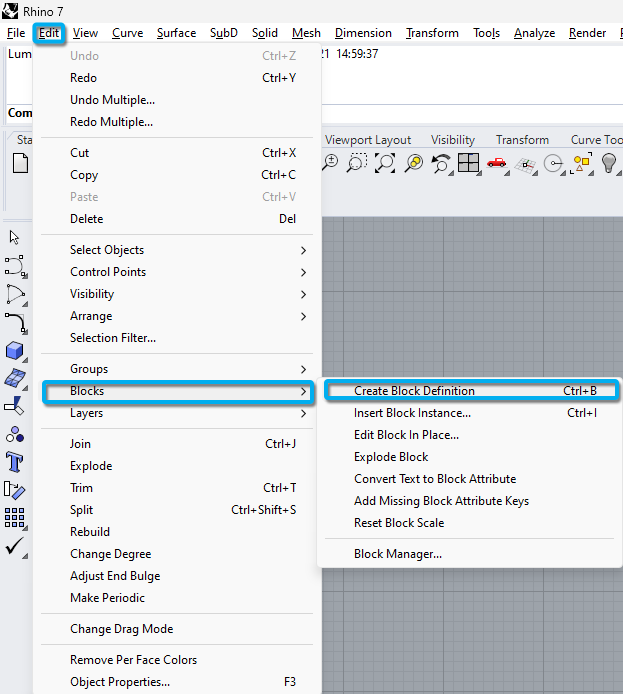
4.5.1: Assign a Block Definition to a cube:
Edit -> Blocks -> Create Block Definition
Duplicate the Block Definition objects as desired in the Rhino model.
4.5.2: Rhino 6.10 and newer: Install the Lumion plug-in for Rhino:
- Knowledge Base: Download Lumion LiveSync for Rhino
Export the proxy objects to .DAE format with the Export nodes tickbox ticked:


4.5.3: Rhino 5: Follow these instructions to export the model to .DAE format:
- Knowledge Base: Model import guidelines for Rhino
4.5.4: Follow step 2.1 or 2.2 above.
4.6: Guidelines for Vectorworks
4.6.1: Vectorworks 2019 SP3 or newer: Install the Lumion plug-in for Vectorworks:
- Knowledge Base: Download Lumion LiveSync for Vectorworks
4.6.2: Create cones to use as proxy objects.
4.6.3: Export the proxy objects to .DAE format with the plug-in.
4.6.4: Follow step 2.1 or 2.2 above.
4.7: Guidelines for 3ds Max
4.7.1: Export the proxy objects to .3DS format with the default export settings.
4.7.2: Follow step 2.1 or 2.2 above.
4.8: Guidelines for AllPlan
4.8.1: Export the AllPlan proxy objects to .SKP (SketchUp) format:
- Knowledge Base: Model import guidelines for Allplan
4.8.2: Then open the .SKP file in SketchUp and follow the instructions in section 3 above.
4.9: Guidelines for BricsCAD
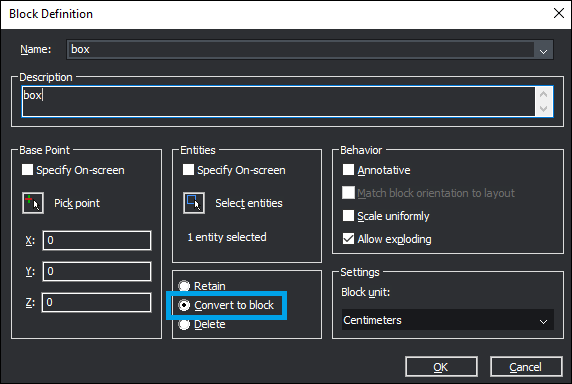
4.9.1: Lumion 8.5 and newer: The most reliable way to export proxy objects is to have block references in the places where Nodes should be exported, not raw geometry. To do so, create a (proxy) box and turn it into a block reference by typing the command Block. In the pop-up window, select 'Convert to block'.
Once that is done, you can copy and paste the box as many times as you need. Then install Lumion LiveSync for BricsCAD and export the proxy objects via the Collada .DAE export method with 'Export Nodes' turned on in the export settings of the plug-in:
- Download Link: Download Lumion LiveSync for BricsCAD
4.9.2: Follow step 2.1 or 2.2 above.