

We take a look at the main changes from earlier versions to Lumion 2023 and newer so you can get an idea of what you were used to, and what newere versions of Lumion now require.
The focus here will be on changes from Lumion 12.5, many will be the same or similar from earlier versions.
The article aims to help you get a quick understanding of the changes in Lumion.
Please also refer to our official Release Notes that include all changes, bug fixes and improvements.
- Knowledge Base: Lumion 2023.0: Release Notes
- Knowledge Base: Lumion 2024.0: Release Notes
Menu:
1. Technical Limitations
2. Changes from Improvement - highlights:
3. Ray Tracing: Bringing to you the world of Ray Tracing
4. Unified Materials: Full PBR Material (physical-based rendering material)
5. Unified lighting system
6. Build Mode
6.1: Transform gizmo
6.2: Auto Snap
7. New Effects
7.1: Ray Tracing Effect (see 3)
7.2: Color Correction (Tonemapping) Effect
7.3: Improvements and changes to other Effects and how they work with Ray Tracing
8. Rendering Aspect Ratios
9. Movie Mode: New Camera Paths:
9.1: Camera Preset Paths
9.2: Imported Camera Path
10. Editor performance improvement with increase in quality for Build Mode display
11. Updating Lumion
12. Transitions from prior versions to Lumion 2023
13. Other
Main Changes:
1. Technical Limitations:
The Lumion team has been working on a roadmap to remove some of the technical limitations found in the list below. There are certain constraints in the integration of the Ray Tracing pipeline with the Lumion rasterization engine that will require further development post the release of Lumion 2023:
1.1: Objects
- Animated Characters and Objects in the Effects Category such as Decals are not yet fully converted to the Ray Tracing engine. This means their shading and Reflections may be inaccurate or not displayed.
- Objects from the Nature Library such as trees and plants do not have Wind animations when using Ray Tracing.
1.2: Materials
- The Water Material has Ray Traced reflections but is not yet fully converted yet to the Ray Tracing engine.
The following articles should assist in case you require a fully Ray Traced Project with water:
- Foliage, Fur, and 3D Grass shadows are calculated using the rasterization pipeline when using Ray Tracing. Those materials are not yet in the Ray Tracing and bindless materials pipeline so will not be visible in reflections.
1.3: Photo, Movie, and Panorama Modes
- Poster resolution is currently disabled when using Ray Tracing.
1.2.2: Photo Mode:
Rendering: The Print resolution is now available when using the Ray Tracing Effect.
Rendering: Lumion 2023.0.1 now displays the option to choose between the Native or Optimized
rendering algorithm for Print resolution when the VRAM is low. More information details can
be found in the article below:

Knowledge Base: What does the message 'Low VRAM detected' mean?
- There can be noise/glimmering in movies with Ray Tracing, depending on the lighting of the scene and camera movements, especially in reflections. Low light conditions and fast camera movements are known to cause this.
- Ray Tracing in Panoramas is not available in version 2024.
1.4: Effects
- Artistic Effects are disabled when using the Ray Tracing render pipeline.
See section: 3.3: Post-Processing Effects
- Global Illumination is disabled. This will be addressed in a future update.
The Global Illumination Effect itself is still available and you can add it to a Project. It is also included in the Effects Stack for prior version Projects. However, there are no results from it as it has been disabled in the rendering pipelines for both Rasterization and Ray Tracing.
If needed, please use the HyperLight Effect as this provides a more modern approach to global illumination.
NOTE - VERY IMPORTANT: Due to the significant engine and settings changes, older version Project files might look different when loaded in Lumion 2023 and newer. This is covered in the article below:
- Knowledge Base: Transitions: Why does my Project look different in Lumion 2023 compared to previous versions?
If you are having trouble getting your old files to look the same as before, we recommend that you start your Effects from scratch or complete any current Projects in the respective version and only use Lumion 2023 and newer for new Projects.
2. Improvements - highlights:
- Ray Tracing Effect: Bringing to you the world of Ray Tracing.
- New Materials pipeline: Full PBR Materials with more Maps.
- Unified Lighting system.
- Transform Gizmo for Move, Rotate, Scale.
- Rendering Aspect Ratios.
- New Camera Paths and Controls.
At a glance (picture enhanced):
2.1: Ray Tracing Effect: Bringing to you the world of Ray Tracing.

2.2: New Materials pipeline: Full PBR Materials with Maps and redesigned interface.

2.3: Unified Lighting system.

2.4: Tools to Build your Scene easier: Transform Gizmo for Move, Rotate, Scale.


2.5: Rendering Aspect Ratios.

2.6: New Camera Paths - Presets and Import.

3. Ray Tracing Effect: Bringing to you the world of Ray Tracing
3.1: The Ray Tracing Effect:
Ray Tracing is added as a new Effect. Of course the most important and massive change for Lumion. Presented to you in a very simple, easy-to-use way in just one Effect.
The Effect is located in the Lighting Effect Category and also in the Featured Effects.

Since Ray Tracing will take care of emulating the way light reflects and refracts the following Effects will get disabled when the Ray Tracing Effects are applied to the Effect Stack since Ray Tracing is taking care of it and does it in a better and more accurate way:
- Skylight Effect.
- Hyperlight Effect.
- Global illumination Effect.
- Shadows Effect.
- Reflection Effect.
Note: due to the way Lumion currently works there may be some adjustments and use of rasterization rendering for this Effect for Glass Materials. This may change in an update.

3.2: Effect Settings:
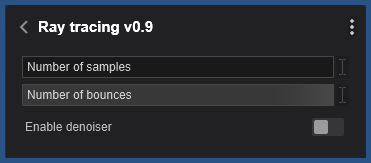
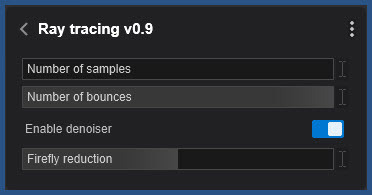
3.2.1: Number of Samples
The number of rays that are cast. Increasing the samples will increase the render time to resolve the image, but will result in less noise
3.2.2: Number of Bounces
The number of bounces a ray can make. Increasing this value will increase the render time to resolve the image, but will improve Global Illumination, ambient occlusion, etc.
3.2.6: Enable Denoiser:
Noise Reduction: This sets how strong the denoiser is applied to the output image. By default it is set to the maximum value of 1. Ray Tracing (the methodology that Lumion needs to work within) involves a method that does result in noise, sometimes a lot of noise.

From left to right 128 samples with respectively 1 bounce, 2 bounces, 4 bounces, and 8 bounces.
3.3: Post-Processing Effects
In this initial release for Lumion 2023 all the post-processing effects, that will give an artistic style, will be disabled when the Ray Tracing Effect is in use. This occurs when the Effect is added to an Effects Stack.
For most of these Effects, you won’t see much of a benefit if the image is Ray Traced when these Effects are done post-process in Lumion.. In other words, do not add the Ray Tracing Effect, or turn it off, to use the Rasterization rendering pipeline.
- Outlines Effect (Concept).
- Sketch Effect (Concept).
- Pastel Sketch Effect (Concept).
- Blueprint Effect (Architectural).
- Painting Effect (Artistic).
- Watercolor Effect (Artistic).
- Manga Effect (Artistic).
- Cartoon Effect (Artistic).
- Oil Painting Effect (Artistic).
3.4: Hardware Support
The Ray Tracing Effect can only be enabled when the GPU that is running Lumion 2023 supports `Hardware-accelerated Ray Tracing`. If the GPU doesn’t support it then the Ray Tracing Effect is disabled.
GPUs that do support hardware-accelerated Ray Tracing:
- Nvidia RTX series (RTX 20X0, RTX 30X0, RTX 40X0…)
- Nvidia Quadro RTX series (Quadro RTX 8000, Quadro RTX 6000, Quadro RTX 5000…)
- Nvidia RTX A series (RTX A6000, RTX A5500, RTX 5000…)
- AMD Radeon RX 6000 series (RX 6900, RX 6900 XT, RX 6800…)
- AMD Radeon RX 7000 series (RX 7900 XT, RX 7900 XTX…)
- AMD Radeon PRO W6000 series (PRO W6800, PRO W6600…)
There is currently no support for Intel ARC GPUs.
3.4.1: Hardware Requirements: Summary
The changes are not that much.
Lumion 12:
Lumion 2023-2024:
Minimum:
Graphics card:
(PassMarks):
CPU (processor):
(Intel/AMD processor scoring a single thread CPUMark)
Recommended:
Graphics card:
(PassMarks):
CPU (processor):
(Intel/AMD processor scoring a single thread CPUMark)
High-End:
Graphics card:
(PassMarks):
CPU (processor):
(Intel/AMD processor scoring a single thread CPUMark)
4. Unified Materials: Full PBR Material (Physically Based Rendering material pipeline)
- Materials - major changes -> full PBR workflow/pipeline.
- Materials Editor and Maps - new Material types.
- Material changes.
- Material Properties.
- New Glass (integrates Glass Standard and PureGlass).
- Water.
- Subsurface Scattering.
- Clearcoat.
4.1: Texture Maps for each different Material type for full PBR pipeline:


Maps are now supported for each of the following Materials Properties when using a Standard Material:
- Texture: Color Map (also prior version).
- Relief: Normal Map (also prior version).
- Roughness: (new, previously known as a Gloss Map, now its inverse)
- Reflectiveness: (new, previously known as the Clipping Mask using an Alpha Map in the Color Map)
- Metalness: (new)
- Emissiveness: (new, previously known as the Emissiveness Mask using an Alpha Map in the Color Map)
Note: Emissive has received a number of updates and it is now a light and shadow emitting source. - Displacement: (also prior from V10.3 import of map)
- Opacity: (new, previously known as the Clipping Mask using an Alpha Map in the Color Map)
Now you can have greater control over the look of a surface and affect the quality of the render.
In the old Standard Material, you could only use one Map as a Reflectivity, Opacity, or Emissive Mask. With the new PBR Material, it is now possible to have a unique Map for all three properties.
4.2: The interface gets a complete revision
The Material Library picker has been refined a little more. At the top of the window, there are now two tabs, the Material Library and Material Settings (for the selected surface). This should be more intuitive for switching between those two.


Some of the functions for Materials have received a change and Copy/Paste now reside in the Material Editor for quicker access than was previously (V12) and in the Context Menu.

The Context Menu for less used functions includes the Load and Save Material file. This file has a new format and file extension *.LMAT

As part of the interface revision are some of the suggestions as feedback from users such as a much larger preview/thumbnail for Texture Maps.

4.3: Map Scale
4.3.1: Retained
When setting the Map Scale to 0, Lumion will still switch to using the Imported Models UV Coordinates that were applied in the 3D modeling program. As it used to do in previous versions.
4.3.2: New
If the value is greater than 0 it will use automatic (box) mapping. This is now applied a little differently. In Lumion 2023 you set the actual size the texture will take in world space (previously local object space).
See article:
These values are global. So even when the Imported Model is scaled up or down in Lumion. The Texture will still cover the actual global size that was set for the Map Scale, it doesn’t scale along with the model.
This change makes it easier for you to get the Texture at the desired size compared to the previous way.
4.3.3: Locating a Library Material
You can also now locate a Material if its source was in the Lumion Material Library (new).

4.3.4: ReImport feature
Due to a range of issues involving updating of materials whilst importing, the ReImport a model feature has been removed from the model properties window when using the Material Editor:
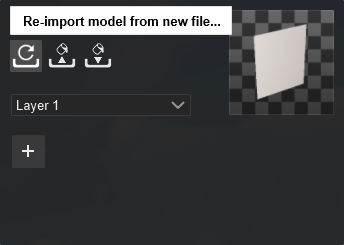

The button will still appear when selecting the model in Object Library Mode.
Note on Materials of course that the settings/values for some of the properties may require tweaking and especially tweaking for the new lighting/rendering. For example, a Material with an Emissive in Lumion 2023 is now based on Nits, whereas previously it was a scaled general value. And that the Specular and Saturation are no longer properties of a Material.
4.3.7: Dual maps from old Projects
Did you use the Alpha Map channel to create Maps for Reflectivity, Clipping or Emissiveness in an earlier version? Or embedded in a Color Map or Normal Map?
Lumion will auto-convert all models and Materials in the Lumion 2023\Library folder for the first time. See further in Section: Transitions for Prior Projects.
For converted Materials all the Maps are split and converted to their respective Map slot. So your Alpha Map should now be seen in the Opacity Map.
4.3.8: Import/Load separate Maps
For new Materials you will need separate Maps.
Lumion 12 already supported this workflow, where you could import a separate Map such as Gloss Map. (You had to have a Normal Map, but that could be just a blank one.)
When you obtain Texture packs or when creating your own Maps with a Texture Map creation software such as 'ShaderMap' or 'Substance Designer', you will have separate Maps.
See our Resources Section: 4. Texture making:
- Lumion Community: The official Lumion list of image editing applications
Before Lumion 12 you had to jump through hoops to get it to work if you needed these extra Maps. You needed an image editor that was able to edit the Alpha Channel, paste the Gloss Map in there and save the file. Any changes needed going through that whole process again. It was for very experienced users only.
Now you can use pre-made or your own maps straight away. Also added is an option to invert the Map if it was made as a Gloss Map for the Roughness Map.
And an option to fix the Normal Map if it was generated for a renderer that uses a flipped Y axis.
4.3.9: Texture Blending for the slider Values
Please check our articles especially the Standard Material article for how these now work to understnad the differences from prior versions.

4.3.10: Specular is no longer a property of a Material
(This setting is taken from the Lumion 12 Standard Material article)
Specular:

There is no Specular slider now. Specularity from a PBR perspective is a combination of Roughness, Reflectiveness, and Metalness.
4.3.11: Subsurface Scattering

Subsurface Scattering has been added to the PBR Material Editor. This property simulates light being scattered within the surface of a (translucent) object. For example, how light penetrates human skin.
Previously this was attained (in part) by using the Waxiness property, however, this feature now fully supports the capability for Subsurface Scattering.
See article:
The conversion process for Lumion 2023:
Since Subsurface Scattering is much stronger than Waxiness, the setting will be set to half the value it was in previous versions. So for example, if you import a file that has 100% Waxiness setting on a surface, it will be set to 50% Subsurface Scattering.
It's also worth noting that Subsurface Scattering's translucent effect is visible on both sides of surfaces, while Waxiness was mostly only visible from the back.
Current Limitation applies to 2023.0:
Because Subsurface Scattering is not yet fully converted for Ray Tracing, then the values best work at around 0.5-1.5% if you're rendering in Ray Tracing.
4.3.12: Clearcoat

Same material. The sphere on the left sphere has 100% clearcoat, and the sphere on the right has 0% clearcoat (RT off)
This is similar to the Clearcoat that is available as an object property for Cars in the Object Library. Clearcoat is a colorless resin that is applied over the top of the base coat. It's the layer that makes your car look glossy and shiny.
And now you can apply it to surfaces with a Standard Material/Library Material.
See article:
4.3.13: New Glass
Both the old Glass and old PureGlass have been merged into the new Glass Material. This new version has some nice new features.
4.3.13.1: Custom Textures

Example of glass with a custom normal map, color map, and frostiness map. (RT off)

It is now possible to import custom Textures for the Glass Material. Supported Maps are a diffuse Texture (Color), Normal Map (Relief), and a Frostiness Mask (grayscale). This will provide you with more options to customize the Glass.

4.3.13.2: Distortion / Refraction

Sphere with double-sided Glass, distortion set to 0%, 20%, 40%, 60%, 80%, and 100% respectively. (RT off)
In the prior PureGlass Material, the double-sided slider had two types of double-sided: thin Glass (value between 0.8 and 1.0) and thick Glass (value of 1.0). When set to thick, the Glass would have a strong refraction. With the new Glass, the double-sided slider is just a toggle between single-sided and double-sided. However, for double-sided Glass, it is now possible to tweak the refraction by setting the distortion value. A value of 0% is no refractions and 100% is maximum refraction.
4.3.13.3: Improved shadows for Glass
The shadows cast by the new Glass Material have been improved. It now takes into account the Transparency, Frostiness, and luminosity of the color of the Glass. But as yet not the color.

4.3.14: Landscape Materials

The Landscape Material has been updated so that it uses the new PBR material and will therefore work with Ray Tracing. The landscape should be visually almost identical to the old version but with some nice potential.
4.3.15: Water Material
The Water Material has been improved, using more physically accurate calculations for refraction, Reflection, and Subsurface Scattering. The Ocean and the Water Plane (both in Landscape Mode) use the same Material and also see this improvement.
Loading prior version Projects that have any of the Water types applied might look different/wrong because of this change. You should reset the Water Material to the default settings.
See article:
- Knowledge Base: Changes for Projects to use the Water Material in Lumion 2023?
4.4: Transitions: Materials from Prior Projects
4.4.1: Existing Materials for a Project
Lumion will auto-convert all models and Materials in the Documents\Lumion 2023\Library folder for the first time if files have been put there as part of upgrading to Lumion 2023.
This might take some time, depending on the number of Materials per Project and the number of Materials files in the Library.
See also article:
- Knowledge Base: Lumion 2023.0: Everything you need to know
Lumion will also convert on-the-fly models and Materials for Projects opened for the first time. Once converted they are now using the new Materials system.
See also (below) Section 13.2: Lumion Library content (Models and Materials) - Content is Pre-Converted to new formats.
4.4.3: Materials: Performance and render times:
The PBR Material is more complex, in that potentially you can add in more separate Texture Maps than the other Materials in the past and it is now supporting more features. So this means they can get heavier and that might decrease performance slightly. But the methods used for rendering in Lumion with the new system in itself are more efficient and that should increase performance. So overall there should be little noticeable change when using the same number of Maps and the same resolutions.
4.4.4: Water/Ocean
As earlier: you should reset the Water Material to the default settings.
5. Unified lighting system
In preparation for making the current lights usable in Ray Tracing and improving lighting in general, all light sources have been combined in a unified lighting system.
Sunlight, Spotlights, Omni Lights, Area Lights, HDR skies, and Emissive Materials are now using the same unified system.
Fill Lights are not included for Ray Tracing. They cast no shadows and are only useable for the Rasterization rendering pipeline. If you had used or need to use a Fill Light then replace it with an OmniLight with no IES Profile.
The value for a lighting Object has changed, but Lumion will attempt to convert to a similar value for any existing Projects.
Values:
- Spotlights, Omnilights: Lumen. Range: 1 to 100,000.
- Area Lights and Emissive surfaces: Nits. Range: 1 to 100,000.
You now also get Emissive Materials and Area Lights that cast light and shadow.
The results you could achieve during daytime in previous Lumion versions weren't really possible in real world situations. This means there will be a difference when comparing 12.x renders and Lumion 2023 renders that are during daytime.

Raytraced shadows with different sizes and a Spotlight as the source
Size is a new property added to Spotlight and OmniLight, this can be used to scale the light source. In Rasterization this will only result in a larger light source. In Ray Tracing this will result in softer shadows from the light.
Another improvement, is that the new light source for Spotlights and OmniLights are now properly reflected in Ray Tracing.
6. BUILD MODE:
6.1: Build Mode - Select has been overhauled
Change to User Interface:

Build mode - select, 12.5 vs 2023
Move, Rotate, and Scale are now all directly placed in Select Mode itself.
When in Move Mode the position Type-in panel is now always visible. It will also show the panel with the Snap button.
6.2: The new Transform Gizmo
The special Move functions for constraining vertical movement and horizontal movement have been removed. These options are now redundant because of the Transform Gizmo (Gizmo).

In Select Mode > Move [M], you will get the Move Transform Gizmo by default. Using the red, green, or blue arrow will let you Move over the X, Y, or Z axis (respectively).
That’s why there is no longer the need for the vertical and horizontal move mode or the hotkeys X and Z to constrain the movement.
The red, green, or blue square in the Gizmo will let you move in the YZ, XZ, or XY space. This replaces the old move horizontal, and adds two new planes to move the object. If you click the Object Node it will still default back to the prior Free Movement Mode.

In `Select Mode > Rotate [R]`, you will now also have the “Rotate Transform Gizmo”. This allows you to change the Bank and Pitch.

While the previous Orientation handles would only let you set the heading. When clicking the Object Node, it will default back to the Orientation handles.

6.3: Auto Snap
6.3.1: About Auto Snap:
Auto Snap (previously F hotkey) has been improved.
Currently and by design, it is only possible to enable snapping in the Objects and People and Animals Categories. In Place Mode, the Auto Snap panel is always visible. And in Select Mode, it only becomes visible when an Object is selected.

Chairs and posters are placed using auto snap
This tool makes it easy to place objects against imported geometry so it doesn’t clip through. For example when placing a bench or a painting against a wall of an Imported Model. When this option is enabled, it will snap and auto-conform the object to the surface that is under the mouse cursor. At this moment it only works for models from the Objects Category.
6.3.2: Auto Snap - Objects Category
Models from the Objects Category will snap and align to the surfaces of Imported Models. Some object types like chairs will by default stay on the ground and align the vertical surfaces.
Objects like canvasses, posters, pictures, and paintings will snap and align to vertical surfaces. But can, of course, be moved vertically and horizontally as you need to.

Seated characters are placed using auto snap
6.3.3: Auto Snap - People and Animals Category
Seated characters from the Library will snap and align to chairs, making it super easy for you to place these (smart) Objects.
F key to force orientation is no longer available In preference use the new Snap Tool.
The heading of the selected objects will match the orientation of the surface below the mouse cursor.

6.4: Sliders
Most Sliders now use this new interaction approach. Sliders in Effects have yet to be converted.

- A single left mouse button click on a Slider, will go to the value type-in.
- Click and hold the left mouse button, which will let you drag the Slider. The Slider will jump to the position on the location where the mouse cursor was
See also Section 2. Settings and Sliders:
- Knowledge Base: Is there a list of all the keyboard shortcuts in Lumion 2023?
7. New Effects
7.1: Ray Tracing Effect (see 3)
7.2:. Tonemapping (an important grading tool) > now part of Color Correction Effect

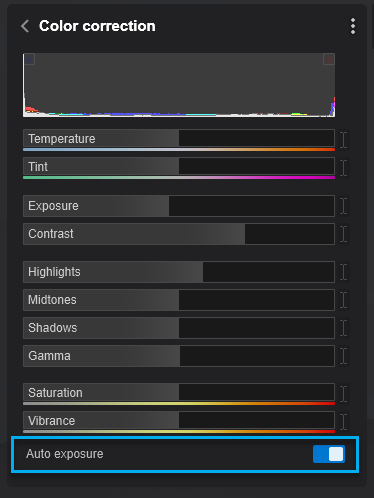
At the top of the Effect is now a working Histogram, showing the color distribution for the RGB channels. In the right upper corner of the histogram is a checkbox. When enabled it will show the areas that are below or above the limit and are clamped. Blue for blacks and red for whites.
The other change is that Exposure is now set in this Effect instead of its own Exposure effect.

Example of a preview where the limits are shown
Auto Exposure has been much improved. Still in some situations you might not want any Auto Exposure at all. So in the Color Correction Effect we added the option to disable it.
See also:
- Knowledge Base: How to use the Color Correction Effect?
7.3:. Improvements and changes to other Effects:
7.3.1: Styrofoam Effect
The Styrofoam Effect is replaced with a new improved version. Making use of the new Subsurface Scattering.

Three examples of renders with the new Styrofoam effect. (Not raytraced)
These Effects also got an update:
- Bloom
- Depth of Field
- Lens Flare
8. Rendering Aspect Ratios:
In Lumion 2023 multiple aspect ratios have been added.
Now it is possible to render in landscape, portrait, and the most used aspect ratios in the industry and social media platforms. It is available both in Photo Mode and Movie Mode located on the camera toolbar.

Custom aspect ratios are now also working in Movie Mode. Each Clip can have its own aspect ratio. When rendering a single clip it will always apply the selected aspect ratio for that Clip. But when you render an Entire Movie, it will use the aspect ratio from the first Clip for the Entire Movie.
The following aspect ratios are available:
16:9, 9:16, 1:1, 3:2, 2:3, 5:4, 4:5, 1.91:1, and 1:1.91
The render resolution option is still limited to the 4 or 5 render presets we always had. In Photo Mode, it is Email, Desktop, Print, and Poster resolution. And in Movie Mode, it is Small, HD, Full HD, Quad HD, and Ultra HD (4k). Where the longest side of the image or Clip is set to:
See article:
- Knowledge Base: What Aspect Ratios and Resolutions are available in Lumion 2023?

In Photo Mode, you can set the aspect ratio for each individual Photo on the camera toolbar which is also used for setting the Focal Length. The set aspect ratio is applied for rendering a single Photo and when rendering Photo Sets.
In Movie Mode, you set the aspect ratio in record mode for each Clip. Again it is located as an option in the camera toolbar just like in Photo Mode. When rendering an Entire Movie, the Movie will be rendered using the aspect ratio from the first Clip on the Movie strip.
When rendering individual Clips, the Clip will be rendered at the aspect ratio it was set to.
9. Movie mode: New Camera Paths:
9.1: Camera Preset paths and Import a Path
In Lumion 2023 we want it to be easier to make specific camera animations and give you more options on how to create them. In Lumion 2023 there are now two different ways to make a perfect orbit camera which wasn’t possible with the normal record mode. You can use one of the Camera Preset Paths or the user can use an Imported Camera Path created in other software.
9.2: Camera Preset Paths

This version provides for:
- Orbit Camera (Simple and Advanced)
- Dolly Shot
- Pan or Tilt
- Follow Object
Camera Presets can be edited by using the interface, or by editing the Camera Gizmo in the Editor Preview.
9.2.1: Orbit Path
This allows for creating a perfect orbit camera. Just set the camera target, the radius of the sphere, the camera height, and the start/end point for the camera on the sphere
9.2.2: Follow Object:
This preset will let the camera follow an object. Select the object it needs to follow and set the camera's position. Choose the orientation, or let the camera automatically look at the object.
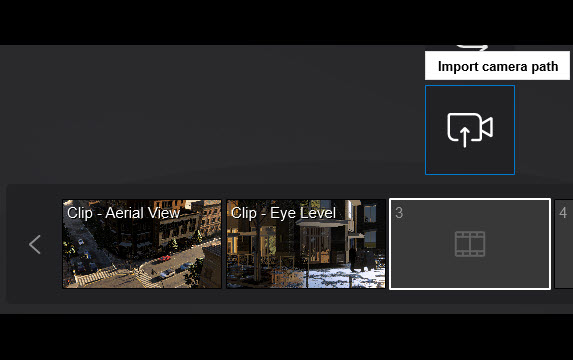
9.3: Imported Camera Path:

Another way to create a Clip is by importing camera animation from external tools. This is for the more advanced users that are able to create (complex) camera animation in other programs, like 3ds Max, Blender, etc. It gives them more control over the actual camera animation.
The way it currently works: more details here soon.
In the preview, it will show the Camera Path, the Camera Gizmo, and Orientation. Again there is the option to switch to the camera on the path to preview it. Click apply to finalize the path.
9.4: Enhanced Camera control
Enhanced Camera in Photo Mode and in the Clip Editor:
- Greater control over the cameras with Heading and Pitch sliders included. Lumion 2023. [Usability, ease of use]


See also: 8. Rendering Aspect Ratios
10. Editor performance improvement with an increase in quality for Build Mode display:
In Lumion 2023 this now gives a much cleaner and sharper image at lower resolutions compared to Lumion 12.

12.5 versus Lumion 2023 50% editor resolution versus 33% editor resolution close-up
This was further improved in a later development update.
11. Updating Lumion:

In prior versions Lumion required that there was a full application and content file download and install. Except for some specific hotfixes which involved small patches and a somewhat cumbersome process for distributing the update.
With the new Updater, we can now provide patches and version updates as small, quick downloads and installs.
This should make it much easier for you to keep Lumion up to date.
See article:
- Knowledge Base: How does the Updater for Lumion work?
12. Other Transitions from prior versions to Lumion 2023:
Things to watch out for - changes that may affect an existing Project from Lumion 12 or earlier versions, if you chose to use Lumion 2023 to render a Project.
NOTE - VERY IMPORTANT: Due to the significant engine and settings changes, older version Project files might look different when loaded in Lumion 2023. This is covered in the article below:
- Knowledge Base: Transitions: Why does my Project look different in Lumion 2023 compared to previous versions?
If you are having trouble getting your old files to look the same as before, we recommend that you start your Effects from scratch or complete any current Projects in the respective version and only use Lumion 2023 for new Projects.
12.1: Poster resolutions for rendering using Ray tracing Effect
Poster resolutions are currently disabled for the Ray Tracing pipeline. This will be fixed in an upcoming release. See the article below for workarounds:
- Knowledge Base: How do you render a higher resolution Raytraced Image?
12.2: Changes needed to a Project to bring it forward for Lumion 2023:
See this important article series covering all you need to know:
- Knowledge Base: Transitions: How to Set up Lumion 2023 for Good renders
12.3: Loading and Saving scenes
Loading Project:
Old scenes should convert and load without any issues. If you do encounter any issues then please let us know.
Saving Project:
Now uses a new file extension LSF, with no version reference in the extension.
We are aware that there is an old (video) format that used to also uses the LSF as a file extension but it has not been in use for many years.
13. Other:
13.1: Content Added in Lumion 2023
See Release Notes:
- Knowledge Base: Lumion 2023.0: Release Notes


13.2: Lumion Library content (Models and Materials) - Content is Pre-Converted to new formats
Lumion Library Models and Lumion Materials have been pre-converted in their files. Video memory usage is higher compared to Lumion 12 because the converted models and Materials now have more Texture Maps (Roughness, Reflectiveness, Metalness, Emissiveness, and Opacity). This also affects the installation size on the disk.
When loading old LS Project files, Materials applied will be converted on the fly and stored into the library folder. You will need to resave the project as a .LSF to avoid this conversion again.
If you have old imported objects in the Documents\Lumion\library folder because you transferred as a file copy from an earlier version \Library folder, then during the start Lumion 2023 will convert all the old files. Depending on the Library content it can take a while before the conversion is finished. It is possible to skip the conversion at any time, by pressing [Esc]. The next time when Lumion is started it will continue with the remaining items in the Library. In case there's a problem converting the library, please temporarily rename the Documents/Lumion folder so that Lumion 2023 can start.