
One-click 3d looking Rooms with Parallax Interiors
Use Lumion’s Library Interiors or import your own.

Parallax Interiors creates the illusion of a 3D room as viewed by the camera, without the need to model full interior spaces. They are especially useful for exterior views of apartments, offices, hotels, retail spaces, and other buildings where the camera looks through windows.
They are also resource-efficient, helping to speed up Scene building while reducing the need for additional interior geometry.
Menu:
See Release Notes, section 1.7: Custom Parallax Interiors:
- Knowledge Base: Lumion 2026.1: Release Notes
1. Lumion 2026.1: What's New?
Lumion 2026.1 builds on the Parallax Interiors Library first introduced in Lumion 2024, adding 10 new built-in Parallax Interiors to the Lumion Library. The workflow has also been expanded with support for compatible custom .EXR parallax maps, Room Width control, and the option to save custom Parallax Interior presets for later use.

1.1 Importing Custom Parallax Interiors
It's now easier to use custom Parallax Interior resources in your Projects.
Instead of using the previous workaround workflow, you can now assign compatible custom Day and Night .EXR maps directly into the parallax settings of a placed Parallax Interior. This means you can use your favourite .EXR maps from third-party vendors, or custom Parallax maps you have created yourself.
Once imported, you can adjust your settings and save your custom parallax back to the custom folder inside your Library for reuse in future Projects.
Some third-party .EXR Parallax Maps may not import or display correctly in Lumion, depending on how the file was created. If a custom map does not load or does not appear as expected, try testing another compatible .EXR map from the same source, or contact the map provider.
1.1.1 About custom Parallax maps
Custom Parallax Interiors use compatible EXR maps to create the illusion of room depth from a flat surface.
A parallax map may look unusual when viewed as an image file, as it contains the visual information needed to create the interior depth effect. The maps are arranged as a 3x3 layout, where different areas represent the ceiling, walls, floor, back wall, and additional alpha information used by the parallax effect.

The layout sections are as follows:
- 1, 3, 7, and 9 are the corner areas of the map. These areas will contain alpha information, props, furniture, or other foreground details used by the parallax effect, rather than representing the main room surfaces.
- 2 is the ceiling surface.
- 4 is the left wall.
- 5 is the back wall.
- 6 is the right wall.
- 8 is the floor.
This map view helps explain how a custom Parallax source file is structured, but it is not something you need to edit in Lumion. The main workflow is to load the compatible Day Map or Night Map, then adjust the Parallax Interior in the Scene.
1.1.2 Insert your custom maps
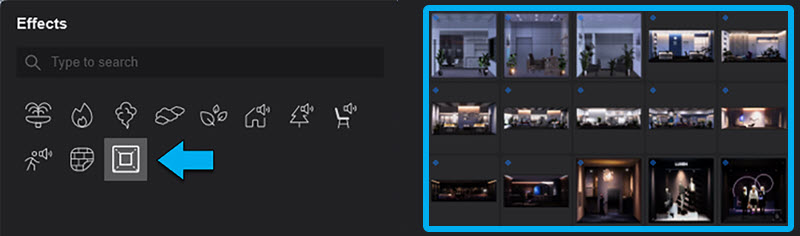
To add your own maps, first place a Parallax Interior in the Scene via Build Mode > Effects > Parallax Interiors. You can use the dedicated Custom parallax placeholder object or customize one of the existing Library Parallax Interiors.
Under Show more, use the Day map and Night map slots to load your compatible EXR files.

After selecting a compatible EXR file, Lumion shows a preview of the selected Day or Night map next to the settings panel. The map preview helps confirm that the correct file has been loaded before checking the final result on the Parallax Interior in the Scene.
Day Map:
|
|
Night Map:
![]() |
![]() |
(Maps courtesy of wParallax)
1.1.2 Save your custom parallax to the Library
After you have assigned at least one custom Day or Night EXR map, the Custom Presets save option becomes available in the Parallax Interior settings.
Click the Save to custom presets button next to the preview image to open the Save parallax window.

In the Save parallax window, enter a name for the custom parallax and confirm the save.

1.1.4 Reuse your saved parallax from the Library
Once saved, the Custom Folder appears in the Parallax Interiors Library. Your saved parallax can then be selected and reused like the built-in Library options.

Each placed Custom parallax placeholder is treated as a unique item, so different placeholders in the same Scene can use different custom maps and settings.

Tip: To quickly access commonly used Library content, click the Star icon on an item thumbnail to add it to the Favorites tab.
1.2 New Library Parallaxes
This update includes 10 new built-in Parallax Interiors, giving you more ready-to-use options.

Lumion 2026.1 also includes a dedicated Custom parallax placeholder object. This provides a clear starting point for loading your own compatible Day and Night .EXR maps.

Note: Custom maps are not limited to the placeholder object. Existing Parallax Interior Library objects can also be customized and saved as presets.
1.3 Room Width Control
The Room Width slider now lets you stretch or compress the room horizontally, giving more control over how the interior fits behind the window. This can be useful when the room looks too narrow or too wide for the window opening.

When using custom Day or Night EXR maps, the starting width depends on the imported parallax resource, so it may not match the default sizes used by the built-in Library options.
For example, if the Parallax Interior Object is not wide enough for the window opening, adjusting only the Room Height may not give the right fit, especially where there is not enough space to either hide overflow or cover gaps.

With a small adjustment to Room Width, the parallax can then be stretched horizontally to fit the window more easily. This makes it much simpler to adapt both custom and existing Parallax Interiors to different window sizes.
Important: Where possible, use Room Height and Room Width to adjust the size of the parallax room instead of changing the Object Scale. The Object Scale setting will resize the placed Parallax Interior in the Scene, but the Room Height and Room Width values will not update to reflect that scale change. Keeping Object Scale at 1.0 ensures these values continue to represent the actual parallax room size.
Additional Tips:
-
Parallax (mapping - interiors) here refers to something quite different from the parallax displacement system (about generating real-time displacement of the mesh of a model)
-
Depending on where you place the Parallax Object and your camera view, you may need to rotate it so it faces the camera first.
-
Ensure the Parallax surface is close to any window frames to avoid extra shadows on the surface that would otherwise not be expected.
2. How to use Lumion Parallax Interiors
- Video Tutorial: Lumion 2024: Parallax interiors
2.1 Easy Quick Steps
2.1.1. Open the Effects category:
In Build Mode, open the Effects category filter to access the available effect-based objects.

2.1.2 Open the Parallax Interiors Library:
Select the Parallax Interiors Library to view the available interior options.

2.1.3. Place the Parallax Interior:
Choose a suitable Parallax Interior and place it behind or near the window opening in your Project.

2.1.4. Rotate the Parallax Interior if needed:
Use the #R# hotkey while placing the object, or rotate it afterward, so the parallax faces the correct direction for the camera view.
2.1.5. Adjust the light and room settings:
Use Toggle light to switch between the Day and Night look when available. Then adjust Brightness, Room Height, and Room Width where supported, to better fit the parallax to your Scene.

2.1.6. That's all there is to it.
Final render of offices with many rooms populated:

Lumion 2024 introduced Parallax Interiors, a new Content Library Subcategory that let you quickly populate interiors visually when you do not need to enter the room's 3D space.
The Lumion Library included 25 Parallax Interiors, available in day and night variants, and options for offices, residential spaces, and retail areas.
Custom Parallax Interior imports were not supported in Lumion 2024 to Lumion 2026.0.2. To import compatible custom .EXR Parallax maps directly in Lumion; please upgrade to Lumion 2026.1.
See Release Notes, section 1.5: Parallax interiors
- Knowledge Base: Lumion 2024.0: Release Notes
Versions prior to Lumion 2024 do not include the built-in Parallax Interiors Library.
However, it was still possible to use external parallax image resources by preparing the source files and applying them to custom room or box geometry. This requires additional steps to set up the files and geometry correctly.
The examples below are provided for users working with older Lumion versions or external parallax resources such as wParallax, ShaderBox, Parallax OSL, or Roombox.
4.1: Using external Parallax resources
4.1.1 wParallax
See forum discussions on wParallax
-
Lumion Community: Lightmap material vs. emissivity
-
Lumion Community: wParallax
-
External Link: wParallax:
Convert the .EXR to .PNG.
4.1.2: ShaderBox:
This has been tested and can work - it's the image resources as cube-mapped (with optional 2 in-between planes), single texture.
- External Link (working as at 11/2024): Video showing use with SketchUp to Lumion
4.1.3: Parallax OSL shader system:
-
External Link - Parallax OSL
"For Blender GPU or Lumion, we use the cut-out boxes for Parallax. We convert the .EXR to .PNG and it works fine."
4.1.4: Roombox:
Free SketchUp resource for use with Roombox:
- External Link: Lindale.io/roombox
SketchUp plugin uses a room definition editor, and access ShaderBox, wParallax or Evermotion etc Cubemap resources for the images used to map the room.
Lumion Community:
- Lumion Community: Questions regarding new Parallax feature
- Lumion Community: Parallax cube
- Lumion Community: Behind the facade (apartments with Roombox 3D roomshaders). (* see section Roombox:)
- Lumion Community: Search results for query: wparallax
See Also:
- Tips and Guides: How to use parallax interiors [Mar 17, 2024]
- Video Tutorial: Lumion 2024 just got released! Top Features You Should Try! by Nuno Silva