
Menu:
|
2. Summary/Short Answer:- Increase the Light Radius. 3. Here is how to achieve softer or harder (more defined edges) shadows. 4. Changing the Size of the Light Source. 5. For Direct Light (Sun):- Change the Sun Disk Size. 6. For Indirect ambient Sky lighting. 6.1: Use softer, overcast or cloudy setups when needed. 6.2: Boost Sky Brightness for more diffuse lighting. 6.3:. Adjust Sun and Sky Settings. |
7. For Artificial (Indirect) Lights. 7.1: Omni Lights & Spotlights. 7.2: For Artificial (Indirect) Lights: Area Lights: [Rasterization] 7.3: For Artificial (Indirect) Lights: Emissive Materials. |
1. Background:
You might want softer shadows in your Scene renders to help in setting the mood and style of the visualization.
Lumion provides out -of -the -box settings that give you accurate shadows based on time of day for the Sun and diffused shadows for the cloudiness of the sky. As chosen by you via the Real Skies Effect and/or Sun Effect/Sky and Clouds Effect.
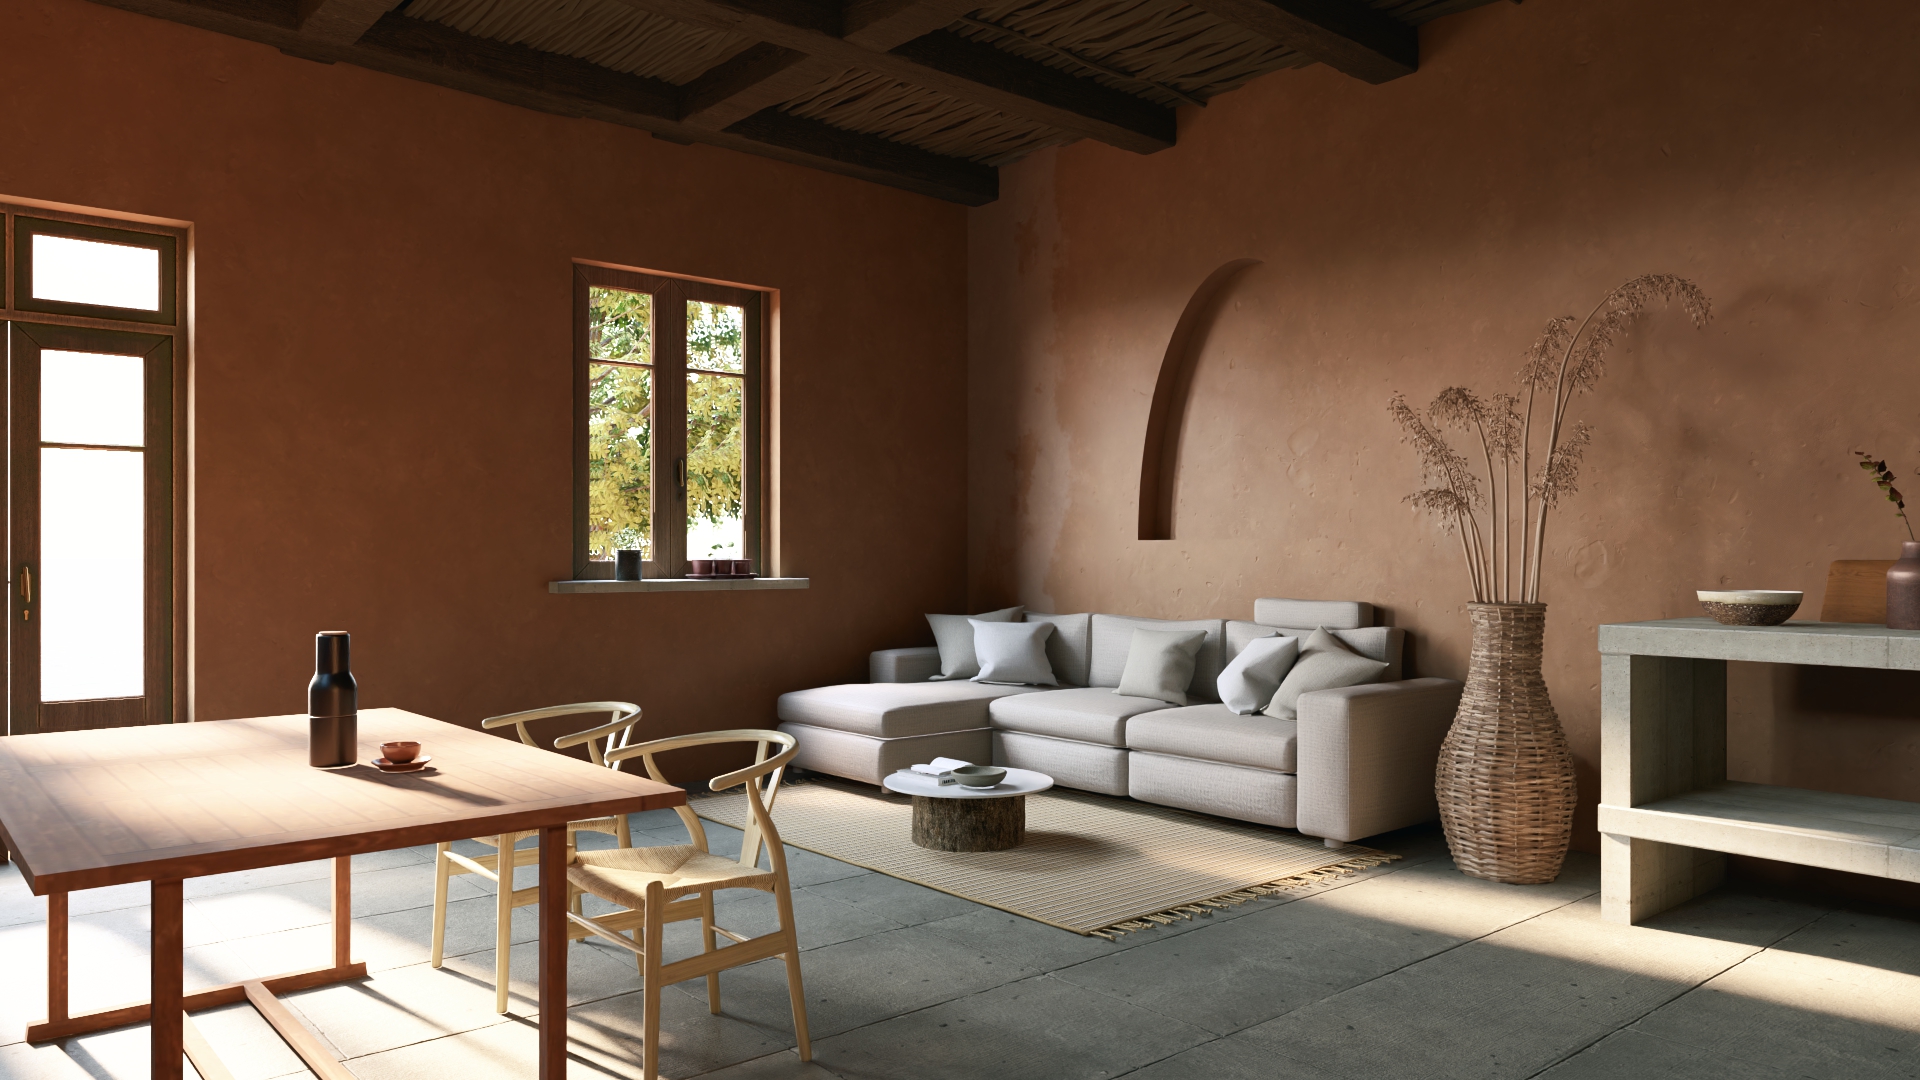
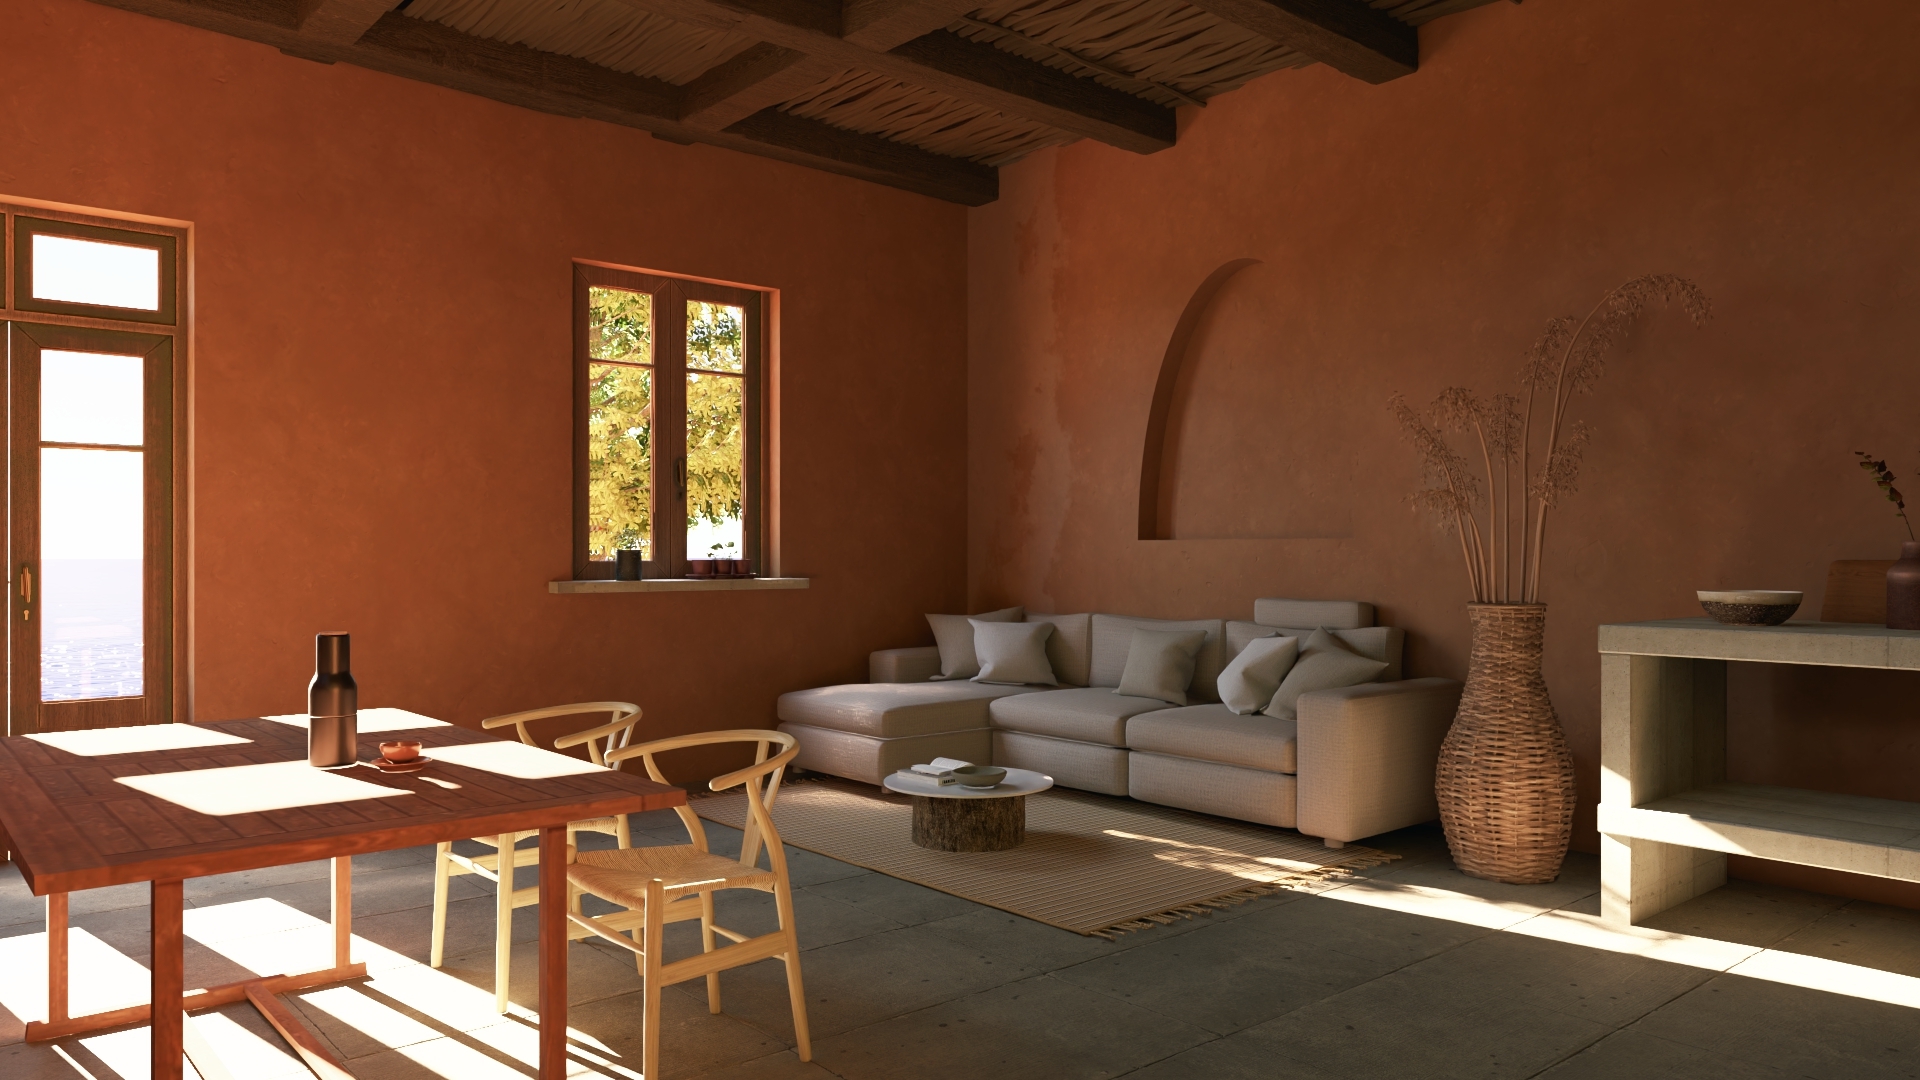
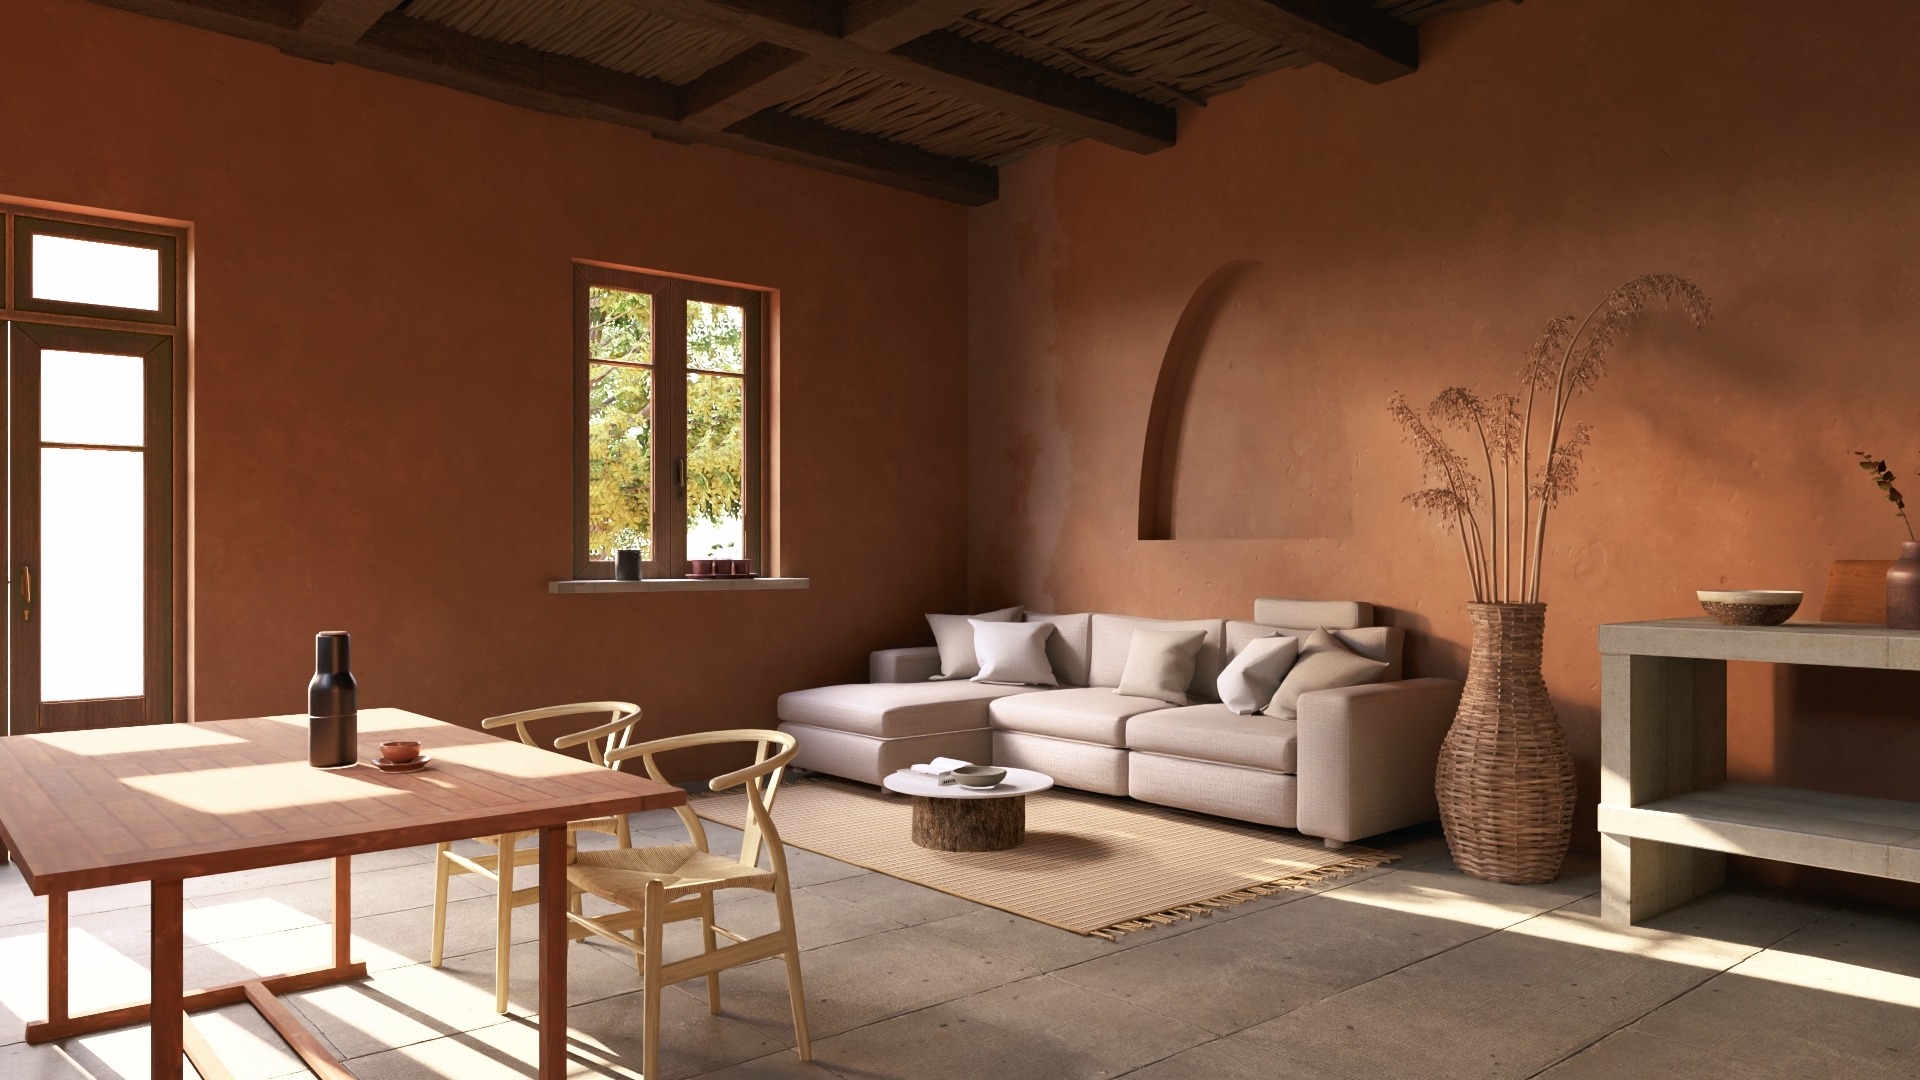
But sometimes you might want to achieve a softer shadow result. For example, here's a range of three levels of softness.
(click image for Desktop 1920x1080 render in New tab)
1.1: Default type Regular Shadows (Ray Traced)
1.2: Softer Shadows (Ray Traced)

1.3: Very soft Shadows

The main focus here is on how you get softer Ray Traced shadows. We'll also cover briefly using the Rasterization pipeline, as you might want to use that as an alternative when rendering a video animation.
Getting softer, more realistic Ray Traced shadows in Lumion Pro involves adjusting light source sizes, utilizing appropriate sky/sun settings, and optimizing Ray Tracing Effect parameters. Ray Tracing inherently handles shadows, so the traditional Shadow Effect settings for Rasterization is automatically disabled (when using the Ray Tracing Effect)
2. Summary/Short Answer:- Increase the Light Radius:
The size - the Lights Radius of the light source, will let you control the amount of softness.
This applies to Omni Lights, Spotlights, Area Lights, and importantly, the Sun (via the Sun Disk Size slider value - Sun Effect).
-
A larger radius results in a softer penumbra.
-
A smaller radius - less soft or sharper shadows.
3. Here is how to achieve softer or harder (more defined edges) shadows: [for Ray Tracing]
In Ray Tracing, the physical size of the light source determines the softness of its shadows.
You will need to consider is the need for software shadows to apply across the Scene such as an interior space, where the direct sunlight has largest impact. Or be more for a focused shot such as some furniture under artificial lighting. along with day or night and what time of day shot you want to render for.
The following covers the options in settings to hopefully get you by for all types of Scenes.
4. Changing the Size of the Light Source:
The most direct and impactful method.
5. For Direct Light (Sun):- Change the Sun Disk Size:
Implemented in Lumion 2024.2.0.
Increase the Sun Disk Size (for sunlight shadows)

This setting will directly control how sharp or soft the sun shadows are.
- Small Sun Disk Size → hard, sharp shadows
- Large Sun Disk Size → softer, more diffused shadows
You can apply the setting as follows:
Only available via the Sun Effect in Photo/Movie Mode.
Note: the Weather tab (Build Mode) Sun settings only include Height, Direction and Brightness (Intensity)
Change the Sun Disk Size, 1x to 10x, until the shadow edges look as soft as you want.

See also:
- Knowledge Base: Lumion 2024: Update to 24.2.0 - Release Notes
6. For Indirect ambient Sky lighting:
6.1: Use softer, overcast or cloudy setups when needed
-
Real Sky: Choosing a more cloudy or overcast sky or increasing overall cloudiness (Sky and Clouds Effect) reduces direct hard sun and gives more diffused, softer shadows.
Tip: try using a Real Sky - Real Skies effect:
from the Lumion Library: Cloudy or Overcast

or one you have via Custom Skies

as these provide enhanced lighting data compared to using the Sky and Clouds Effect
6.2: Boost Sky Brightness for more diffuse lighting
Sky light is non‑directional and naturally softens contrast: So in Lumion Pro in the Real Skies Effect or possibly the Sky and Clouds Effect use these to guide your decisions when wanting to make the shadows softer or harder:
-
Higher Sky Brightness = smoother shading and softer‐feeling shadows (more like a cloudy day).
-
Lower Sky Brightness = stronger, crisper sun shadows.

The slider is percentage based, with the Default at 100%. So that makes it easy to change the lighting to more or less.
5.3:. Adjust Sun and Sky Settings
- Lower Sun Brightness: Reducing the Sun Brightness slider (within the Sun Effect) can produce softer, cooler, and more diffused lighting, similar to a cloudy day.

- Increase Sky Brightness: Raising the Sky Brightness (in Real Skies) increases ambient lighting, which fills in harsh shadows and makes them appear softer.

- Overcast Sky: Use an overcast sky setting in the Real Skies effect to eliminate sharp, direct sun shadows entirely.

7. For Artificial (Indirect) Lights:
You can soften shadows from Spotlights and OmniLights by changing the Light Source Radius value:
7.1: Omni Lights & Spotlights
Select the light, then increase its Size slider. A larger light source produces softer, more diffuse shadow edges.


This works independently of the IES Profile. This also works if the Light Source is disabled.
7.1.1: As another example
Ray Tracing handles shadows sharpness a bit differently. The larger the object that emits light, the softer the shadows.
Omnilight at 0.01 radius:
Omnilight at 0.2 radius:
Although the intensity of the Light is the same (800 ish Lumens here), the shadows are different.
The shadow softness will depend on 2 things:
1. distance from the object that casts the shadow (the further from the object, the softer the shadow)
2. light source size as explained above (also applies to the Sun with the Sun Disk Size slider)
Suggestion: place an OmniLight in the center of the Object and see if you have the same behaviour or increase the Intensity.
- Lumion Community: Lighting: Issue with raytraced lighting
7.2: For Artificial (Indirect) Lights: Area Lights: [Rasterization]
Use Area Lights for large, soft lighting, which creates softer shadows than Point (Omni) or Spot Lights.
Suitable for use when using the Rasterization rendering pipeline (No Ray Tracing Effect). In Ray tracing for the photo-realistic look you would only want to add Area Lights (or any others) that reflect the lighting design of the project.
Sometimes though used for further softening, however, the lighting conditions and results may no longer be accurate to the intended design.
7.3: For Artificial (Indirect) Lights: Emissive Materials
Using large surfaces with Emissive materials will also produce soft, ambient-style shadows.
8. Some Other Practical Things to Consider:
8.1: Use Ray Tracing Bounces & Samples smartly
In the Ray Tracing effect:
- Bounces: Higher values give better global illumination (more light bouncing), which “fills in” dark areas and makes shadows look less harsh overall, especially indoors.
- Samples: More samples reduce noise and make penumbrae (the soft falloff of shadows) cleaner, but increase render time.
Typical starting points: - Interiors: Quality preset Balanced or High, then increase Bounces if corners still feel too harsh.
- Exteriors: Often Balanced is enough; focus more on Sun Disk Size and Sky Brightness.
8.2: Optimize Ray Tracing Effect Settings
- Samples: For final renders, use between 256 and 512 samples to ensure smooth, non-blotchy light-shadow gradients.
- Bounces: Interiors. Set to a moderate number (e.g., 5-8) to allow light to fill in dark areas naturally. See also Section Light Bounce (Global Illumination).
8.3: Avoid overly small, intense light sources
For artificial lights (spot/omni/area): Where possible.
8.5: Light Bounce (Global Illumination)
The number of Bounces simulates the interaction of light with non-reflective objects. When a light ray hits an object, it is randomly deflected in a certain direction and the result is a converged image with smooth 'blending' between different surfaces in the rendering whose colors affect each other.
The higher the value, the better the global Illumination.
That said, this actually adds or changes pixels for further lighting over all of the area, depending on what light source is creating the extra lighting/global illumination.
This should generally be done in for its own consideration of how light bounce will affect the image given the nature of the Scene, such as material reflectivity and roughness, interior, sources of light creating extra bounce.
Settings:
-
Bounce in Ray Tracing Effect:
-
This is the number of times a ray of light cast, will bounce off/be reflected when it hits a reflective surface. Lumion limits this to a maximum of 8 Bounces to ensure suitable performance given light bounce adds a lot to computational times and thus, performance.
-
-
Rasterization:
-
Global Illumination Effect - deprecated as of version 2023. In preference for the:HyperLight Effect.
-
HyperLight Effect.
-
9. Need some Help?
Still need some Help to get to the Shadows soft? Or advice on whether there is anything else you can do as it seems all the settings have been applied, you aren't even using software shadows?
- Knowledge Base: Contact Lumion Technical Support
See Also:
-
Knowledge Base: How do you use the Ray Tracing Effect?
-
Knowledge Base (Learning Pathways): Lighting
-
Lumion website (Tips and Guides): 7 ways to light interiors - Lumion 3D Rendering Software for Architects