
Menu:
1. Scenarios and your questions regarding visible Light Sources in reflections.
2.1: Example: Area Light and Show Source is On.
2.2: Rendering of Light Sources.
3. How to work with Light Sources.
3.1: Using a Light Source.
3.2: Light Source Options.
4.1: Overall.
4.2. Control the reflective surface instead of the light:- Reduce Reflectivity or Increase Roughness on the Reflective Material.
4.3: Reposition or angle the light so it’s not visible to reflective surfaces.
4.4: Replace visible strips with emissive geometry + hidden lights.
4.5: Swap one long light for several smaller spots or Omnis.
4.6: Two‑pass render and post‑production.
5. See Also - Forum Discussions.
1. Scenarios and your questions regarding visible Light Sources in reflections:
-
With the new Lumion Pro 2024, you have noticed that light sources show in reflections even if the "Show source" toggle is off. This happens for Linear Lights and OmniLights.
-
You wonder if there is a way to stop Area Lights from showing up in ray traced reflections. You often have to change the lights or take them out completely so that they don't show up in the final renders in reflective materials, mainly windows.
- Is there is a way to stop area or line lights from showing up in ray traced reflections?
2. Here's why:
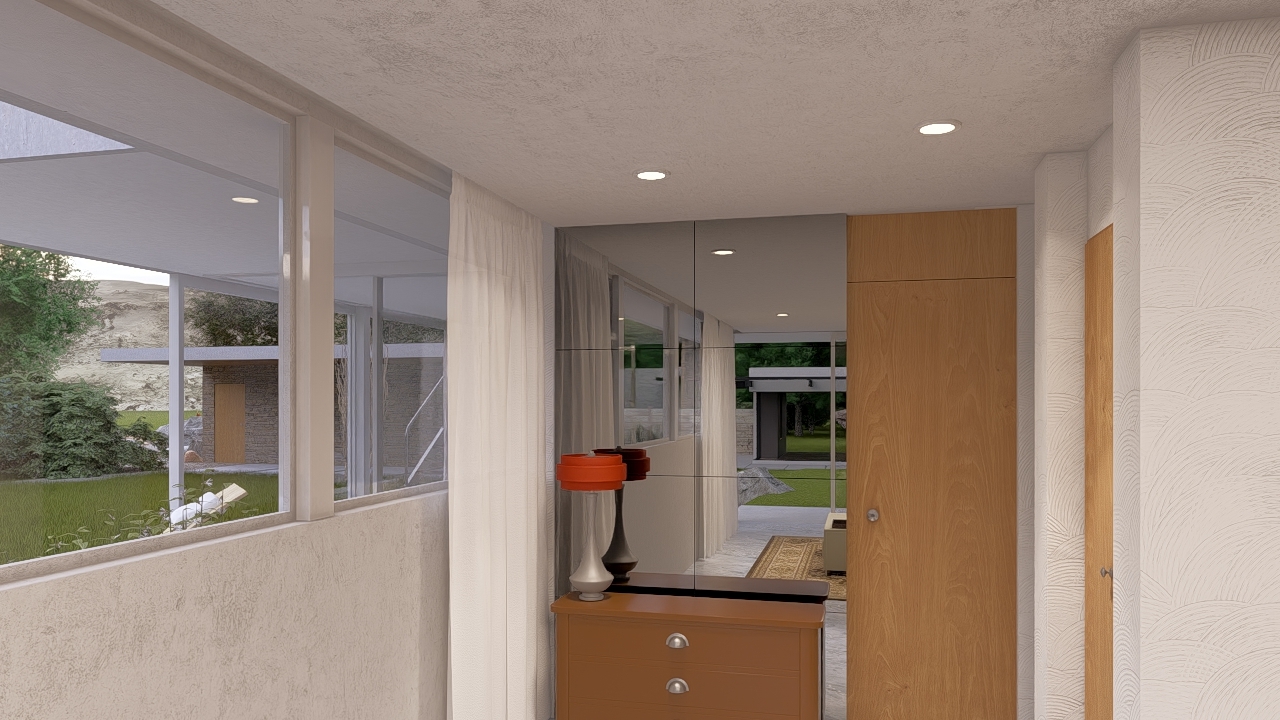
2.1: Example: Area Light and Show Source is On
![]()

When rendered the mirror reflections show the Light Source = Lamp:

with the Light Source turned Off there is still an Area Light there:

2.2: Rendering of Light Sources
The light trickeries that could be done in rasterization don't scale well with Ray Tracing. From a user perspective for certain cases, it would make most sense for light to be visible but for the light source not to.
However, this is an unfortunate consequence of Ray Tracing: the Reflections (which are calculated on any object whose Roughness value is larger than 0) know that an object is emitting light, and, in order for them to be Ray Trace accurate, they will display the Light Source. The situation is a bit like this:
- Reflections must either reflect all light (including light sources) or no light/light sources at all.
If the Light Source is hidden by a Layer or facing away from the Reflection it will always be invisible. However, if the Light and its Light Source is hidden by a Layer, then the light itself is off and that means the light and shadow cast by the light object.
If the Light Source itself is visible on diffuse surfaces then it will always be visible in reflections as well. Hiding in Build Mode itself will not hide it in the Reflections (here meaning the toggle to enable/disable the geometry of the light source).
3. How to work with Light Sources:
3.1: Using a Light Source
The purpose of the Show Source property for an artificial light is to allow you to provide quick and easy lamp placement without the need to specifically have a modeled lamp in the Scene.
In general, you would always want your lighting to coincide with physical lamps - artificial light sources.
In practice though, sometimes those models are not yet provided or will not be available for you in the Scene. And for pragmatics you want to set up some lighting for expediency.
If you had a model of a lamp, then that is the lights Source. and would be, as expected, seen in reflective surfaces, such as a mirror. The same then applies for rendering using Ray Tracing.
For Ray Tracing this is the underlying decision about whether to have Light Sources seen in reflections.
Artificial Light Sources (when Off) are still seen in reflective surfaces as follows:
-
SpotLights: No.
-
OmniLights: Yes.
-
> minimize the Light Radius - there is still a minimum size of 0.01mm, but it helps to reduce the noticeable size in the reflection.
-
-
Area Lights: Yes.
-
No light radius to control. need width and length for fill area
-
-
Line Lights: Yes.
-
No light radius to control, as you need width and length for fill area
-
Fill Lights (not applicable - not a light source for Ray Tracing and is not capable of casting shadows).
Note: this capability is under review by the developers.
If you have a physical light/lamp in the Scene and it is visible at time of render then it is something that should be rendered for the reflections. You would usually also add some Emissive to show a brighter surface.
In earlier versions Area Lights used to be included as a way to make the light more diffuse and softer. If you are using the Ray Trace Effect for Ray Trace rendering, then Area Lights do not need to be used in the way they could be for versions prior to Lumion 2023 and the Rasterization pipeline. In other words you should not need them to be in the Scene for correct realistic lighting, unless there is an actual physical Area Light type of lamp casting that type of dispersed, diffuse light in that space.
3.2: Light Source Options
Physically modeled Lamp > is the light source > a light type added in Lumion does not need the Light Source to be On
No physically modeled lamp > the light cast is unnaturally being emitted from no source - no light > add in a source,
-
either a 3D model of a lamp.
-
turn On the property for a Light Type - the Light Source. Expect it then as would the 3d model, to show in reflections.
-
decide whether in fact this lighting is needed, as it is additional to the physical lighting design.
If it is required: see the suggestions below.
4. Suggestions:
Here you will find some suggestions derived (in part) from the forum discussions linked to later on.
There is no per‑light “visible in reflections” toggle, so you need a workaround. Here are options that tend to work well specifically for Ray Traced Photos renders.
4.1: Overall
If light is being emitted then it usually will have a Source: either
-
A modeled physical lamp, or
-
A light Source (property of the Light Object).
As earlier you should look to having a light that has a Light Source. Usually that is expected to be a physically modeled lamp. Where that is not possible then Lumion Pro provides for a quick and easy way to have a Light Source visible and as such is expected to be in any reflections. Where you are using lights to add other lighting not part of the true physical representation of where and what lamps are in a Scene, then some more generalist workarounds as follows may help you achieve the results you are after..
4.2. Control the reflective surface instead of the light:- Reduce Reflectivity or Increase Roughness on the Reflective Material
Sometimes the fastest fix is on the material side:
- Open the Material for your reflective surface (floor, glass, etc.).
Note: you might need to make separate surfaces/materials so you can more easily control just the surface where the reflections need adjustment. - Slightly raise roughness / reduce gloss:
- E.g. if Gloss is 0.9, drop to 0.7–0.8.
- Or if Roughness is low, nudge it up just a bit.
- If it’s glass:
- Reduce Reflectivity a notch.
- Slightly darken the glass color if it’s too mirror‑like.
This keeps a sense of reflection but breaks up the crisp line/area light shape so it’s not a hard stripe in the render.
Best for:
- Glass partitions.
- Windows.
- Interior glazing where perfect clarity isn’t required.
4.3: Reposition or angle the light so it’s not visible to reflective surfaces
For cases where you want to keep the actual area/line light:
- Identify the offending reflections
- Look at your main reflective surfaces (glass, polished floors, glossy furniture) in Photo mode preview.
- Move the area/line light:
- Slightly above/below the camera’s vertical band.
- Further back into the ceiling recess or hidden just out of sight behind a soffit.
- Rotate the light so it points more along the surface rather than straight at it.
Even a relatively small shift can move it out of the reflection path while preserving the lighting pattern.
You might also find it helps to adjust Shadow Exclusion Zone along with the above.
Best for:
- Cove lighting.
- Indirect lighting setups.
4.4: Replace visible strips with emissive geometry + hidden lights
Goal: Keep the lighting effect but remove the bright area/line shape from reflections.
The bright surface of an Emissive Material will be the light source. So you are still seeing an accurate representation of the lamp. This approach merely offers a way to avoid Light Sources confusing the Scene results.
Workflow:
- Model a strip/line object where the light should appear (if you don’t already have one).
- In Lumion’s Material editor:
- Set that object’s material to Emissive (Colorization or Emissive slider).
- Keep the emissive strength moderate so it doesn’t blow out in reflections.
- In Lights:
- Turn off / delete the original area or line light that’s causing the harsh reflection.
- Add one or more spotlights or omni lights near the strip, but:
- Place them slightly behind, above, or inside geometry so the bulb itself isn’t directly visible to reflective surfaces.
- Adjust cone/attenuation so they still light the scene.
This keeps your scene lit but removes the line/area light primitive that’s being “seen” by ray traced reflections.
4.5: Swap one long light for several smaller spots or Omnis
If the reflection is from a long continuous strip:
- Delete or disable the single long line/area light.
- Place a chain of small spotlights along the same path:
- Lower each one’s intensity and radius.
- Slightly offset them so individual point‑like reflections are either hidden behind frames/beams or visually less distracting.
- Alternatively, Use Omni Lights instead of Area/Line Lights:
- Omni lights do not appear as visible emitters in ray‑traced reflections.
- You can still attach IES profiles to Omni lights.
- Tune intensities so the overall brightness is similar to the old line light, but the reflections are less obvious or easier to crop/paint out.
Best for:
- Downlights.
- Decorative lighting.
- Any situation where the light source itself should not be visible.
4.6: Two‑pass render and post‑production (best control for stills but added time and level of expertise)
When you are doing Photo renders, this gives maximum control:
-
Photo 1 – with lights:
- All area/line lights enabled (your “beauty” render).
-
Photo 2 – without offending lights:
- Duplicate the Photo.
- Turn off specific area/line lights that cause bad reflections.
- Re‑render.
-
In Photoshop / similar:
- Use Photo 2 as the base.
- Overlay Photo 1 on top.
- Mask out all areas except the illuminated regions you want from Photo 1, avoiding the reflective surfaces.
- Or, more simply: use Photo 1 and clone/paint over just the bad reflections using Photo 2 as reference.
5. See Also - Forum Discussions:
- Lumion Community: L26 area light
- Lumion Community: Issue with raytraced lighting
- Lumion Community: Light source shows in reflections
- Lumion Community: Light sources off but visible in glass reflection
- Lumion Community: Lights at Max Lum not Visible in Build, Preview, or Render
- Lumion Community: Lights in reflection
- Lumion Community: Why do light sources show up in reflections while Ray Tracing is turned on?
- Lumion Community: Light plane in glass reflection