
(User interface may vary slightly for Mac edition of Lumion Live for SketchUp)
1. About Lumion View:
1.1: Lumion View Is
- Directly used from within your CAD software.
- Highly focused for fast internal or client facing renders.
- Release so far for SketchUp 2025.0 +. Revit 2022 +.
1.2: What Can Lumion View do
Help with the collaboration, sharing and refinement of the design process of your project.
- Knowledge Base: All About View: When should you use Lumion View?


1.3: Lumion View Boundaries - What it does do and some of the what it does not do:
- Knowledge Base: All About View: When should you use Lumion View?
2. Access to Lumion View:
3. Steps to get going:
1. Install from your Lumion Account, or
2. Install via the CAD plugin resource: SketchUp: Extension Warehouse, Revit: Autodesk Apps Store.
3. Start the Lumion View Editor.

- Knowledge Base: Lumion View for SketchUp (Win): Installation guide
- Knowledge Base: How do you get Access and Install Lumion View for SketchUp (Mac)?
- Knowledge Base: How do you get Access and Install Lumion View for Revit (Win)?
4. Overview:
There are two work areas:
- Lumion View Toolbar.
- Lumion View Editor window.
The Lumion View Toolbar (editing in SketchUp):

SketchUp (Win)

Revit (Win)

SketchUp (Mac)
- To Start and Stop the Lumion View Editor window.
- For setting Material properties or adding and editing Lights.
The Lumion View Editor Window:

- Set the look and feel of the Scene using features:
- Environment.
- Styles.
- Render.
- Manage the Editor and your access.
5. Run Lumion View - the Editor:

SketchUp (Win)

Revit (Win)

SketchUp (Mac)
The Editor window:

- Real time view of your CAD model with Ray Trace rendering (where available).
- You control the Environment and Conceptual Style.
- Render as a high quality Ray Traced image.
- Water materials are auto-converted to a Lumion Water, great for Ray Trace rendering.
- Glass materials are auto-converted to Lumion glass with transparency/opaqueness levels and real reflections of the environment.
Access tools from the window bar in the Editor window:

- Knowledge Base: Working in the Lumion View Editor
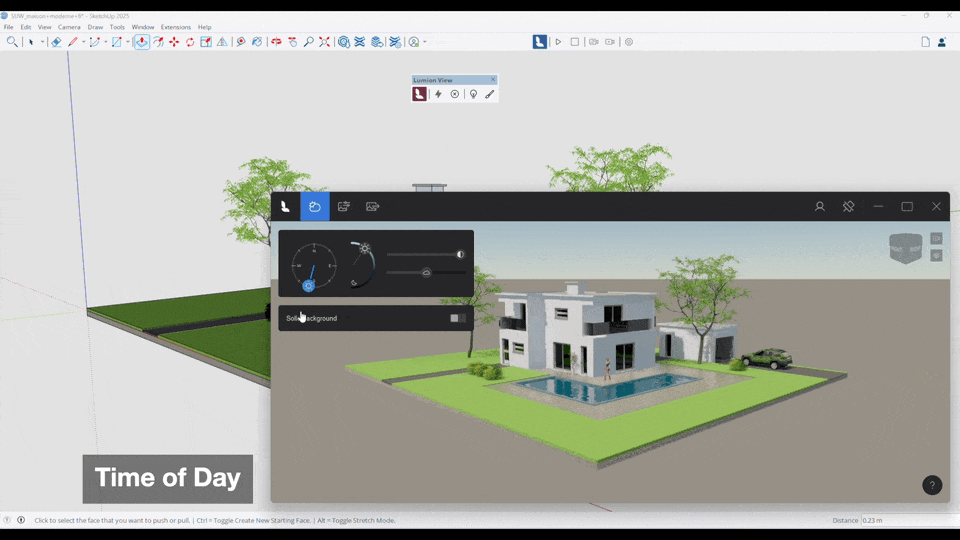
5.1: Edit the Environment settings: Sun, Sky and Background

- Set the Sun Height and Heading and Sun Brightness.
- Use a solid background for a difference in style than a sky.
For further:
- Knowledge Base: All About View: Working in the Lumion View Editor
- Knowledge Base: All About View: Working in the Lumion View Editor: Environment: Sun, Sky and Background
5.2: Set the Visual Style

How do you want to communicate the feeling for your design to the client? Set one of two overall Styles:
Realistic:

Conceptual:

Include Edges as part of your style choices:


For further:
- Knowledge Base: All About View: Working in the Lumion View Editor
- Knowledge Base: Working in the Lumion Live editor - Styles
5.3: Set your Output render options and Render

- Real-time view and update of your CAD model with Ray Trace rendering (Windows edition).
- Mac edition currently supports Rasterization for screen and final rendering.
- Options for Resolution, Aspect Ratio and Output for copying to Clipboard, opening saved file, upload to Lumion Cloud.
Make final output for your client as:
Realistic:

Conceptual:

Conceptual With Edges:

For further:
- Knowledge Base: All About View: Working in the Lumion View Editor
- Knowledge Base: All About Lumion View: Working in the Lumion View Editor: Output
6. Other Editor tools on the View window bar:
Account and Feedback:

Manage the Window:


- Minimize, maximize, close(Stops Lumion View)
For further:
- Knowledge Base: All About View: Working in the Lumion View Editor
7. Use the Lumion View Toolbar:
7.1: For SketchUp
(Win)
(Mac)
- Start and Stop the Lumion View window.
- Set Light Properties.
- Set Material Properties.
- Lights and Materials are in development for Lumion View for Revit (early release 25.4.x)
- Does support Revit Materials and Revit Lights, just not the full Editors for enhanced rendering and compliance with LiveSync for sync to Lumion Pro.
7.2: For Revit
Lumion View for Revit 25.4.2 and newer supports Revit Light Objects and Revit Materials directly.
There is no View Toolbar buttons and Editors for Lights and Materials.
7.3: Start/Display the Lumion View window with the model and Stop/Close the window

- Start/Stop the Lumion View window as you need.
- As a flexible window, size and position where you need, full screen size, including on a dual monitor.
7.4: Use the Lights Editor to add Light Sources for Day and Night ambience
(SketchUp editions)


- The four main types of artificial light are supported.
- Set the properties for a light type as you add them or later on change the properties.
- These are special Lumion View Objects/components added into the SketchUp model.
See further:
- Knowledge Base: All About View: Lumion View Toolbar: Using the Lights Editor
- Knowledge Base: Lumion View Toolbar for SketchUp (Win): Using the Lights Editor
- Knowledge Base: Lumion View Toolbar for SketchUp (Mac): Using the Lights Editor
7.5: Use the Materials Editor to affect the look of your model
(SketchUp editions)

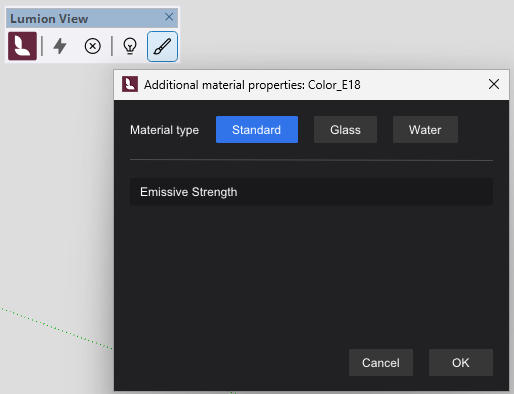
- Supports three core PBR (Physically Based Rendering) material Types.
- The interface provides for additional properties.
- Otherwise View uses the properties of a Material from SketchUp.
8. Getting Help and Support:
Share your best Practice and workflows:
We invite you to discuss your use of Lumion View for approaches to Best Practice for your design workflows:
- Lumion Community: Discuss all things Lumion with other users
(please make sure to include the Prefix for Lumion View)
To showcase your designs and Lumion View renders:
- Lumion Community: Showcase your Lumion renderings & movies
(please make sure to include the Prefix for Lumion View)
Technical Support for any issues and questions please use this channel:
- Knowledge Base: Contact Lumion Technical Support for Lumion View
