How do you use the Ray Tracing Effect in Lumion 2023?

Note: This article specifically discusses the Ray Tracing Effect in Lumion 2023. For information on this Effect in the latest version of Lumion, please refer to our updated article.
- Knowledge Base: How do you use the Ray Tracing Effect?
To use the Ray Tracing Effect : you first need to ensure you have a Ray Tracing capable graphics card. Please consult section 1.6 for compatibility:
- Knowledge Base: Which graphics card do you need for Lumion 2023?
Also, Windows must meet at least minimum requirements, preferably fully updated. See:
- Knowledge Base: What kind of computer does Lumion 2023 need?
and
- Knowledge Base: Why is the Raytracing Effect blocked on my PC?
2. The Effect sliders
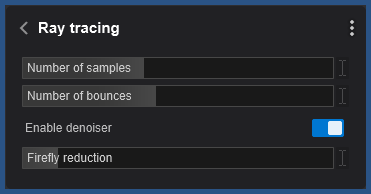
There are four adjustable options in the Ray Tracing Effect :

2.1: Number of samples:
This slider adjusts the number of rays shot per pixel per frame to control the accuracy of light: the bigger the value, the higher the number of rays shot and intersections calculated. When the slider is set to maximum, the light transport simulation is as accurate as it can get and the level of detail in the final rendering is higher.

2.2: Number of bounces:
The number of bounces simulates the interaction of light with non-reflective objects. When a light ray hits an object, it is randomly deflected in a certain direction and the result is a converged image with smooth 'blending' between different surfaces in the rendering whose colors affect each other.
The higher the value, the better the Global Illumination.

2.3: Enable Denoiser:
This toggle controls the rendering artifacts in the final image - when the toggle is active, the Denoiser will remove any noise from the image. An extremely high Number of samples may not require denoising if the lighting conditions are right.

2.4: Firefly Reduction:
Important: This value should only be modified in case shiny artifacts are noticed in the Preview - otherwise, it is highly recommended to always keep it at 0%.
When enabling the Denoiser ('Enable Denoiser' toggle), Lumion will display an option to blend the brightest pixels on the screen and decrease the amount of "Fireflies". In case the rendered output has bright spots, the Firefly Reduction slider will blend them into the image:

3. Other Effects:
Ray Tracing will take care of emulating, in a better and more accurate way, how light reflects and refracts.
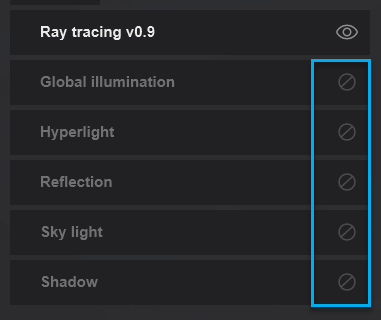
The following Effects will get disabled when the Ray Tracing Effect is applied to the Effect Stack:
- Global illumination Effect.
- Hyperlight Effect.
- Reflection Effect.
- Skylight Effect.
- Shadows Effect.

4. Benefits:
The Ray Tracing Effect will increase the accuracy of the light in your Project. You will see a significant quality boost without the application of multiple Effects to achieve it.
Area Lights, Line Lights, and Emissive surfaces will also cast shadows.
5. Technical Limitations:
The Ray Tracing Effect will display an incredible increase in the quality of the rendered output. However, there are certain limitations in its usage described in the article below:
See Also:
- Knowledge Base: Why is the Raytracing Effect blocked on my PC?
- Video Tutorial: Lumion 2023: The Raytracing Effect


