

Menu:
1. Install the Lumion Plugin for Revit
2.1: Method A: LiveSync (direct/live) export/import
2.2: Method B: Export to Lumion (Collada .DAE file)
4. Importing models from Revit LT
Note: When using LiveSync with Revit, PBR materials and material parameters are now synchronized with Lumion in real time. Changes to PBR texture maps or material settings in your modeling software will update immediately in Lumion while LiveSync is active.
For more information, see section 1.5 in the Lumion 2026 Release Notes:
-
Knowledge Base: Lumion 2026 Release Notes
1. Install the Lumion Plugin for Revit
1.1: Download
Please follow the instructions in this article to download and install the plug-in for your version of Lumion and Revit:
1.2: Revit LT:
See section 5 below: 4. Importing models from Revit LT.
1.3: Lumion View for Revit:
The Lumion Plugin for Revit is a single plugin and includes both LiveSync and Lumion View.
Lumion View is a real-time rendering tool. Directly within Revit.
To learn more about Lumion View for Revit, see these Lumion View Knowledge Base sections:
-
Knowledge Base: All About View: Getting Started with Lumion View
-
Knowledge Base: Getting Started with Lumion View for Revit: an Introduction
-
Knowledge Base: How do you get Access and Install Lumion View for Revit (Win)?
2. Export/Import to Lumion:
Once installed, LiveSync and Lumion View are available via the Menu ribbon and also as toolbars.


You can rearrange the toolbars for LiveSync, Lumion View and Export, to suit:


2.1: Method A: LiveSync (direct/live) export/import
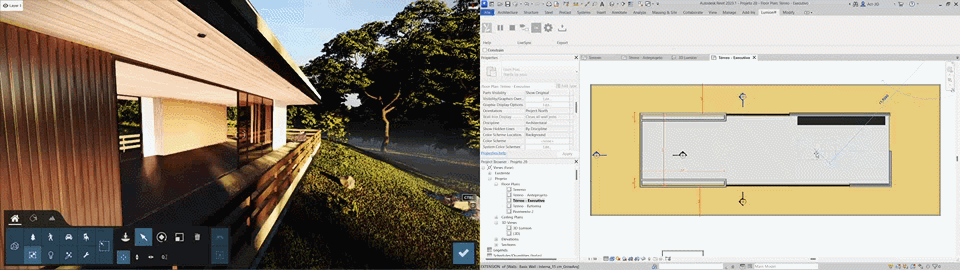
With Lumion LiveSync for Revit and Lumion 8.3 and newer, you can immediately set up a live, real-time visualization of your Revit 2015-2027 model. Make sure that you have selected a 'Perspective 3D View' in Revit (see also section 5.12 below) before clicking on the LiveSync button.
We show the new Plugin interface alongside the older and now static version.
Lumion Plugin for Revit: For Lumion 12.0 and newer (Revit 2023-2027), for current versions see Section 1.1: Download link for the latest version:
-
Knowledge Base: Download Lumion LiveSync and Lumion View single plugin for Revit
LiveSync for Revit: For Lumion 10 and 11(3) (Revit 2016-2025), for the older version see Section 3. Older version download links (to version 3.60.544):
-
Knowledge Base: Download Lumion LiveSync and Lumion View single plugin for Revit
Lumion Plugin for Revit: |
LiveSync for Revit: |

|
 |
(If you are using Lumion 8.0 and older, please see section 2.2 Method B below)
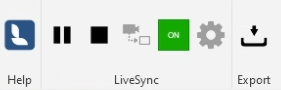
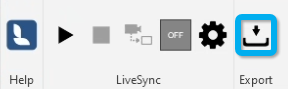
2.1.1: Click on the Play button to Start LiveSync.
Lumion Plugin for Revit: |
LiveSync for Revit: |

|
 |
| LiveSync is now running: | |

|
 |
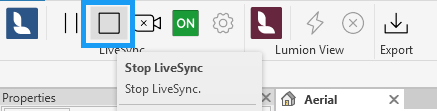
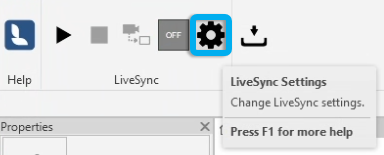
2.1.2: Before starting LiveSync you can change the Settings, or click on the Stop button and then change the Settings.
Lumion Plugin for Revit: |
LiveSync for Revit: |
|
 |
|
Note: The Surface Smoothing slider is no longer available. See Section 3.2: Surface smoothing: |

|
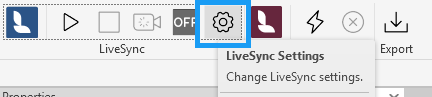
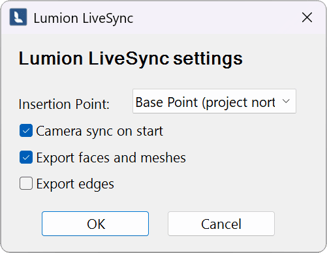
2.1.3: If you hold down the Shift key when clicking on the LiveSync Settings (cog) button, you will see more options:
Lumion Plugin for Revit: |
LiveSync for Revit: |
 Note: The Surface Smoothing slider is no longer available. See Section 3.2: Surface smoothing: |

|
See also: Section 3 on Settings.
We recommend exporting/importing the model via LiveSync rather than via .DAE format as it is faster and requires fewer resources.
2.2: Method B: Export to Lumion (Collada .DAE file) for Revit 2016 and newer
Lumion 10 and newer:
If you prefer to export your model via a file using Lumion 10.0 and newer, then you can export a Lumion Collada file (.DAE) file from Revit using the Lumion LiveSync for Revit Export button in the palette. This file can be imported directly into Lumion.
For Lumion 9.5 and older, see Section 2.2.2 below.
2.2.1: Collada DAE Export Steps:
Lumion Plugin for Revit: |
LiveSync for Revit: |
|
2.2.1.1: Click on the Export button |
|

|
 |
|
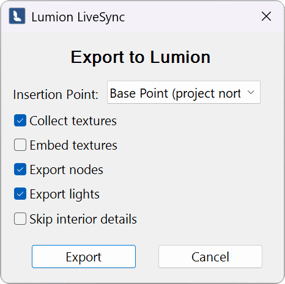
2.2.1.2: Select the desired export options: |
|
|
|
 |
2.2.1.3: If you hold down the Shift key when clicking on the Export button, you will see more options: |
|
|
 |

See section 3 below on Settings. These Settings vary from those available for LiveSync.
2.2.2: Lumion 9.5 and older versions
2.2.2.1: Lumion 8.3 to Lumion 9.5:
If you prefer to export your model via a file, then you can also use the method mentioned in Section 2.2.1.
However, please also see the following Section 2.2.3.
2.2.2.2: Versions older than Lumion 8.3:
For these versions, the Collada DAE option is the only option when using Revit 2016 and newer. Please see this thread, section 2. Technical Support for older Lumion versions:
- Knowledge Base: The new version of Lumion and more updates!
And then please contact us for our advice on options and Lumion versions to move forward with:
- Knowledge Base: Contact Lumion Technical Support
3. Settings:
Options for which setting is dependent on the use of either LiveSync (direct/live) or Export to Lumion as above in section 2.
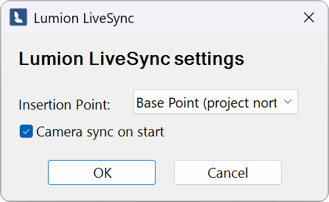
3.1: Insertion Point:
- In Revit, you can mark the Base Point and Survey Point in your project. The Lumion exporter settings let you define one of those as the Insertion Point in Lumion.
- If you choose Base Point as the Insertion Point, then 'project North' is taken into account.
- If you choose Survey Point as the Insertion Point, then 'true North' is taken into account.
3.2: Surface smoothing:
- Surface smoothing in new versions from 25.4.0 and newer: use the Revit Detail Level setting:
-
The slider is available up to version 3.60.544.
-
The Surface Smoothing slider lets you define how detailed (how many facets) curvy surfaces should be.
-
Setting it to the maximum value can have a serious impact on the time it takes to import the model as well as on performance and render speeds in Lumion.
-
For that reason, we recommend setting the slider to the lowest possible value, which still ensures that curvy objects look reasonably smooth.
-
See also Section: 5.15: How do you change the facets of a curved surface?
3.3: Collect textures:
- If ticked, all of the textures that are used by the Revit model will be placed in a folder in the same location as the .DAE file. This tickbox should remain ticked if you need to import the .DAE file on a different computer.
3.4: Export nodes:
- This tickbox should only be ticked if you have prepared a special model for 'node' replacement in Lumion. There is more information about this process in the following article:
- Knowledge Base: How do you replace imported 'proxy' objects with Library objects?
3.5: Export lights:
See
- Knowledge Base: How do you import Lights from your CAD software?
3.6: Unicode Support:
- This tickbox is only required for legacy naming conventions and should normally never be ticked.
3.7: Skip interior details:
If you select this option then these Revit Categories are not exported:
- Casework
- Communication Devices
- Data Devices
- Duct Terminal
- Electrical Equipment
- Electrical Fixtures
- Fire Alarm Devices
- Furniture
- Furniture Systems
- Generic Model
- Lighting Devices
- Lighting Fixtures
- Mechanical Equipment
- Model Text
- Nurse Call Devices
- Plumbing Fixtures
- Security Devices
- Specialty Equipment
- Telephone Devices
3.8: Optimize railings and structural elements:
- This tickbox lets you export railings, roofing elements and structural elements with fewer details to prevent Revit from crashing. Please note that section planes in Revit are not supported when this tickbox is ticked.
3.9: Optimize IFC surfaces:
- If ticked, IFC surfaces will use far fewer materials, which can help prevent very low framerates in Lumion.
3.10: Merge Linked Materials:
- Merge the same material in linked Revit models to a single material in the model for Lumion.
4. Importing models from Revit LT
Revit LT does not support other plugins, such as our LiveSync for Revit plugin.
- External Link: Is it possible to use plugins or add-ins in Revit LT?
4.1: Install the DWG plug-in in Lumion if you are using version 9.5 or older:
- Lumion 10.0 and newer: No plug-in installation is necessary.
- Versions older than Lumion 9.5:
- Download Link: Download the Lumion DWG plug-in for Lumion
4.2: In Revit LT, click on File -> Export -> Options -> Export Setups DWG/DXF:

4.3: Click on the Layers tab and select 'Export category properties BYLAYER and overrides BYENTITY':

4.4: Click on the Colors tab and select 'Specified in view (True Color - RGB values)':

4.5: Click on File -> Export -> CAD Formats -> DWG to export the model and then import it in Lumion.
- Please note that textures are not transferred correctly from Revit LT to Lumion due to Autodesk limitations in the exported .DWG file.
- Different materials may also be combined for certain building elements, so you should assign a unique color to the material that you do not want to be merged before exporting the model.
5. Tips & Troubleshooting
5.1: Why can't you see the model after importing and placing it in your Scene?
- Make sure that your Revit model is placed near the Base Point or Survey Point depending on which Insertion Point type you have selected in the plug-in export options (see section 3.1 above) before importing it in Lumion.
- See also:
- Knowledge Base: Why is your model invisible or black after importing it?
- Knowledge Base: Why do yellow lines (but no model) appear after Importing your model?
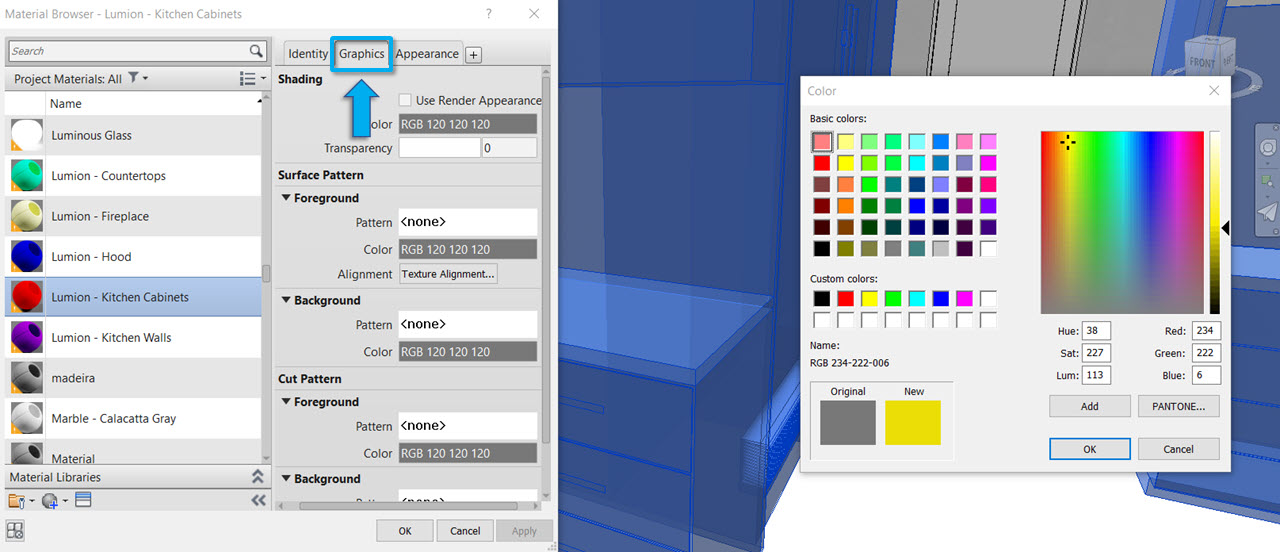
5.2: Why can't you assign a Lumion material to individual surfaces?
Lumion will always combine surfaces that use the same material in Revit. If you want to assign a Lumion material to a specific surface, you must assign a unique material to that surface in Revit before importing the model.
- Knowledge Base: Why can't I select just a part of the imported model?
- If you are using Revit LT, please assign a unique color to the material that you do not want to be merged before exporting the model.
- Revit MEP. Ensure that you assign the materials by category for the piping system. If you assign a material to the system, then there is only a single material for the complete piping system and Lumion is not able to recognize individual surfaces/piping structures.
5.3: What does the Geometry Optimization setting do in older versions of the plug-in?
Before the plugin exports an object from Revit it needs to tessellate it (divide the model into triangles). But the default built-in Revit tessellator has a problem with thin, long objects (railings, frames, etc). It generates too many triangles. If you turn on Geometry Optimization then, only for the given object categories, the exporter tries to tessellate it differently to get optimal smoothing with minimal triangles, instead of the built-in tessellator. However, occasionally there is a drawback; sometimes texture mapping coordinates are incorrect. It's better to avoid this option unless your Scene generates too large a .DAE file (after reducing it using lower Surface Smoothing/Smoothing Accuracy settings).
5.4: Can you export a Family model (.RFA file)?
- No, the Lumion exporter cannot export a single .RFA file (Family) and will result in an error ("Object reference not set to an instance of an object"). This is a technical constraint.
- To solve the problem, make sure that the .RFA model is placed in an .RVT project file.
5.5: What do you do if your Lumion Materials go missing after re-importing a model?
5.6: How do you replace imported objects with Library objects?
5.7: Why are some materials automatically converted in Lumion?
- Knowledge Base: How do Auto-Converted Materials work in Lumion?
5.8: How do you update a model in LiveSync when the file name or folder location of the Revit file has changed?
5.9: How do you resolve an 'Object reference is not set to an instance of an object' message?
Please follow the instructions in section 4 in the article below:
5.10: How do you connect LiveSync with BIM360 for multiple users of Lumion?
5.11: How do you link the same material for multiple Revit models?
- Knowledge Base: How do you link the same material for multiple Revit models?
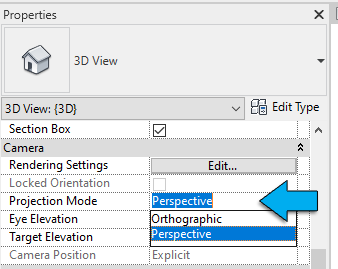
5.12: How do you make sure the camera is synced between Revit and Lumion?
Please make sure that you are in a '3D View' in Revit and that the 'Projection Mode' is set to 'Perspective'.
and that LiveSync Camera Synchronization has been turned On:
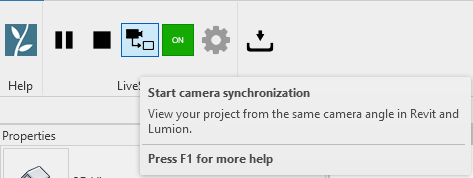
or is On in the LiveSync settings -> Camera sync on start.

5.13: Why some materials sometimes seem to be 'lost' when you use a 'Section Box'?

If a 'Section Box' completely removes a surface of a model then the material also no longer exists in Lumion. The state of the model has changed to reflect the 'Section Box' view. Refer to this more in-depth article:
5.14: Having trouble seeing the LiveSync for Revit tab in Revit?
Please try following this troubleshooting article by Autodesk:
- External Link: Revit add-on not showing in the Ribbon Tab
5.15: How do you change the facets of a curved surface?

Increase the Surface Smoothing slider. See section 3.2: Surface smoothing.
Note: The Surface Smoothing Slider has been removed in the most recent Lumion LiveSync for Revit plugins.
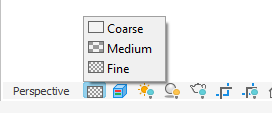
For Lumion Plugin for Revit 25.4.0 and newer, the export quality is determined by the detail level setting in Revit at the time of export. You'll see options like:
-
Coarse = fewer polygons (lower quality, faster export)
-
Medium = balanced polygon count
-
Fine = higher polygon count (smoother geometry, larger file)
To improve the model quality of your Lumion imports, simply set your Detail Level to 'Fine' before exporting your model.
That should give you smoother surfaces/edges in Lumion. However, as with Surface Smoothing, an increase in detail will increase the complexity (number of polygons) and may have some impact on screen redraws (FPS) and rendering times in Lumion.
5.16: Suggestions for optimizing your model before exporting:
- External Link (Revit 2024 Help, and earlier versions): About Limiting Model Geometry Before Exporting
5.17: How do you make capped walls/fill the gap between surfaces such as walls in Lumion?
- Knowledge Base: Why does the Clip Plane not cap clipped walls and other solid objects?
- Knowledge Base: How do you fill the spaces in a wall so they look solid or capped?
See also:
- Video Tutorial: LiveSync for Revit: Model synchronization
- Video Tutorial: LiveSync for Revit: Camera synchronization
- Video Tutorial: LiveSync for Revit: Materials synchronization
-
Other (External) Video Tutorials:
- Complete Lumion Tutorial - Revit-Lumion Workflow: Created by Balkan Architect. This is a beginner's tutorial from a Revit user's perspective.