
Menu:
|
6. Steps to Using Area Placement 7. Steps to Using Fill (Surface) Placement In Detail: |
1. Introduction:
1.1: You can:
Place Objects on a selected Surface:
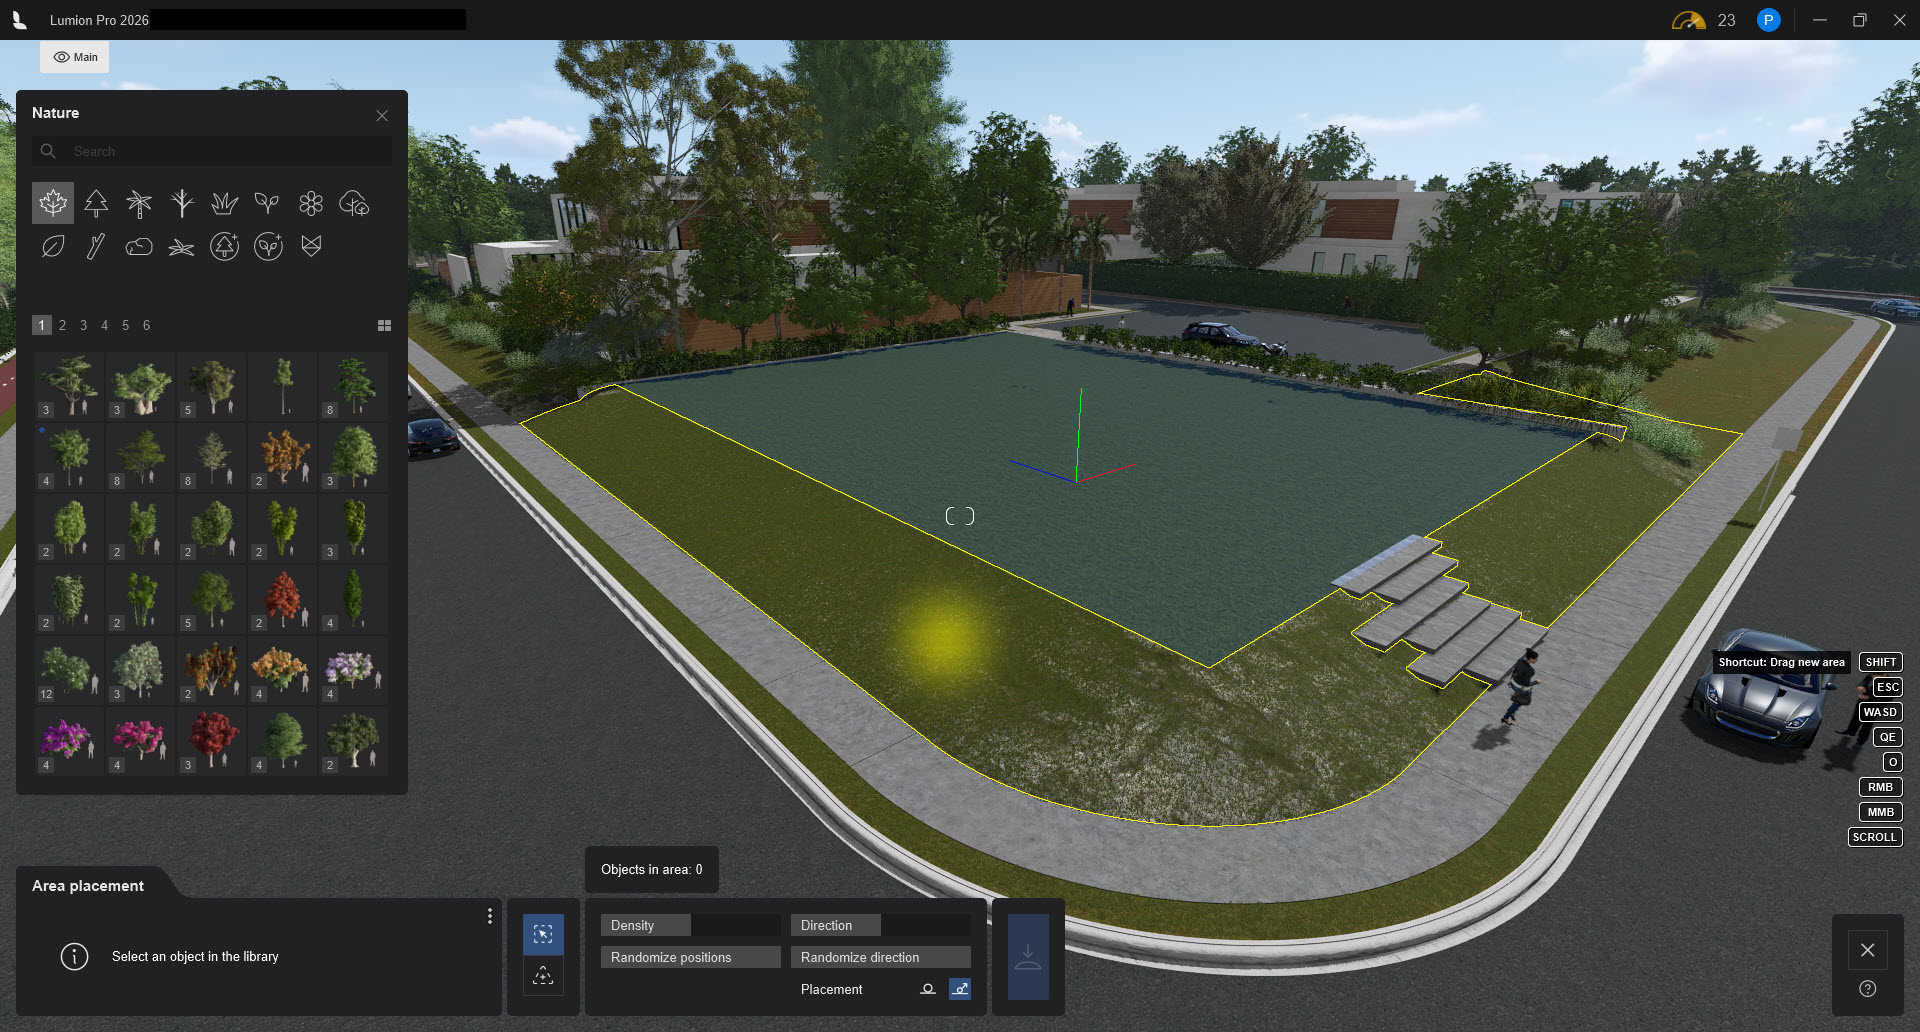
Place Objects on an Area you create.
The area can be a simple or more complex shape. The shape is determined by the closed-line area.
Also:
-
Control how many Objects should be placed
-
Control the distribution via the Density and Collision factors of the model size.
-
Control how the Objects will be placed for Direction, Position and relative to the ground:
Notes:
Important: There is a required upper limit of 5,000 Objects to manage memory issues.
This implementation for Lumion 2026.0 applies only to outdoor use and placing Nature Objects. This might be extended to some of the other Object Categories in future versions.
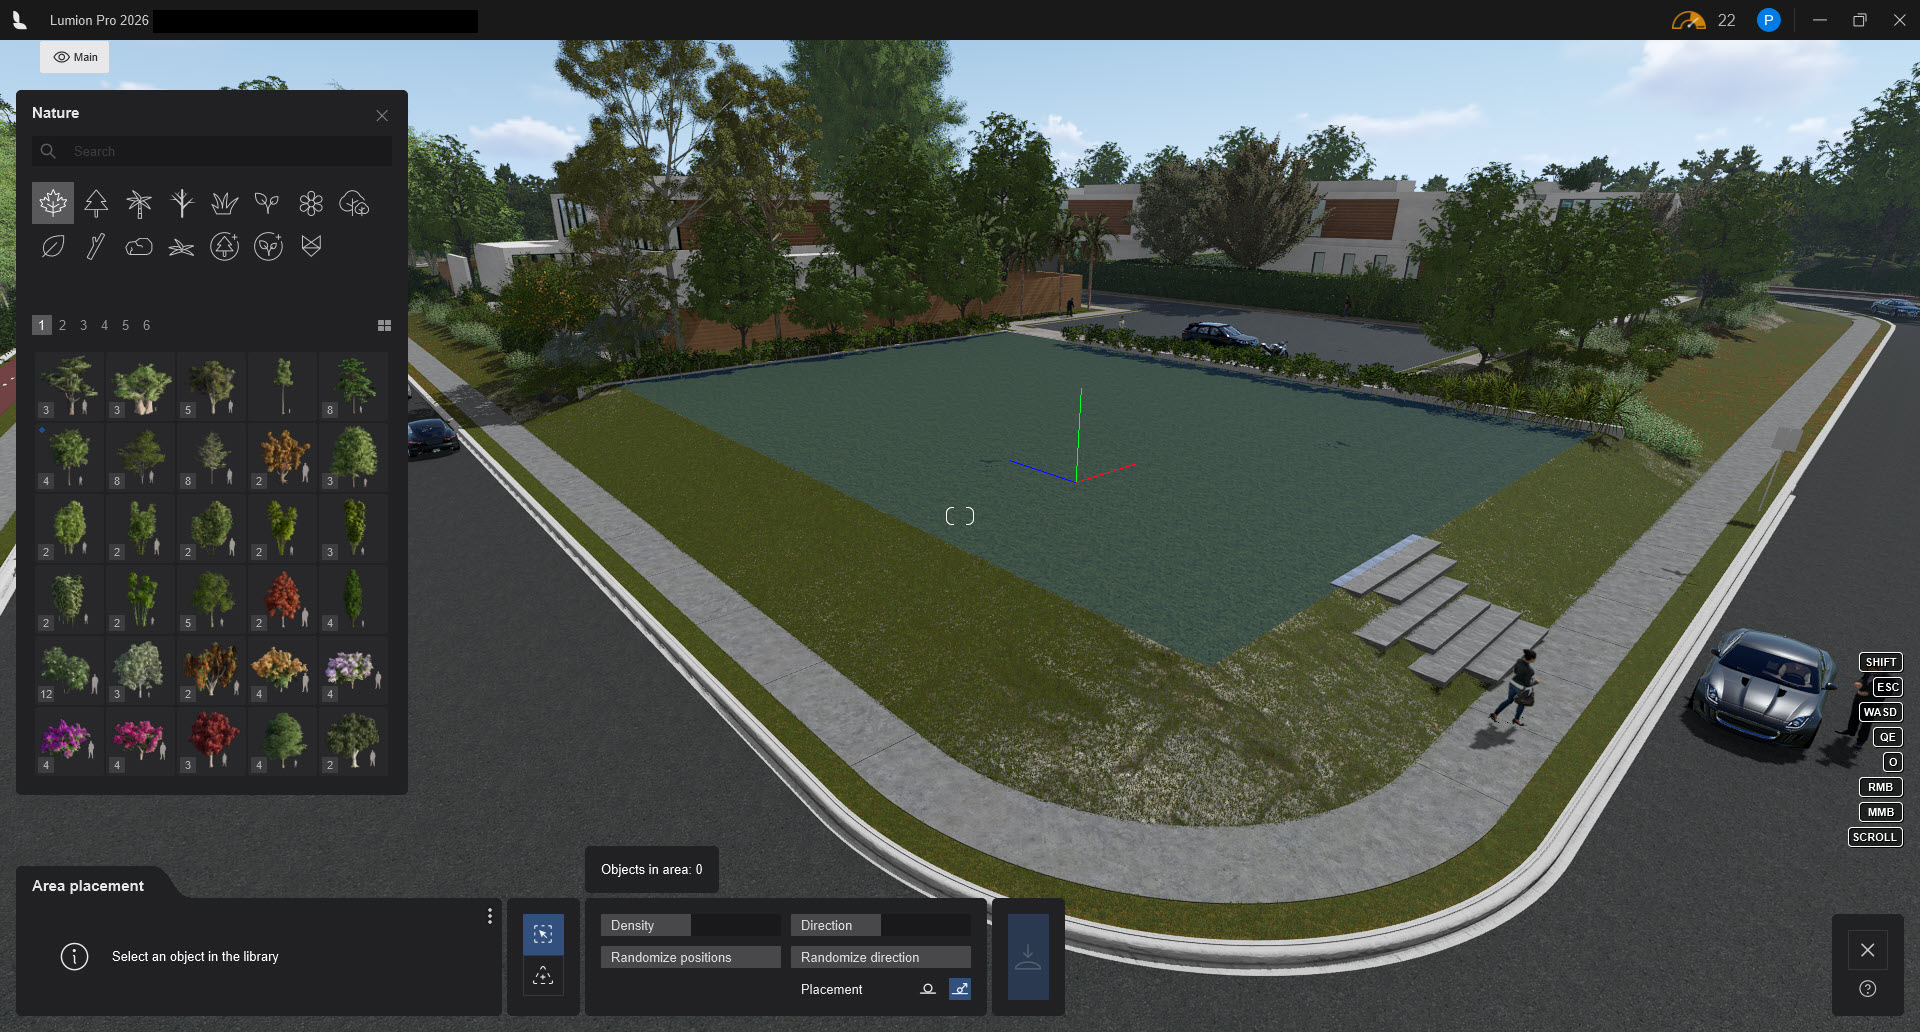
1.2: The Area Placement Tools
This new Area Placement Tool sits alongside the other Placement Tools (there may be some overlapping of functionality, but this tool provides two key requested features from customer feedback)


1.3: Example Scene
1.3.1: Surface Placement
1.3.2: Area Placement

1.3.3: Any shape
2. Key Features:
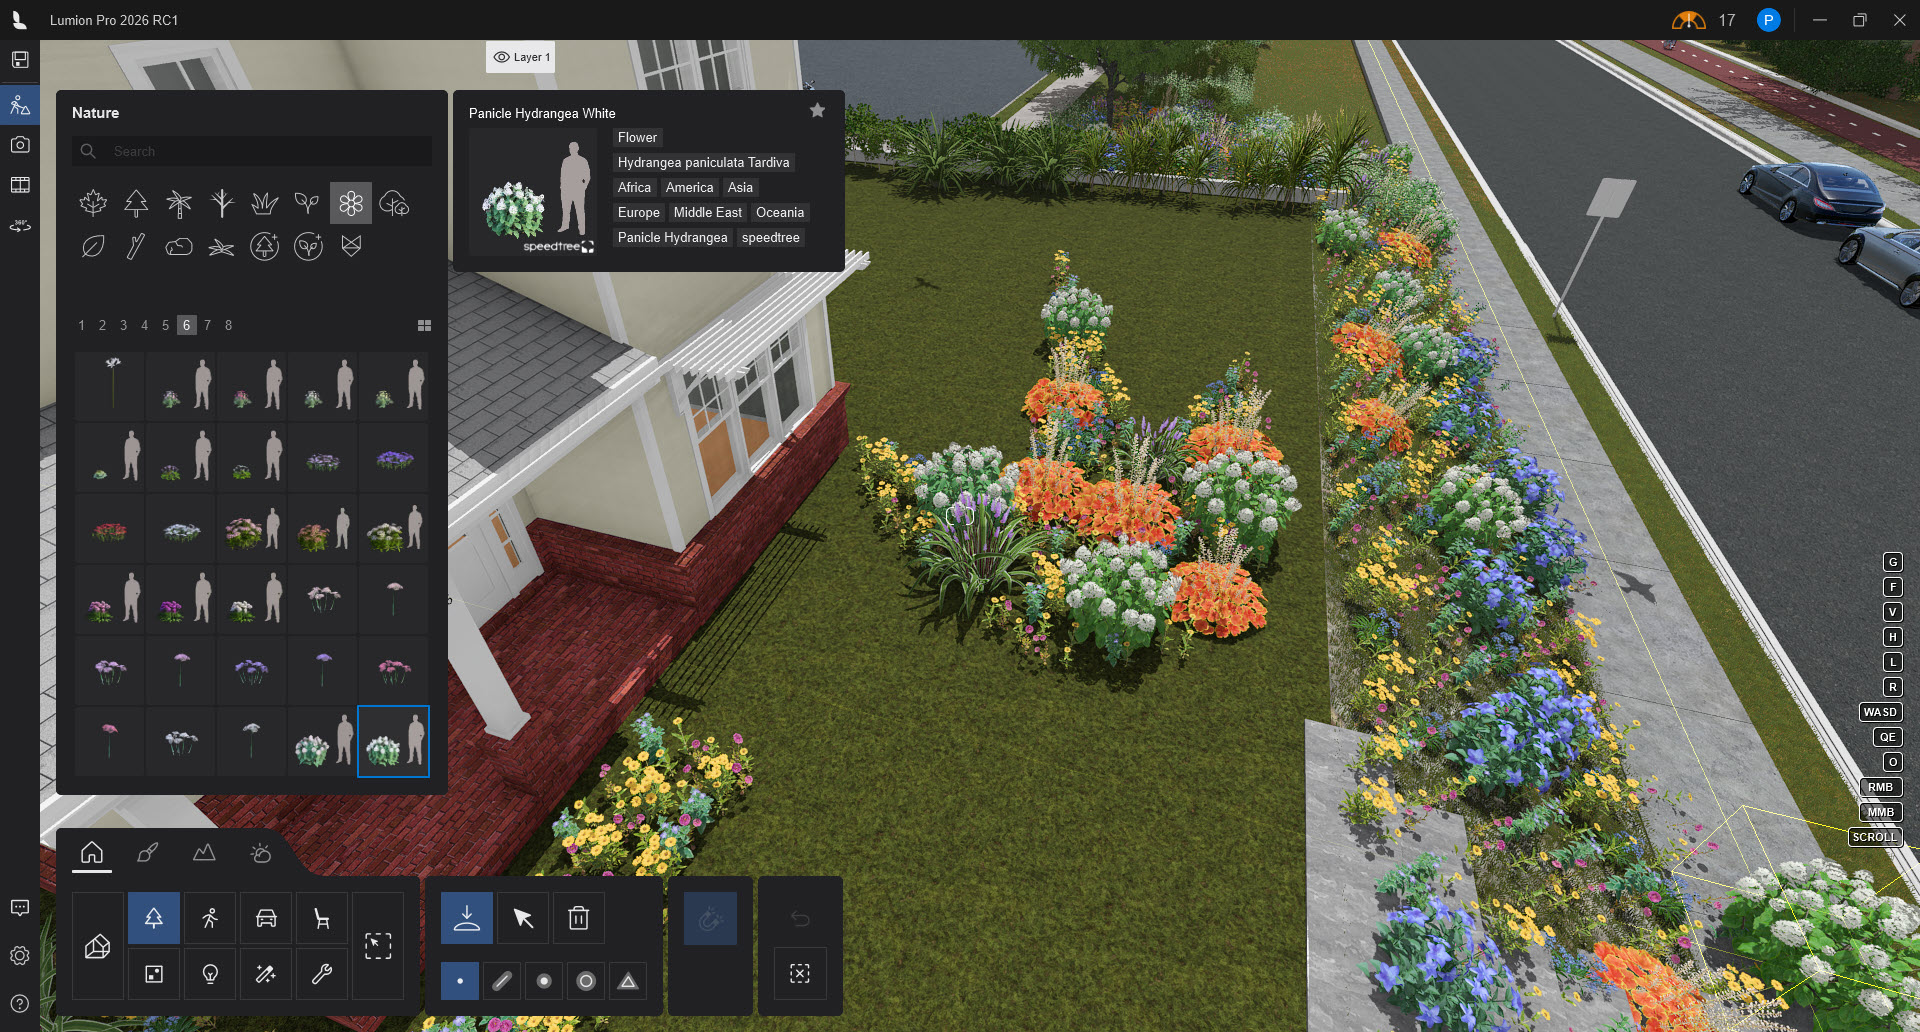
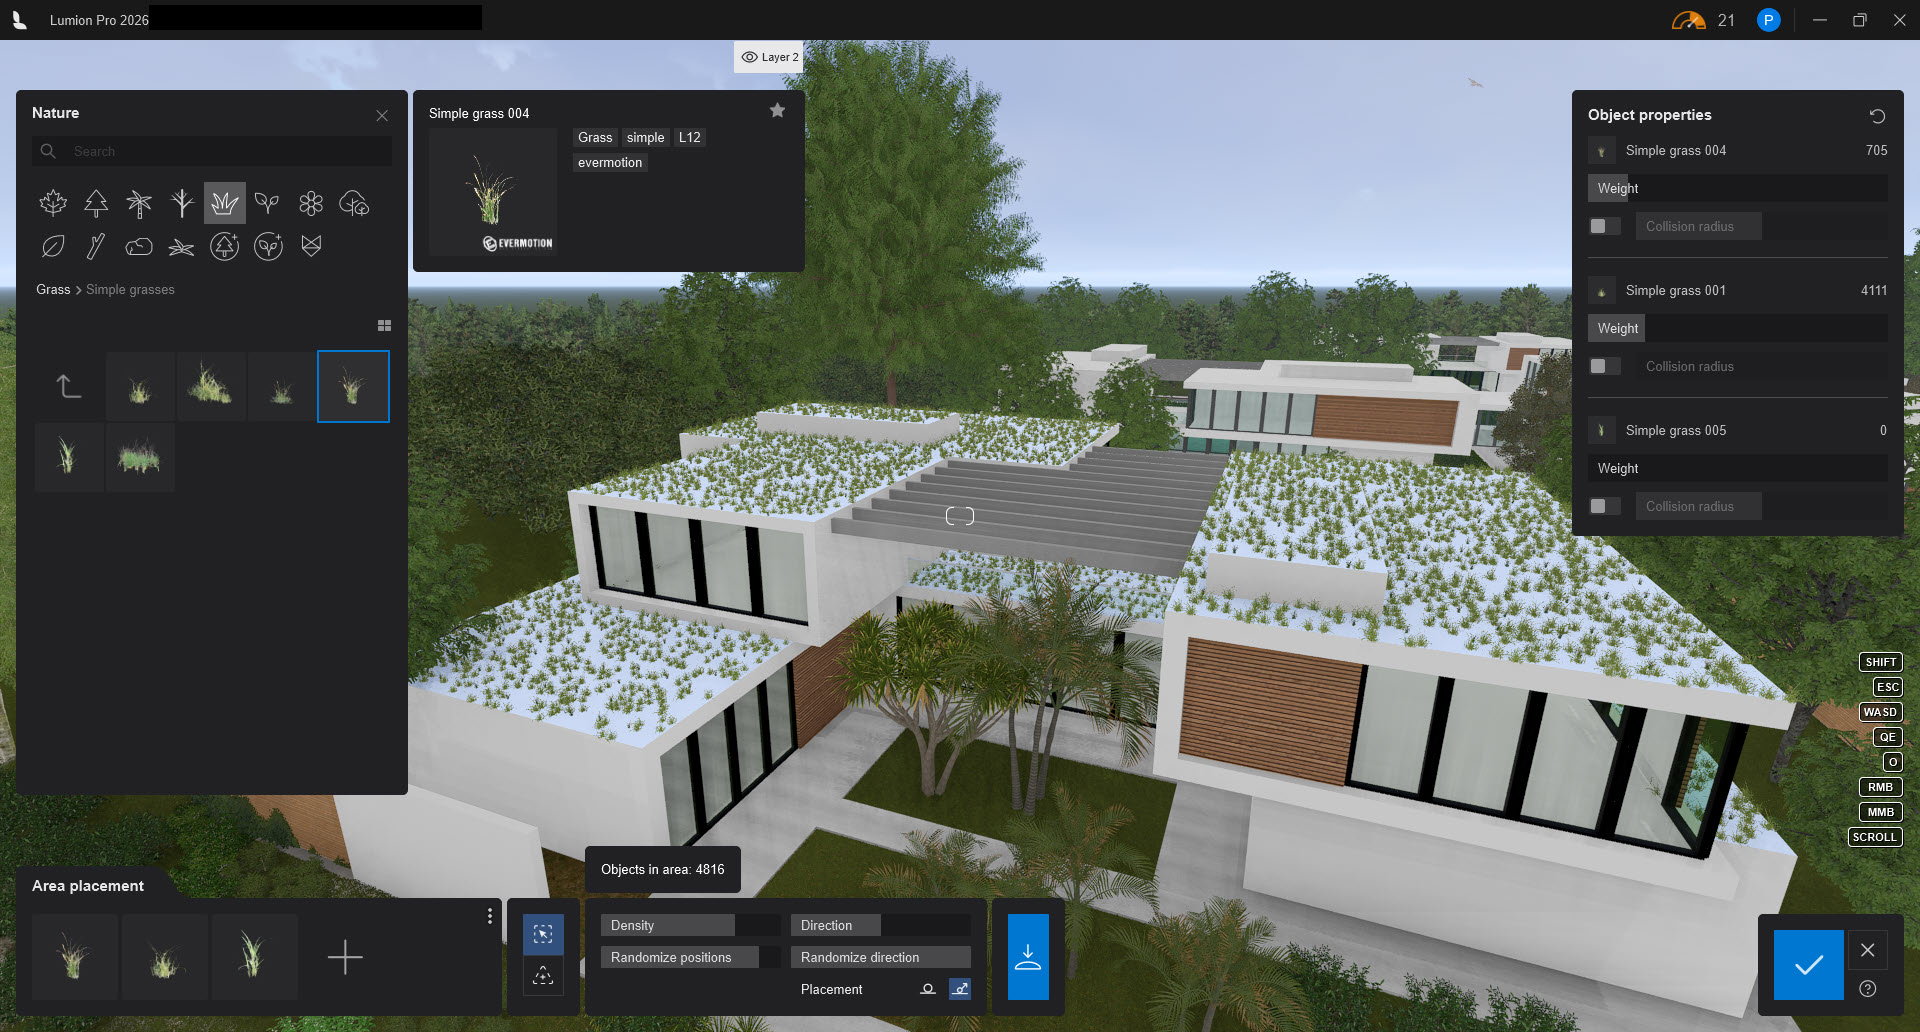
Place Objects (Models) from the Lumion Nature Library.
2.1: Placing, Adding and Mixing Objects
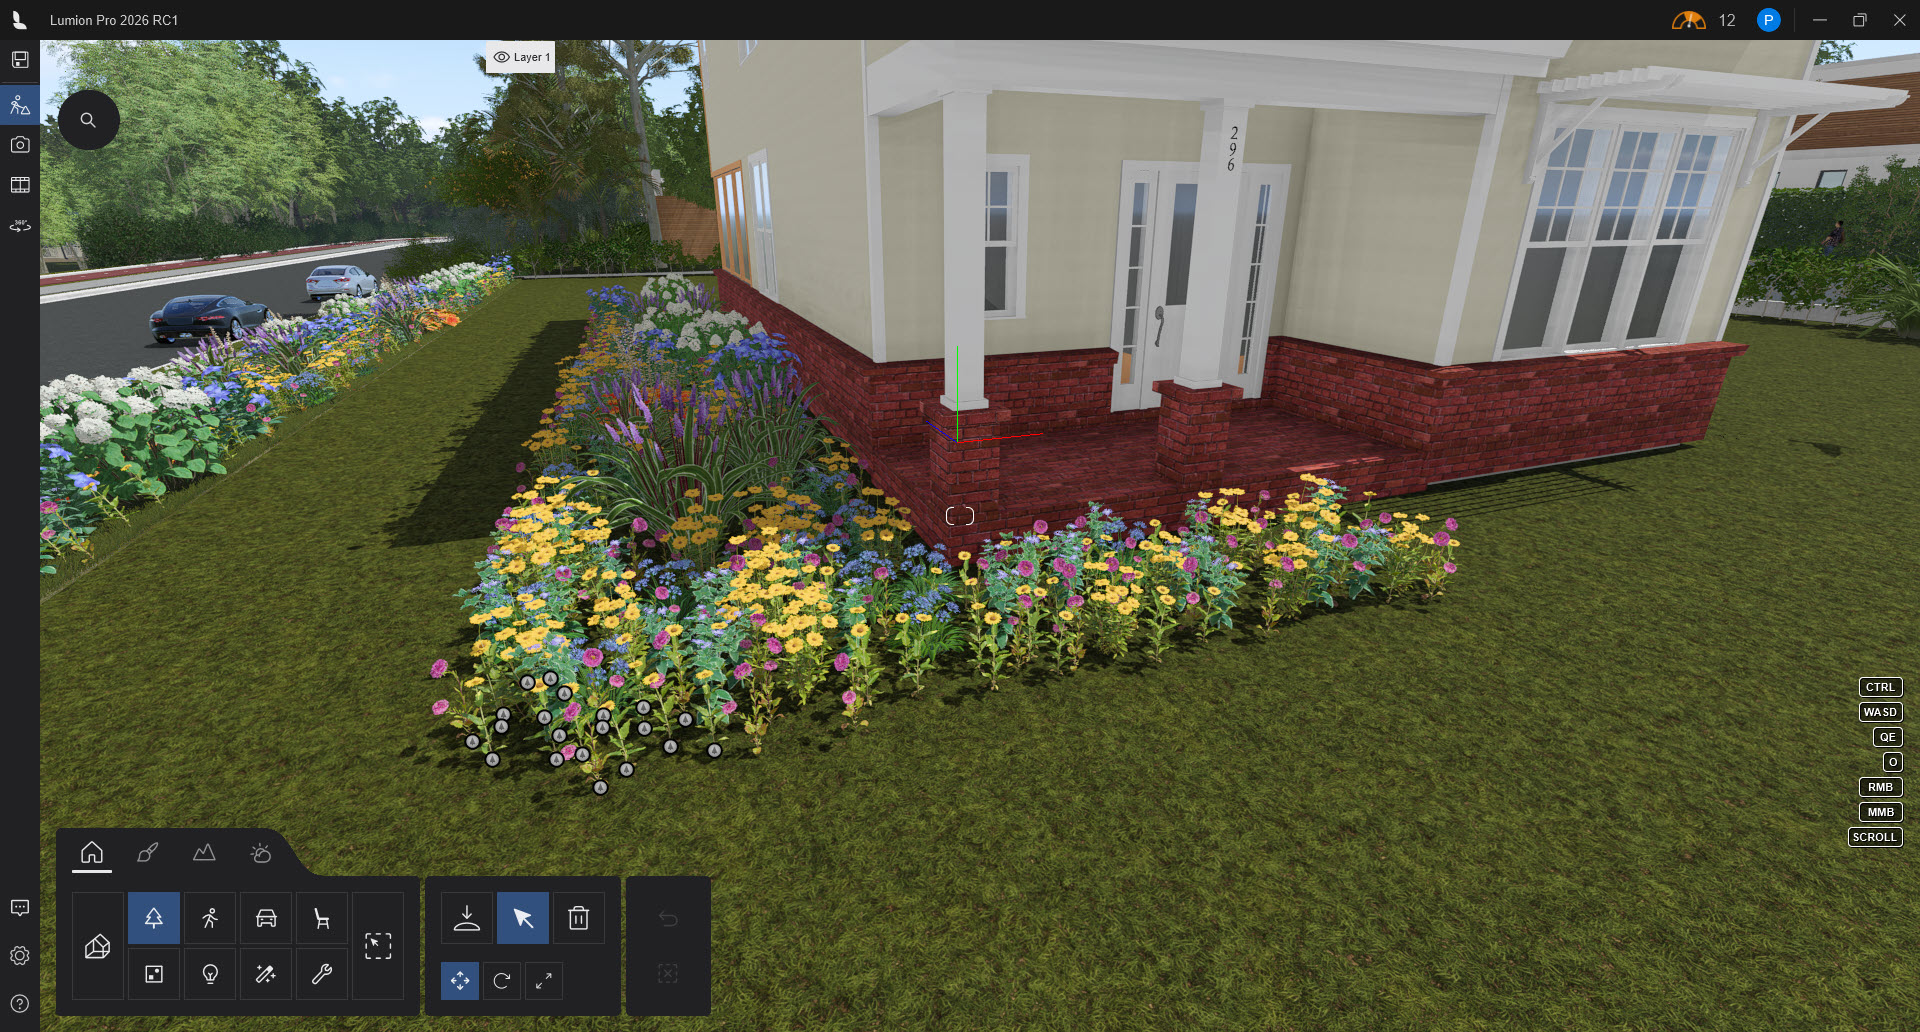
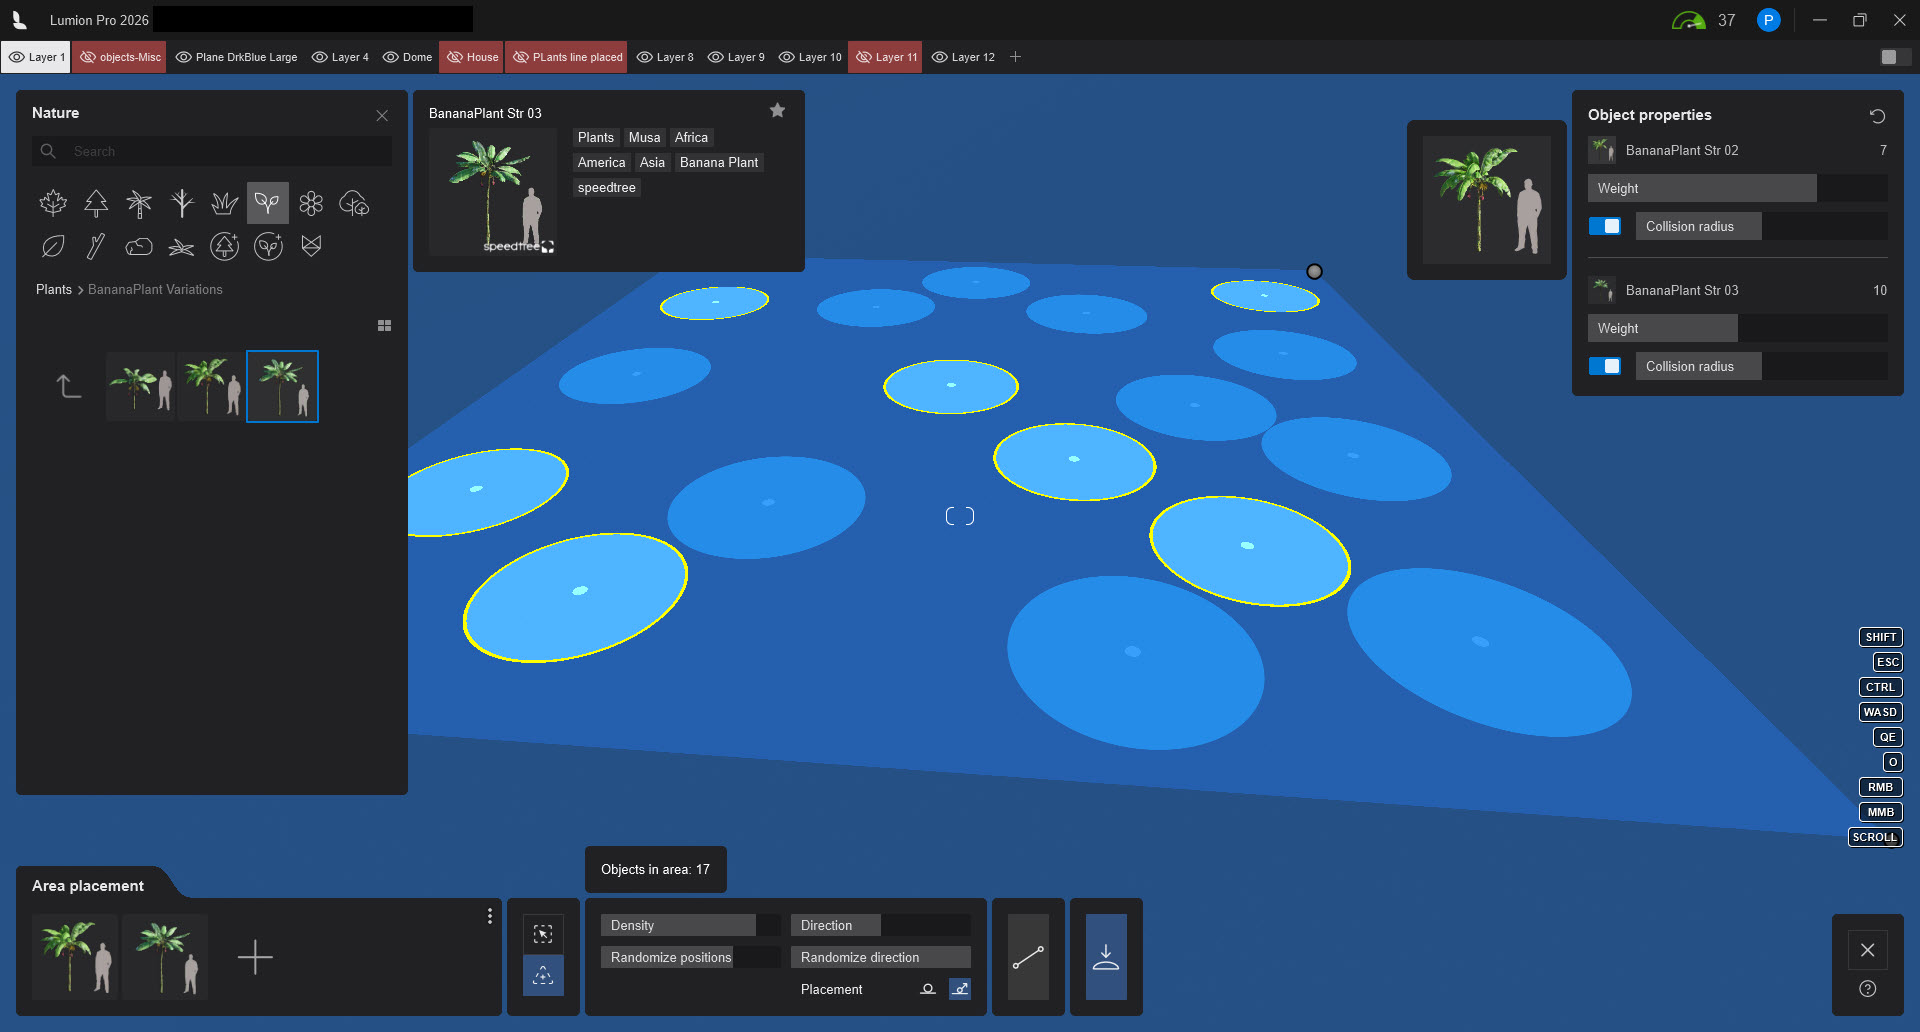
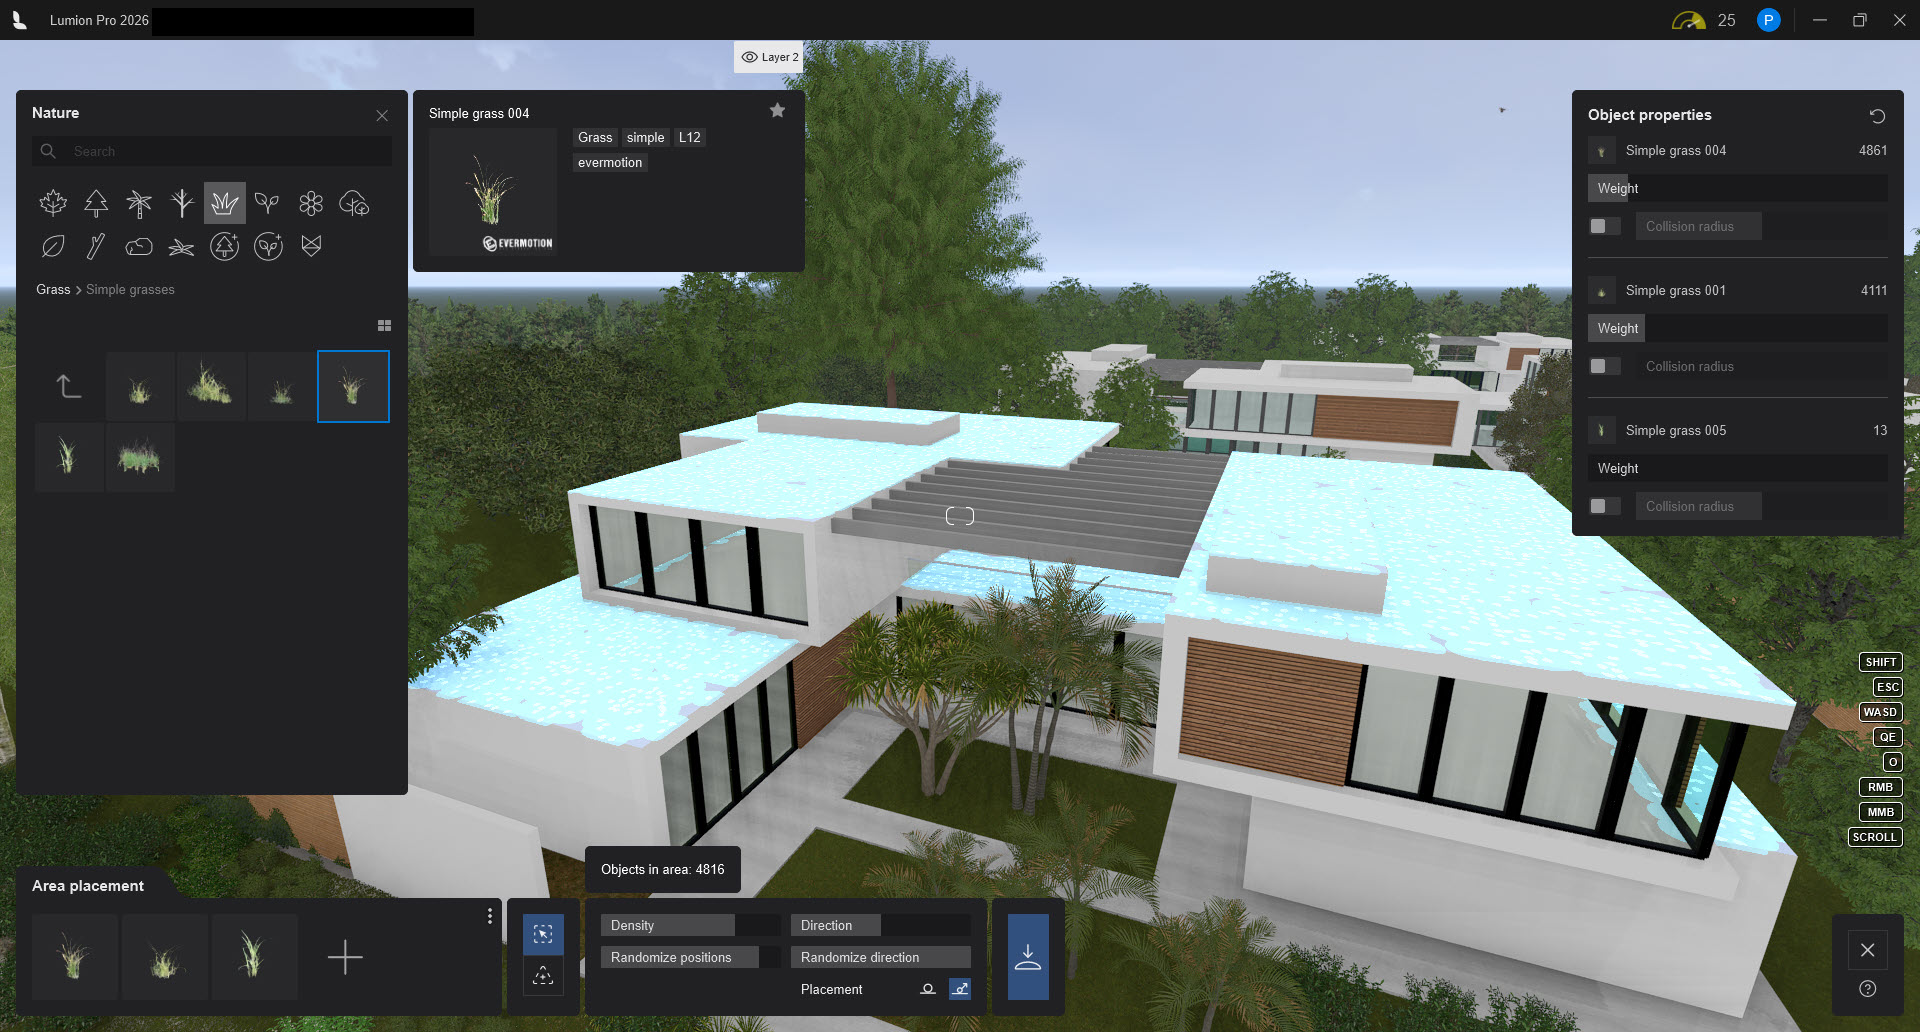
You can populate a single area with multiple different assets (e.g., a mix of grass, flowers, and trees).
With the area and nature asset selected, click the Add button (plus icon) in the properties panel.
You can adjust the global Direction, Randomize Positions, and Randomize Direction and overall Density sliders to vary the look of all objects within the boundary.
Controlling Density and Collision
To fine-tune the distribution, you can adjust settings for each specific object in the mix.
Use the Area Placement Properties Panel with individual settings for each and all the objects in the Placement. See Section: Object Properties Panel.
Important Note:
There are required upper limits in place to manage memory issues across all use cases.
Area Placement supports a maximum of 5,000 objects per area. If you exceed this limit, Lumion will prompt you to either lower the Density or reduce the size of the area.
The Generate button is disabled until you can bring the number below the limit.

You can reduce the number of Objects placed by reducing the area or reducing the density slider.
This monitoring of the maximum number allowed is done during the visual guide - (Nodes) placement diagram stage:
 |
After the Objects are Generated - Placed: |

You can add more Objects:
 |
 |
3. Using the Area Placement Tools
3.1: Expected Usage
-
Landscape design.
-
Placing of Nature Objects for added context in a visualization Scene.
-
A unique shape exists to be populated by plants.
-
A surface modeled in your CAD can be used to define the required area for one or a mix of plants.
-
You can create and define areas in your CAD to make more powerful workflows in Lumion to place Nature Objects.
-
The shapes to be populated for either Area or Surface cannot be populated as easily by the other tools.
This tool makes it especially useful for landscaping workflows, such as placing mixed vegetation, underbrush, trees, or ground cover with natural variation and minimal repetition.
• Mixed planting zones with multiple species
• Large grass or ground-cover areas
• Forest undergrowth and tree clustering
• Natural variation without manual repetition
• Rapid population of large landscape scenes
3.2: When do you use Area Placement rather than one of the other placement Tools?
Single Placement: You want more than 1 (one) Object for the area.
Line Placement: Your shape to fill is determined by a Surface or manually made shape that is not a line. Some settings will allow you to place in a linearly.
Cluster Placement: You do not need the clustered circular shape. And may need stricter control around the shape's borders.
Paint Placement: You do not need the brush anywhere approach to placing Objects. Area Placement offers a more controlled, specific place to add your Objects.
4. Key Steps:
1. Click on the Area Placement Tool:
> Build Mode > select Nature Category > click on Place Tool > Area Placement

2a. Either, select Fill Surface Tool:

2b. Or, select Create Area Surface Tool:

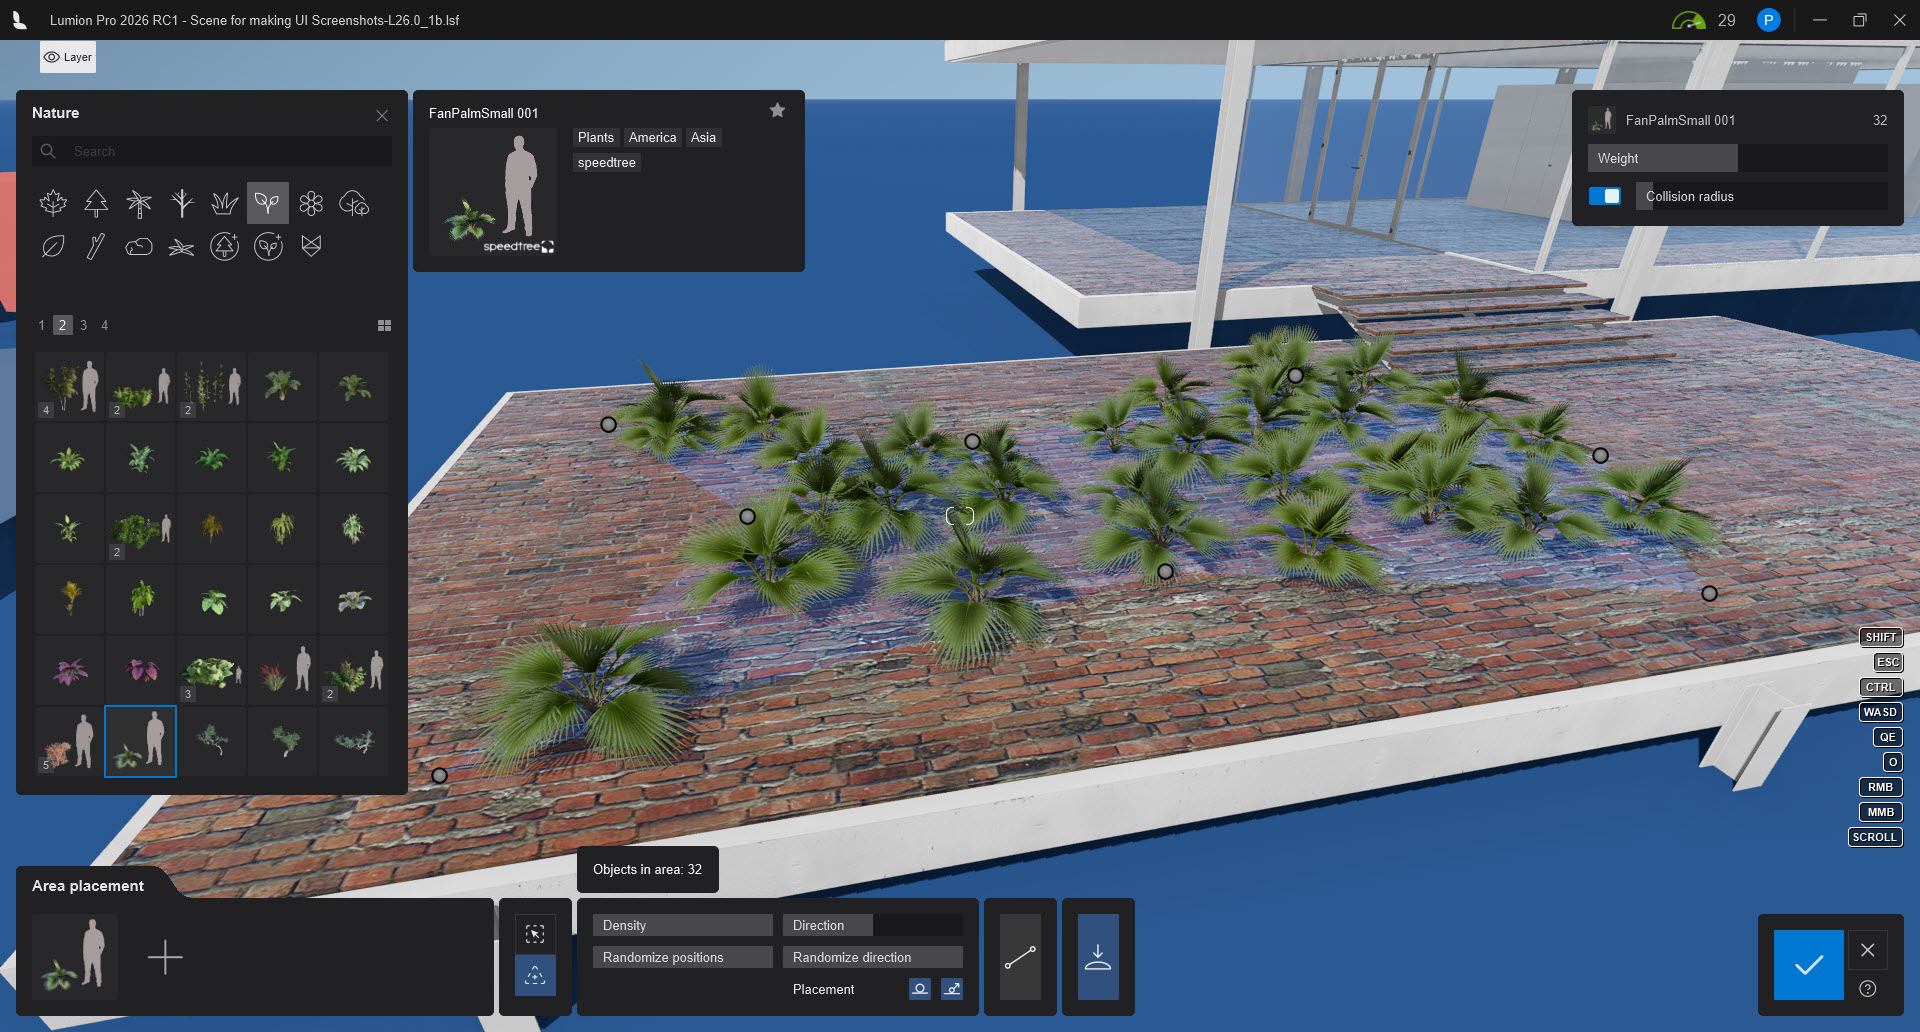
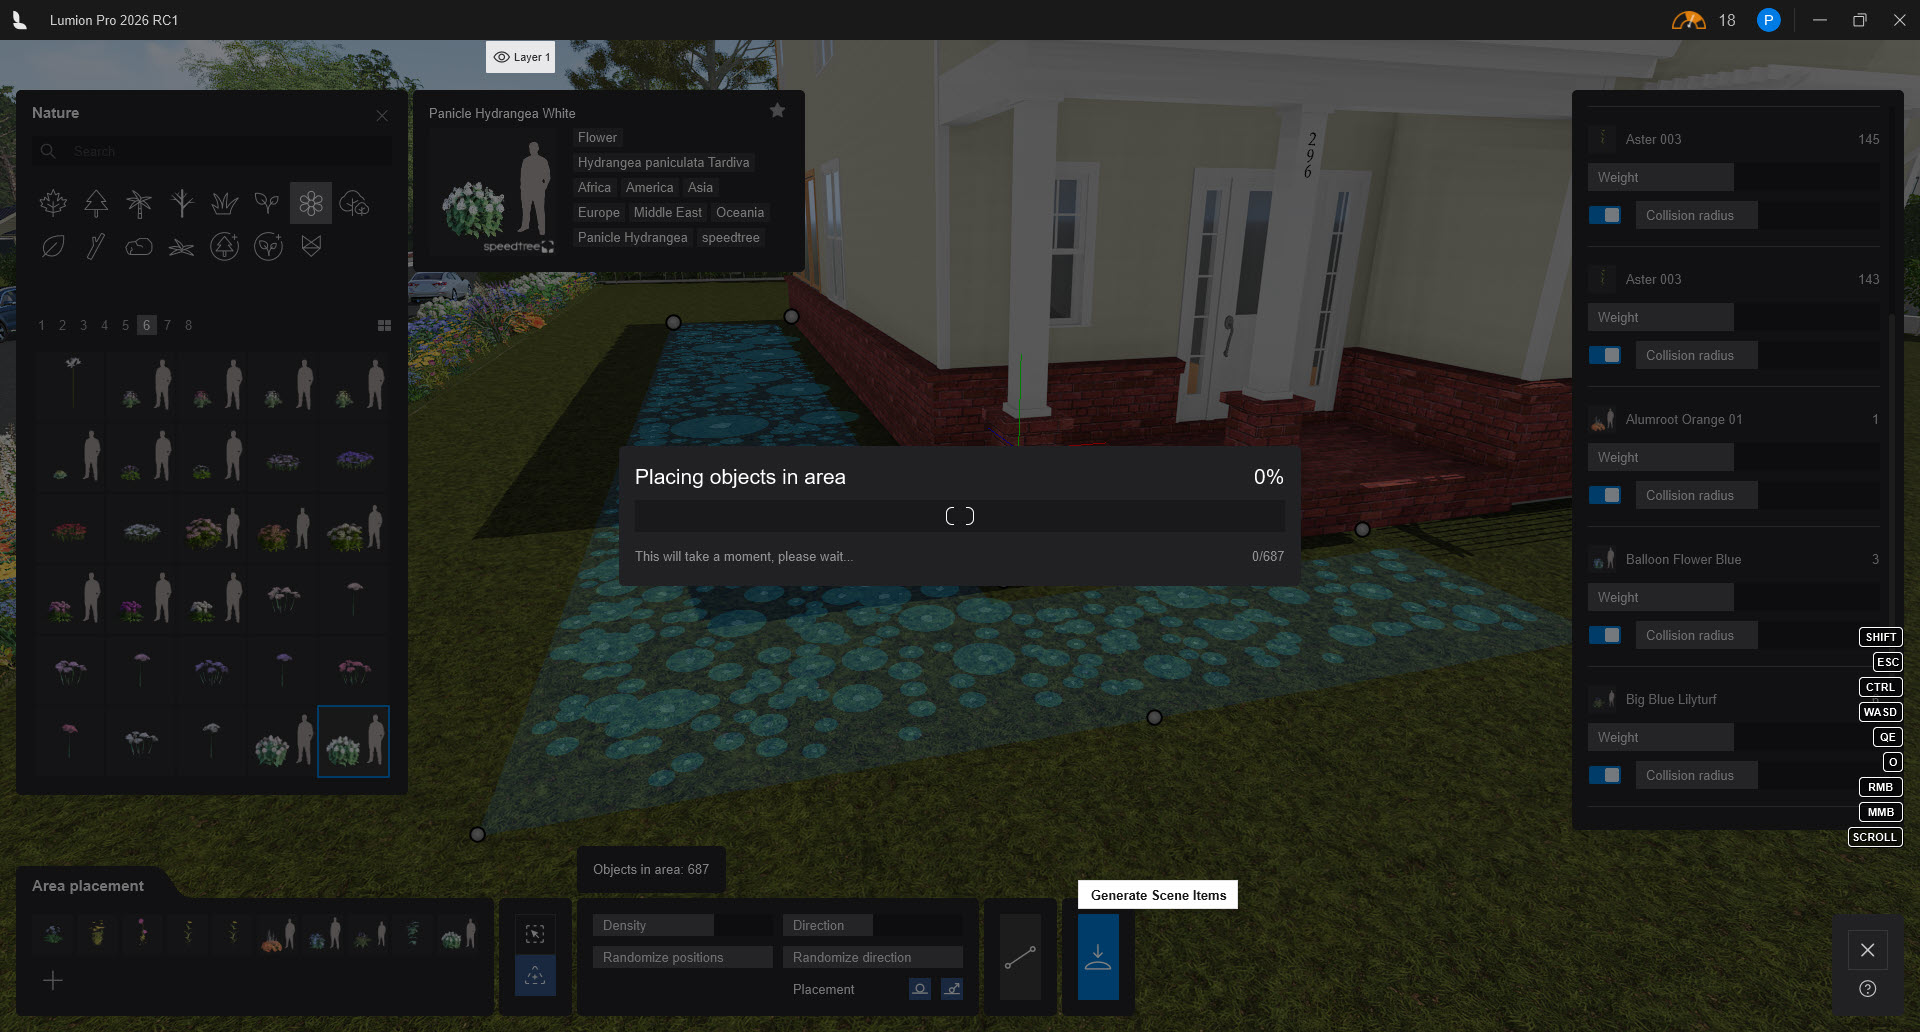
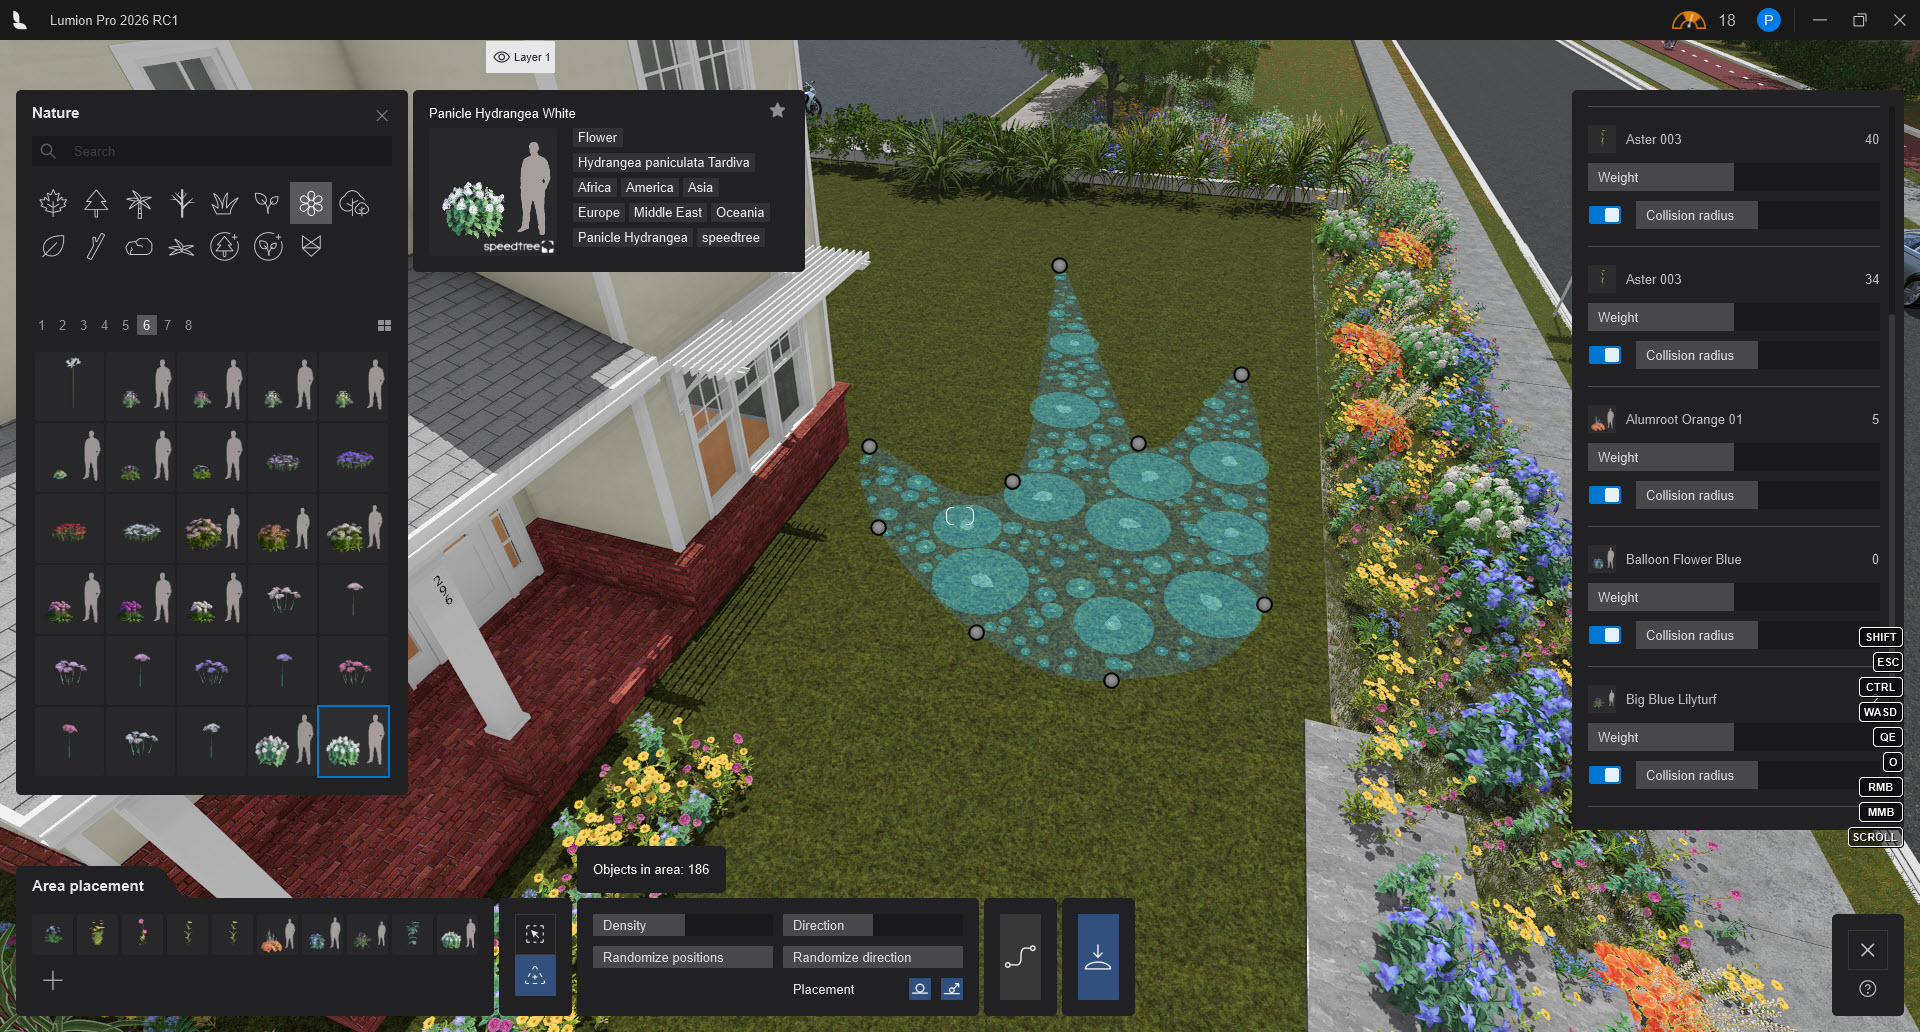
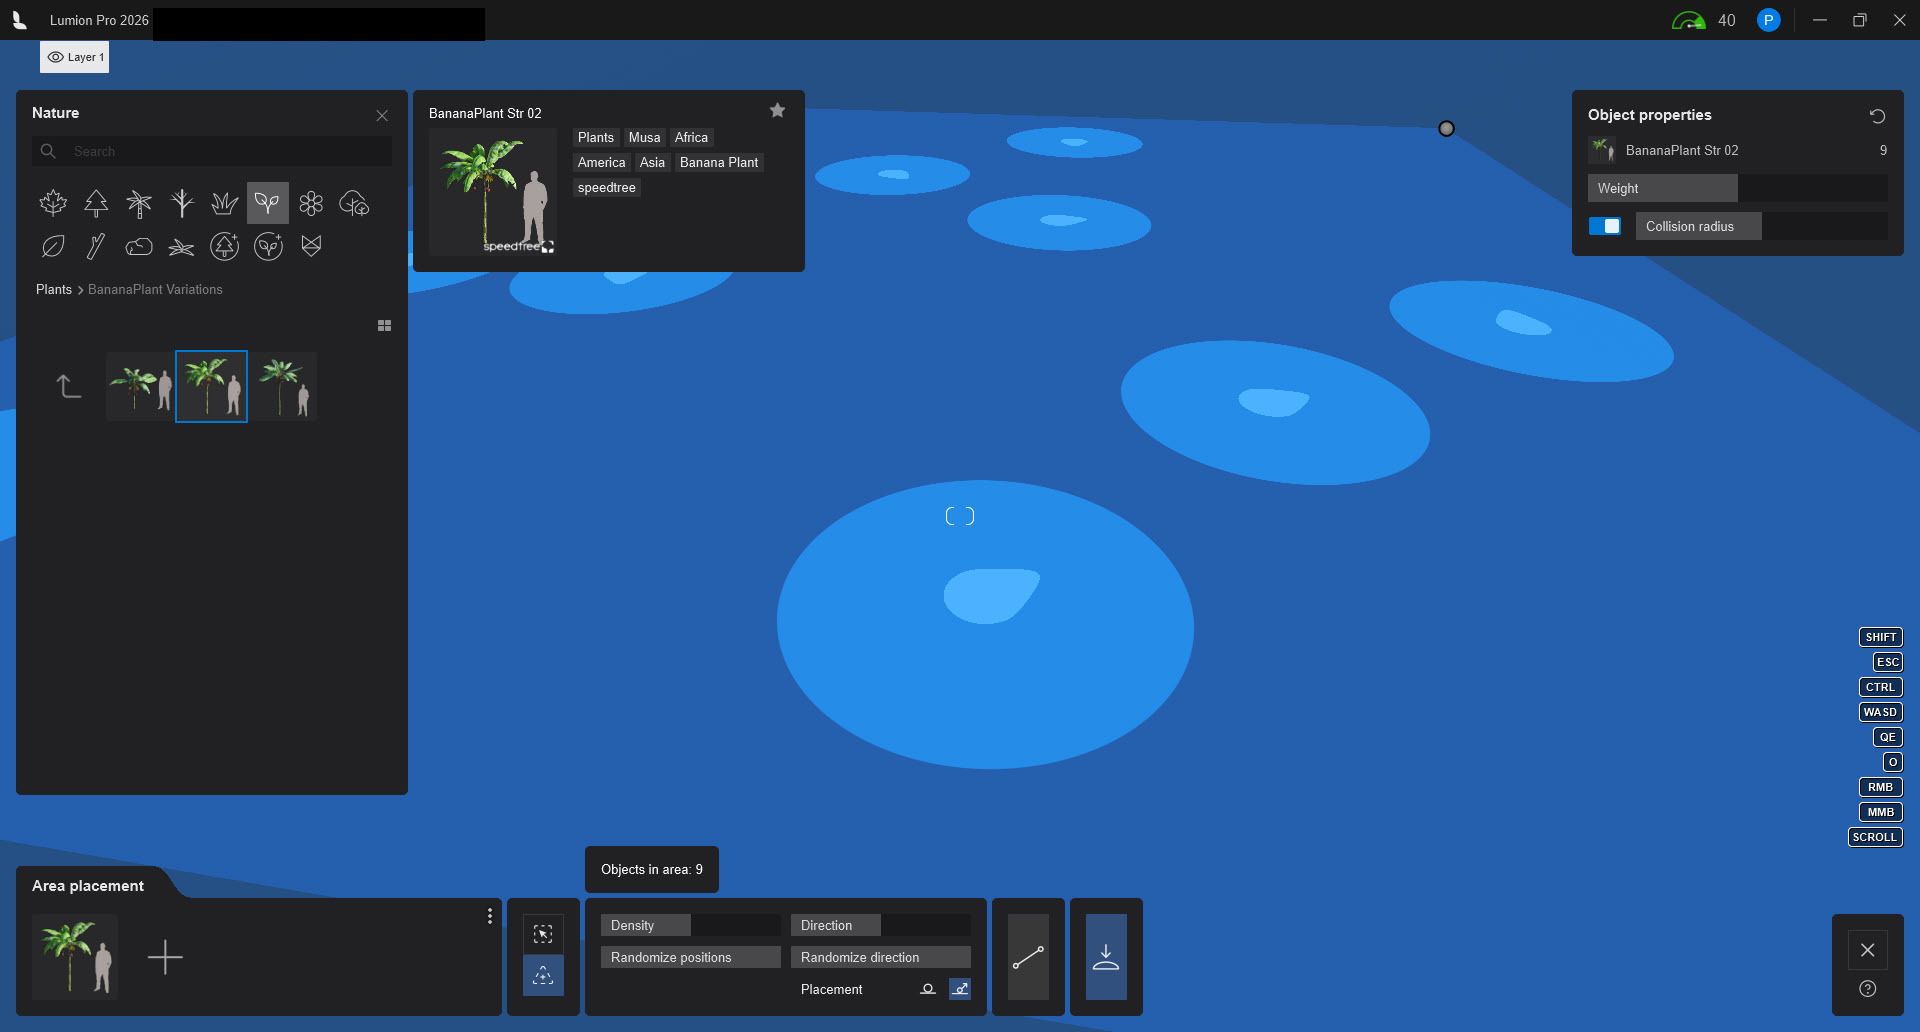
3. Using the Visual Placement Guide - Diagram, decide on the number of Objects and set their Density and Positions and Direction:

4. Generate the Objects for the Surface or Area:

5. After the Objects are Generated-Placed,

decide to accept-Confirm or Cancel the Placement:


Exit Mode:
To avoid accidentally exiting the mode without placing any items, the big friendly blue button is disabled if you have not generated any items. If you want to exit without placing any Objects then click the red Exit button.
Placement done:
5. Main Capabilities:
5.1: Surface Placement
You can place Objects on any surface that is not vertical.
 |
 |
Including where a surface is on more than one plane:
 |
 |
Excluded Surface: Lumion Landscape/Terrain:
Surface does not mean the surface of the Lumion Landscape, which is excluded from selection. Use other Placement Tools such as Line, Paint or Cluster Placement.
You can place on an almost vertical:

See also: 11.2: Can you use Area Placement to plant a wall for a Vertical Wall planting?
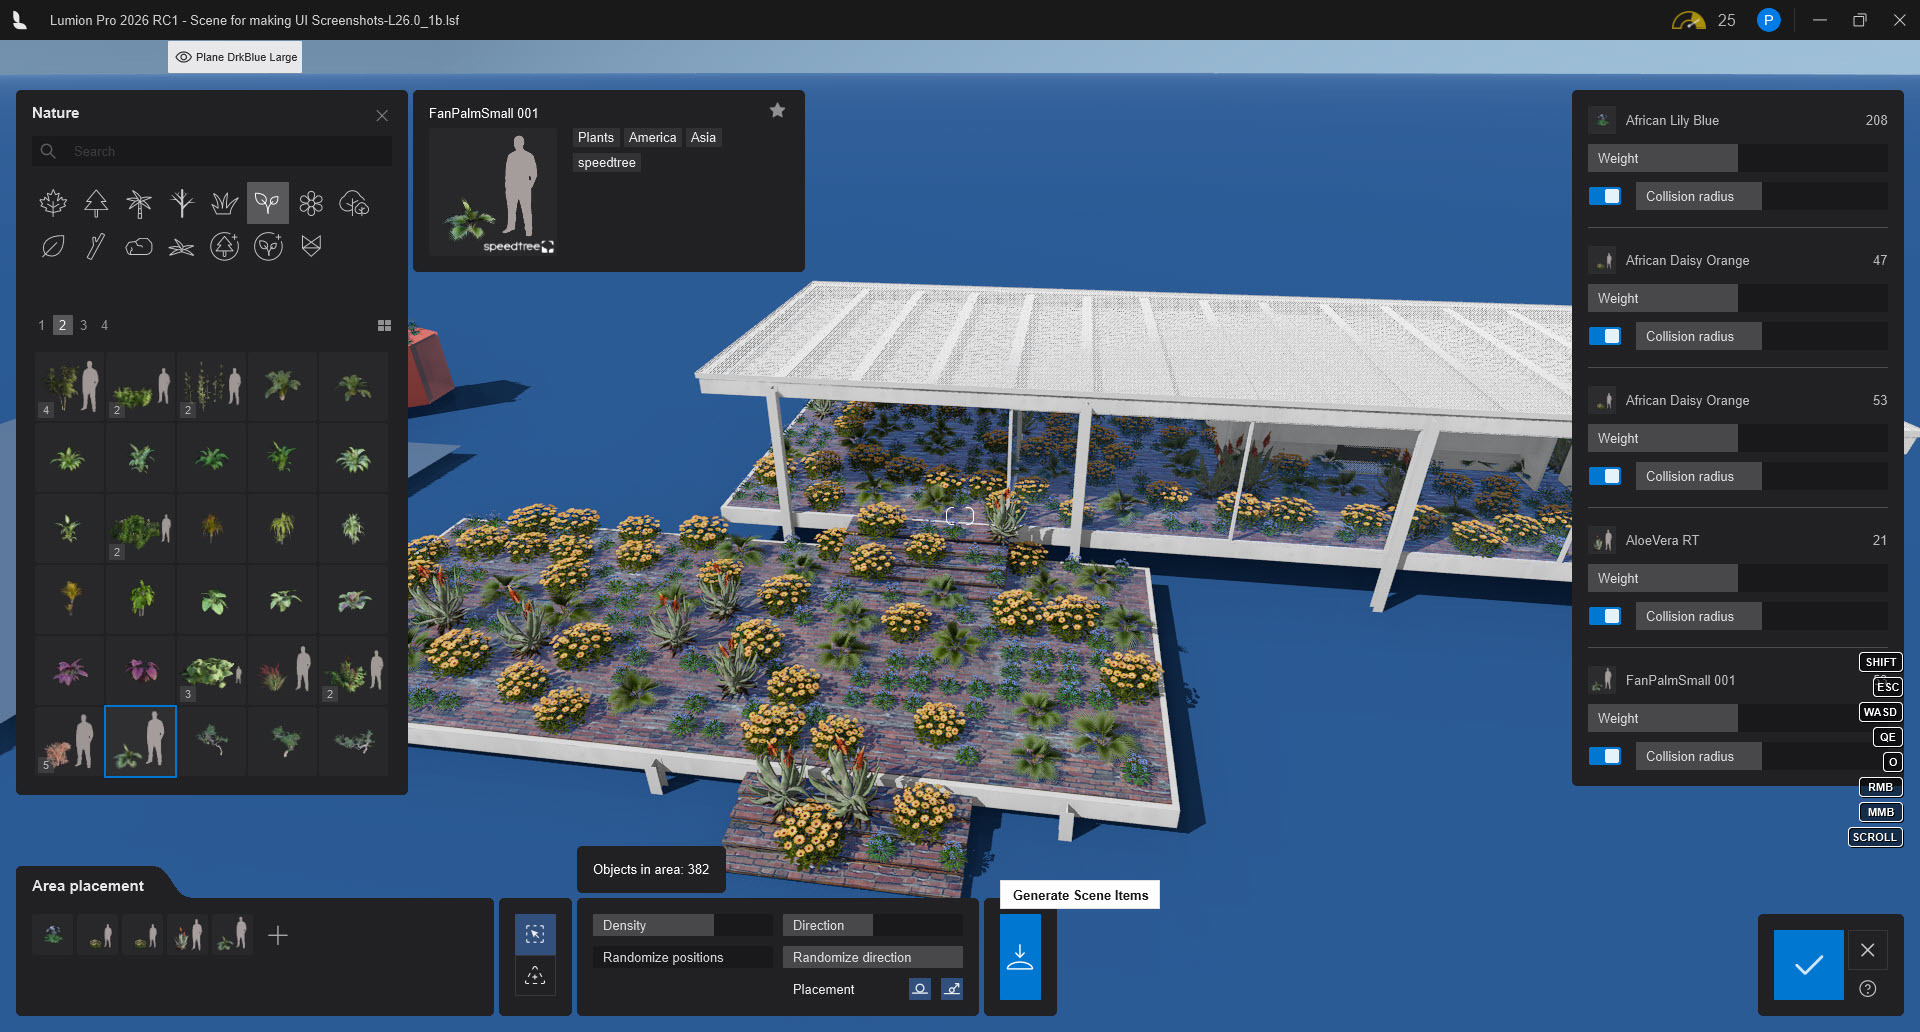
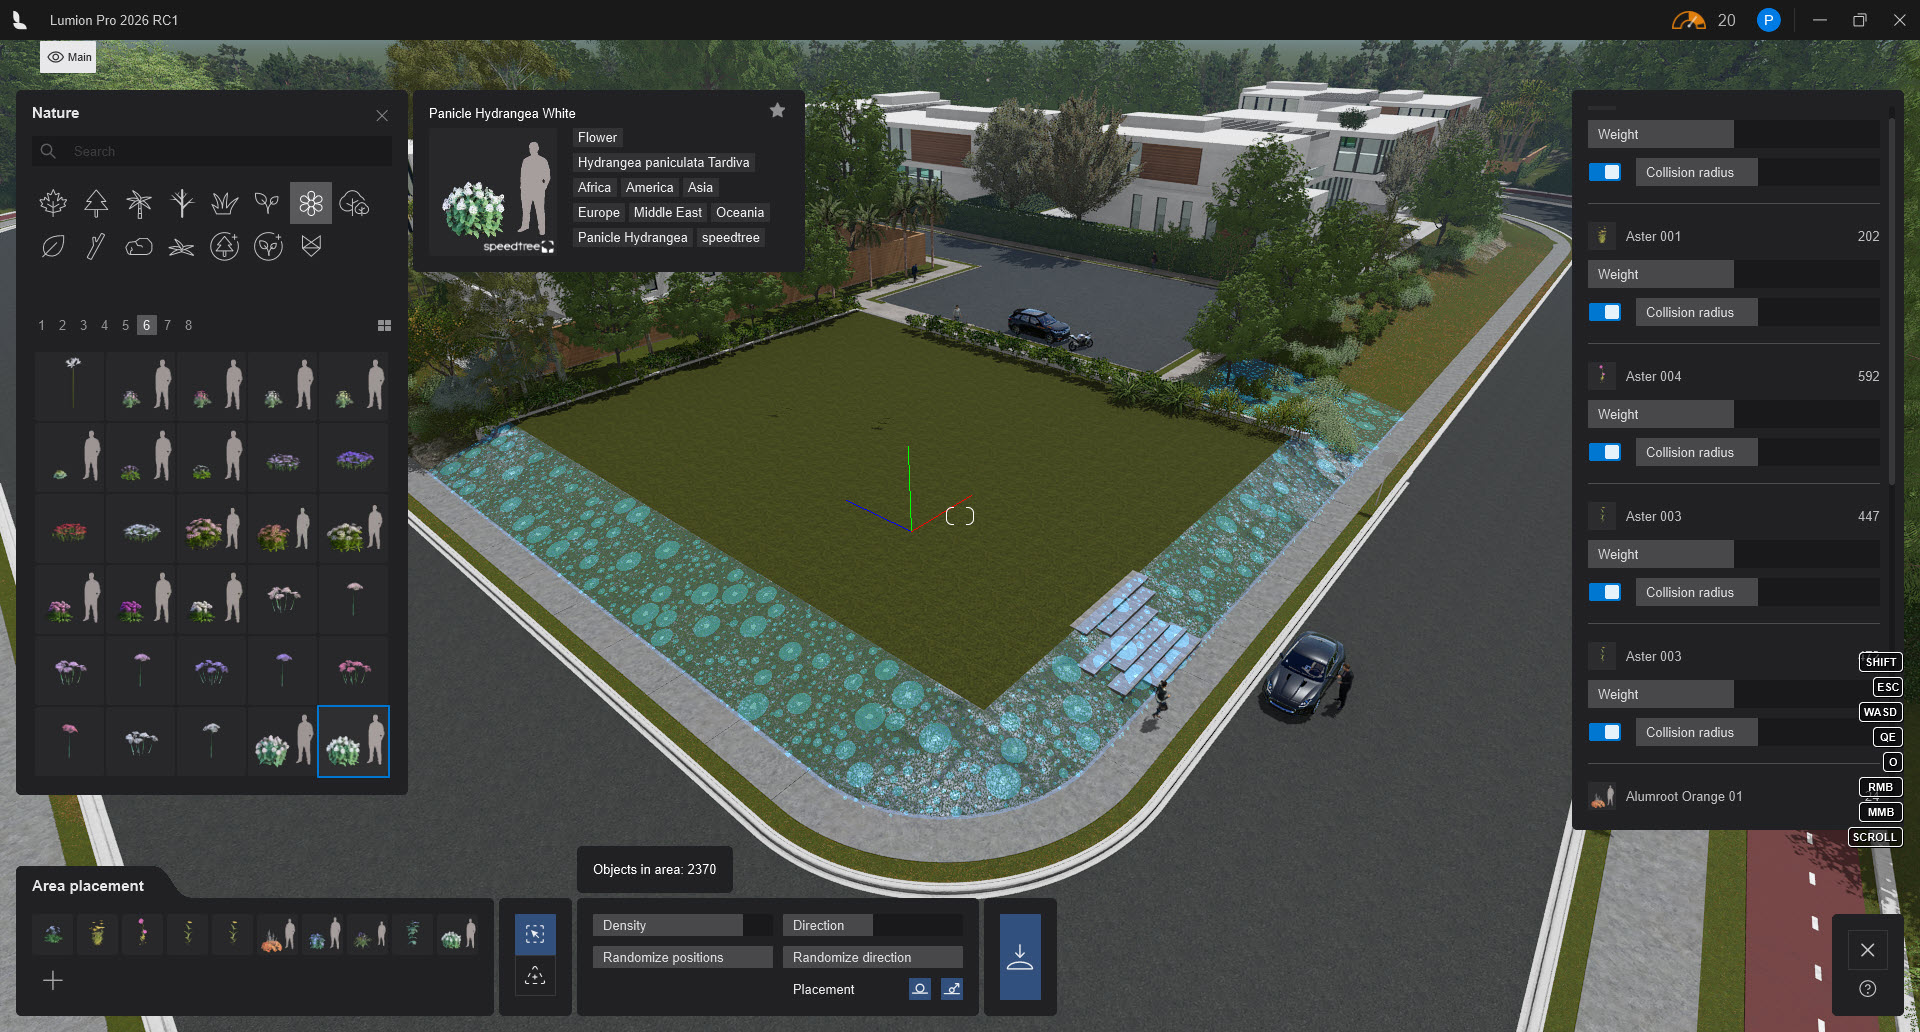
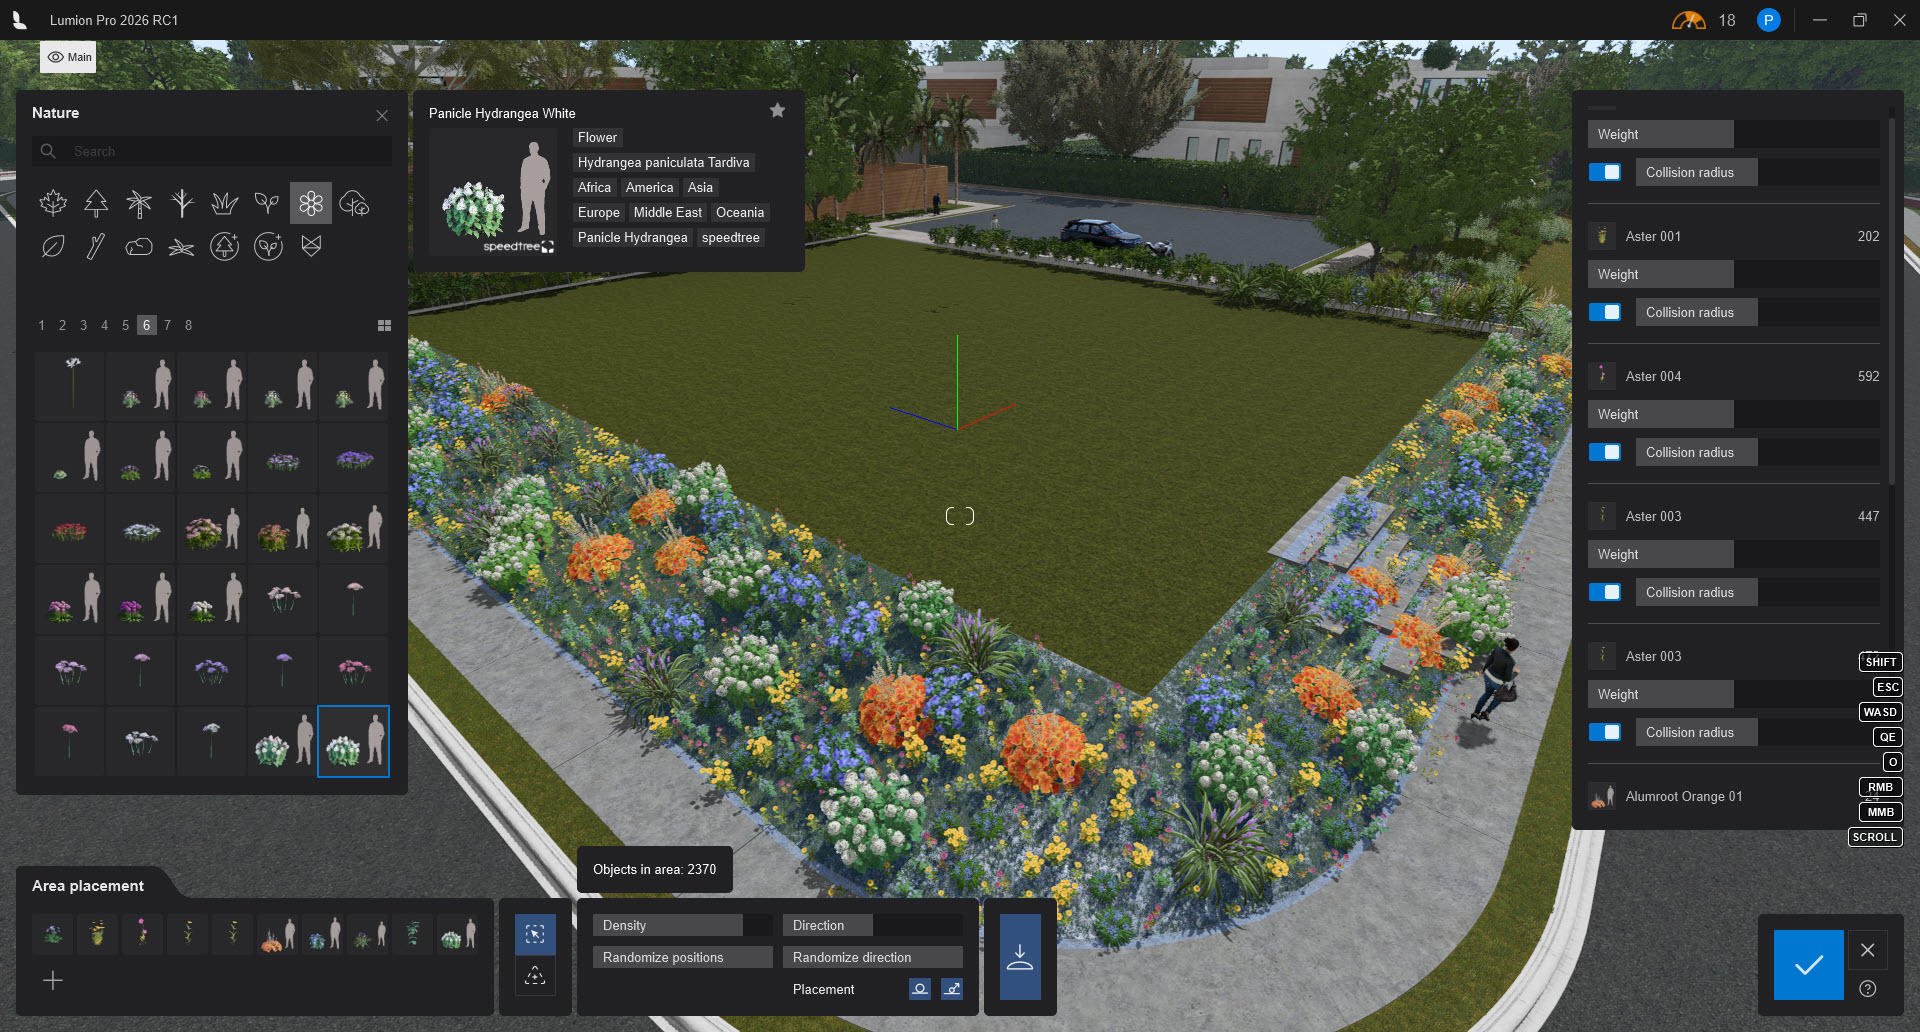
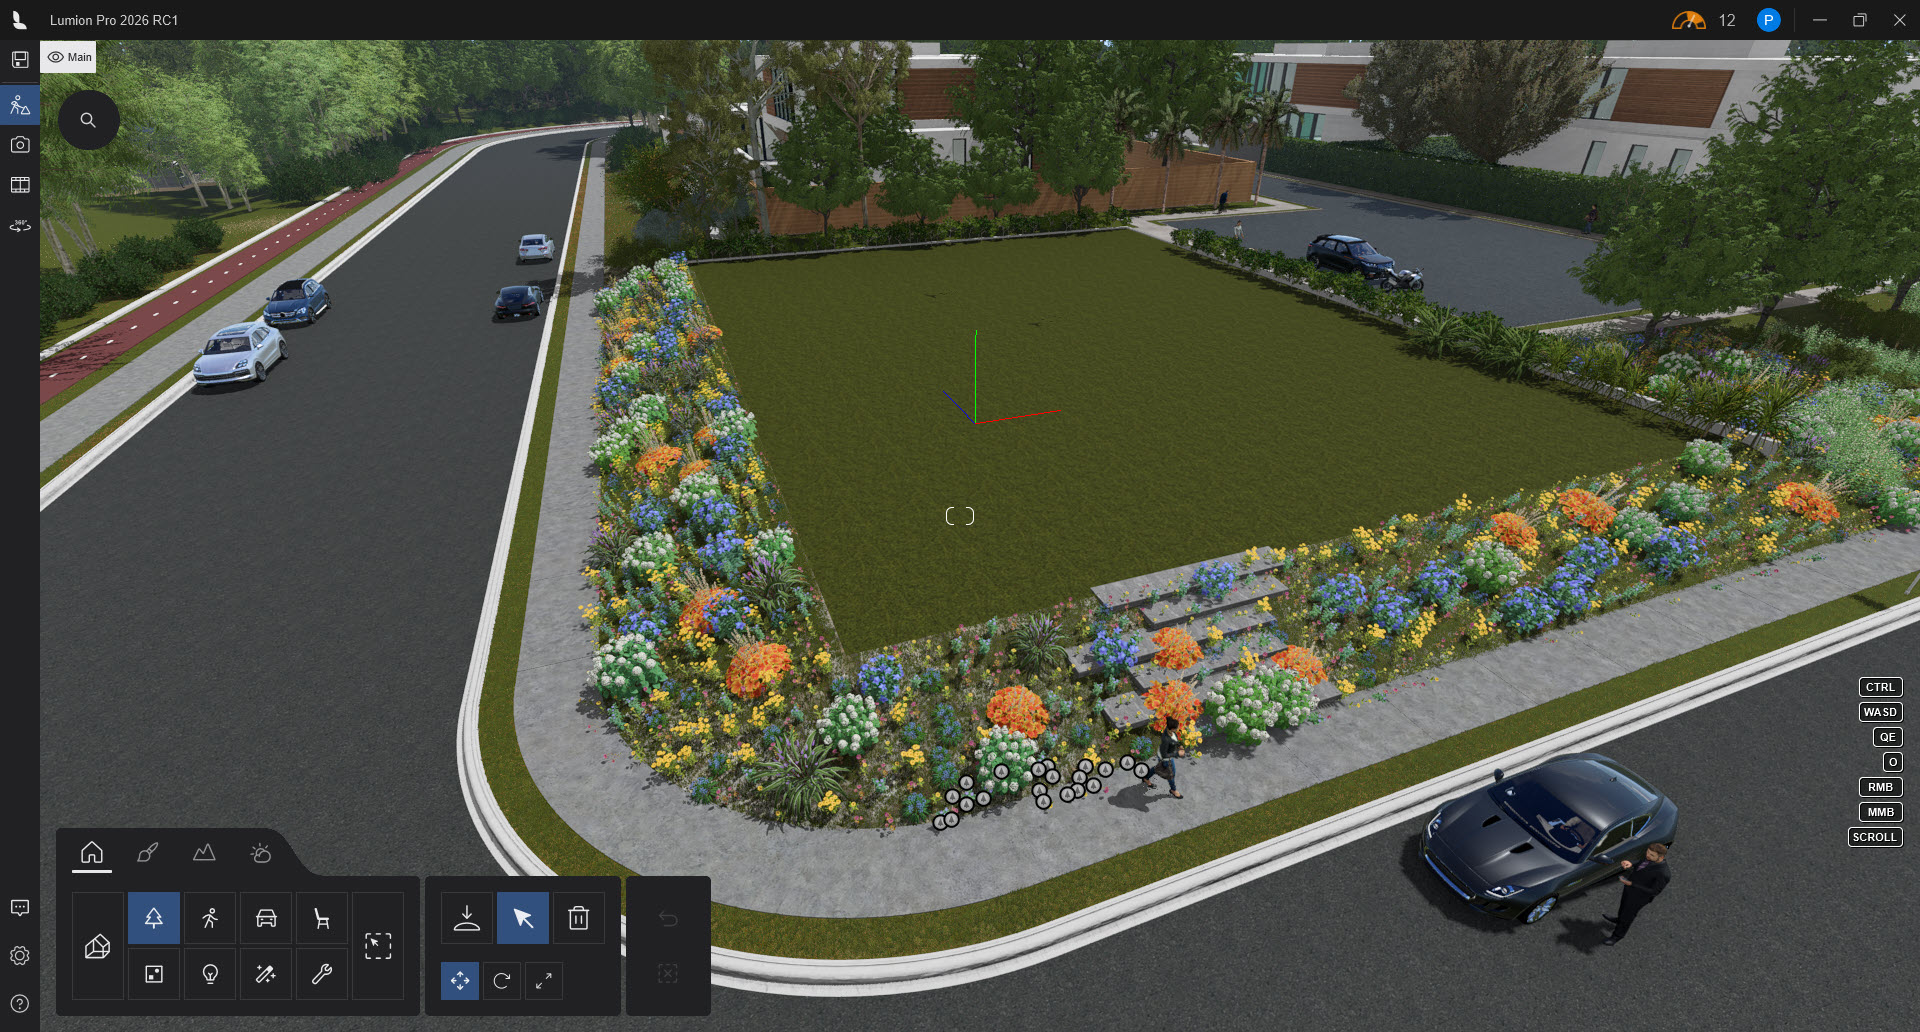
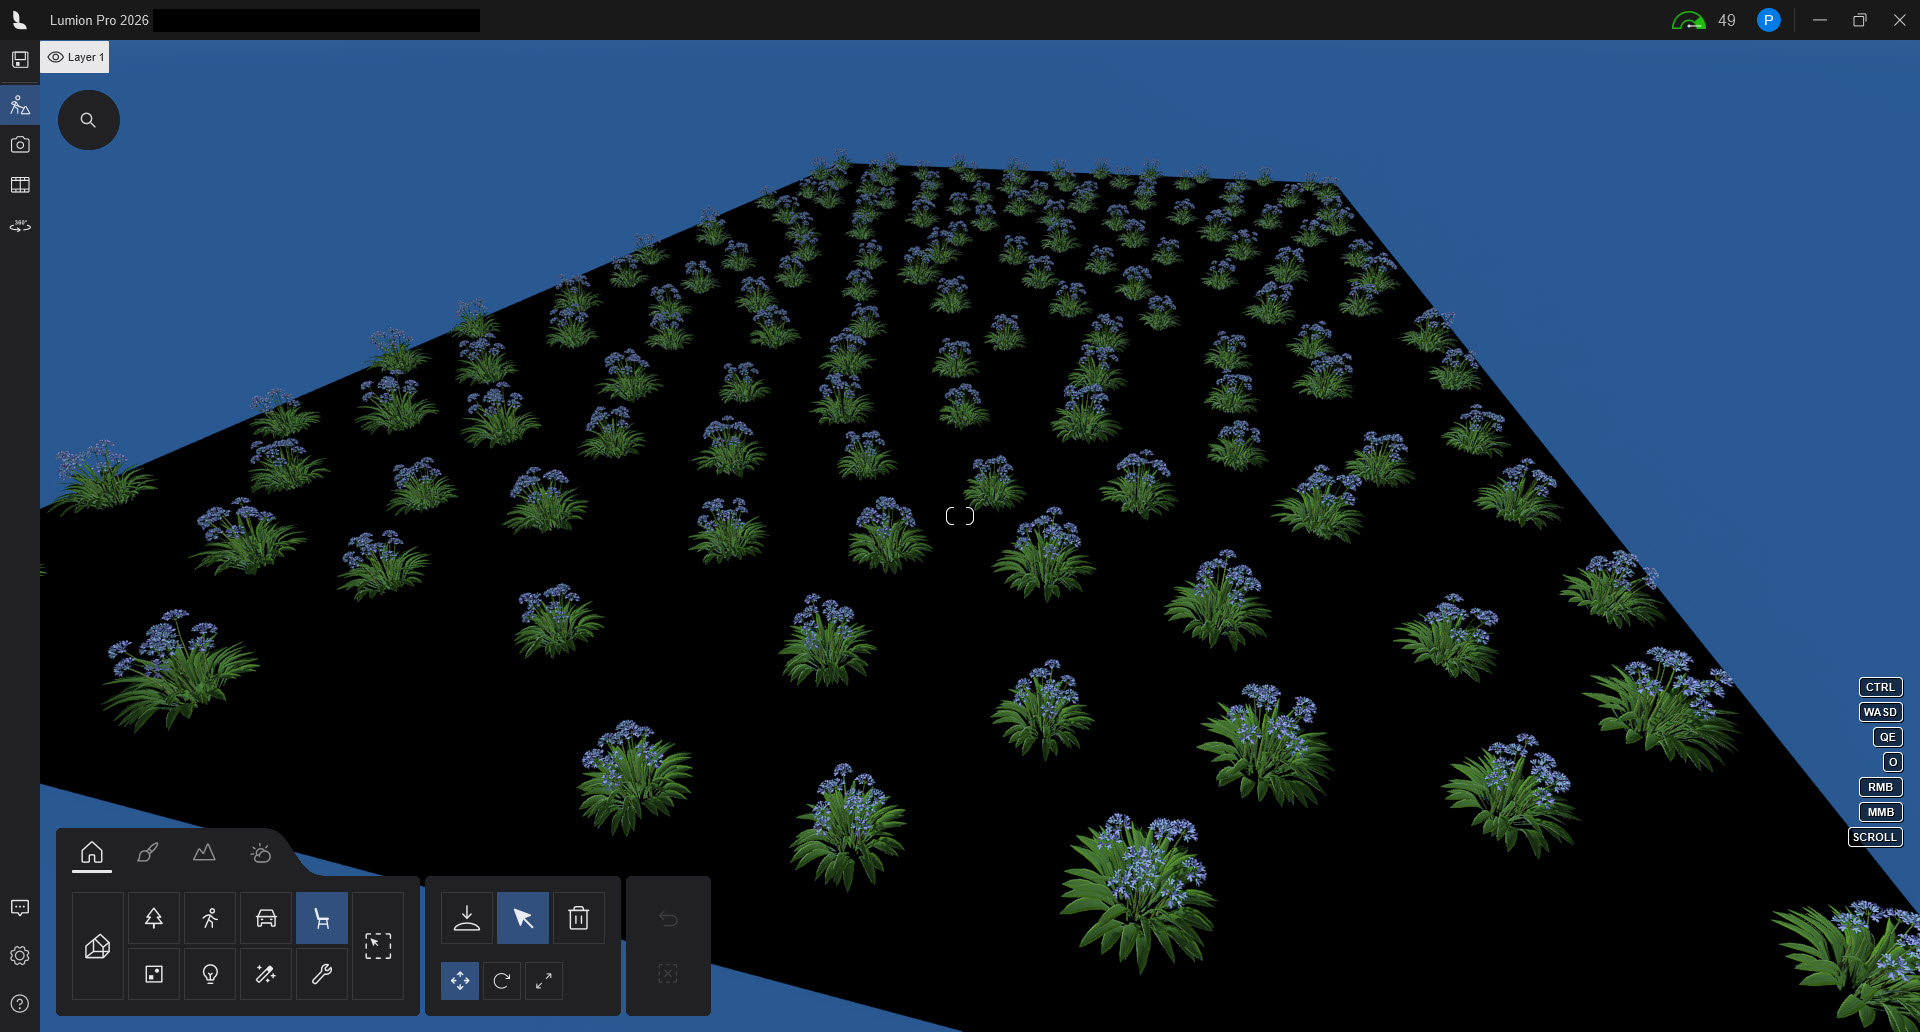
5.2: Area Placement
Create a shape for the Objects to be placed.
The shape is determined by the closed-line area.
 |
|
|
Or control the smoothness - curve of the joining lines. From: straight |
|


The shape can conform to the underlying surfaces or Lumion Landscape:
 |
 |
 |
Fill curved shape, heavy with limited Collision - Object: Grasses
 |
 |
You can only create one boundary/area at a time.
6. Steps to Using Area Placement:
6.1: Click Create Area.
6.2: A default rectangular area is placed in the Scene.
6.3: Add Control Points (nodes) to reshape the area.
6.4: You can change the shape using the Control Points that you are familiar with when using the Line Placement Tool when placing in Build Mode or Mass Move Effect - create a Path in Movie Mode.

| Area Placement - Control Points - Add (RMB) | Line Placement uses the same Control Points (nodes) |
 |
 |
The Control Points (nodes) allow you to:
-
Reshape: Click and drag any of the corner nodes to change the shape of the area.
-
Add Nodes: To create a more complex polygon, hold the Ctrl key and click on the area line to add a new node.
-
Remove Nodes: To simplify the shape, Right-click on an existing node to remove it.
-
Smoothness: Click the Toggle line smoothness button in the interface to switch between sharp, angular corners and rounded, organic edges.
7. Steps to Using Fill (Surface) Placement:
This mode requires less steps than for Area Placement.
7.1: Select a Surface to fill
Note: if you do select a Surface to fill and decide that it's not the surface you want, then you can use the Shift hotkey to reselect some other surface: This hotkey usage is under review and may not be available in a future version.
And click on the other surface you do want for Fill Placement:
Or, use the Cancel button and the Area Placement Tool again, then re-select the surface:
In Detail:
8. Properties and Sliders:
8.1: Common Properties - UI Sliders:

8.1.1: Objects in Area
Gives you a real-time count of the Objects.
The lower limit value is:
The upper limit value is: 5,000. Although this may vary on some factors.
Sliders Affecting the number of Objects for the Placement
8.1.2: Density
The % (ratio) of all Objects for the area.
This is used along with the sliders for each Object in the Area Placement Properties Panel.
8.1.3: Randomize Position
Varying the Positions will also vary how many Objects there will be as they may collide with other Objects.
You might find it useful to first set this slider value to 0. Then do changes to the Density and per Object Weighting and Collision sliders to give a base number you are after.
8.1.4: Direction
As for other Placement Tools, the Heading you chose for all Objects to apply to.
8.1.5: Randomize Direction
As for other Placement Tools, this randomly changes the Heading for an Object that you set using the Direction slider.
8.1.6: Placement
Place on Ground:
As for other Placement Tools, this pushes the Object down to the Landscape surface at a point below where the Object's Pivot Point is located.
Note: This option will not be visible/enabled when you select the Fill Surface Mode.
Conform to Ground:
As for other Placement Tools, this sets the Pitch of the Object to the same as the underlying Slope of the surface, usually a Lumion Landscape Terrain, or imported surface for Landscape.
See also: Placing and Changing Objects, Section: 4. Advanced Object Settings
8.1.7: Generate Scene Items

8.2: Object Properties Panel
 |
Scrollable panels for each Object for the Library Assets Selected |

8.2.1: Weight

How frequently the Object will be in the area, The Weight controls the likelihood (probability) of this Object being placed compared to others in the selection set of Library Objects you have chosen.
A slider from 0 to 100% to 200%. Default is 100%. Meaning if all other Objects also had a weight of 100% (or 1) then they would all appear the same number of times if the other properties such as collision radius (generalized Object size) were the same.
8.2.2: Toggle Collision

8.2.3: Collision Radius
Defines the minimum distance between objects based on the Objects Bounding Box. Y
You can toggle this On or Off or adjust the radius to prevent geometry from intersecting.

This slider/value also enables you to make sure the Objects stays within the designated area.
8.2.4: Toggle Collision
You need to have the Toggle Collision button On for the slider to be active.

Turning the Toggle Collision button to Off means no collision data is calculated and Objects may intersect or even more fully overlay another Object.
8.2.5: Count
A count of the Objects that make up the final count (above the common Properties).

8.2.6: Reset
You can reset all Properties for Weight, Collision, and Collision Radius here:

9. How It Works:
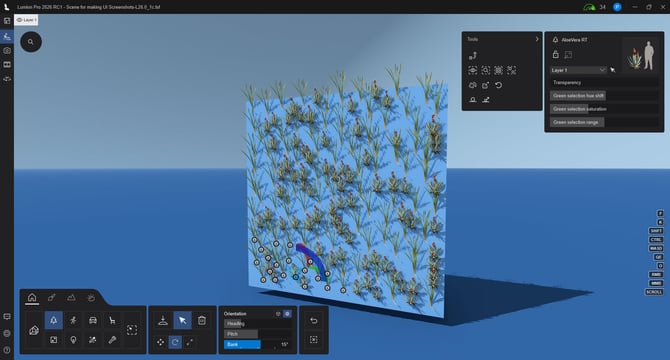
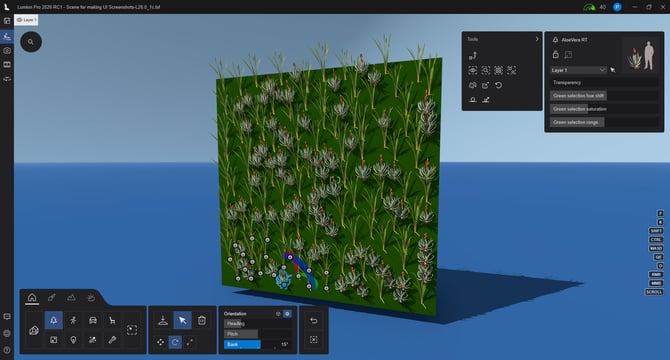
9.1: Visual Placement Map - Shape Nodes
Collision Radius, Direction Indicator, Object of interest highlighted
You see the placement and distribution approximations for you visually by the circles and direction pointers of the Placement Map:
Moving your mouse over the Object Properties Panel interactively indicates/highlights the Object in a lighter blue:
Placements are highlighted anywhere in the interface for this Object:

The Collision Radius is shown by the yellow circle. It might be more or less than the sized area (100%) of the Object:

A smaller Collision Radius allows for more of all Objects to be placed closer.
A larger Collision Radius will add further distance between any two Objects.
The inner light blue indicator shows Direction:
|
The inner light blue indicator shows Direction:
|
When randomized, you visually see the different Direction Indicator:
|


9.2: Basics of how the Object Distribution and Number of Objects is Determined
See also: Section 8.2: Object Properties Panel.
The system places Objects on a grid of cells, which is controlled by the Density slider value. There are distribution factors such as the size of the smallest Objects to be placed, and the Weights. It will
To calculate the probability/likelihood of an Object being placed and for how many times it is going to be placed.
It will randomly select one of the Objects in your collection from the Library to determine the number and position.
9.2.1: Control
You can control the weight and collision per Object (See Section 8.2: Object Properties Panel). Giving you control over how an item is treated, whether it overlaps with other items, and keeps them nicely inside the Area Shape or Surface. Control like this is useful if you’re combining plants such as underbrush and trees.
Some further Notes:
-
The grid will never match up perfectly with your shape.
-
Objects will be culled if they're too close to the border. Every attempt is made in the calculations to ensure Objects do not go over the edge/border.
-
Objects will be culled if they overlap.
- There is a cell size that is based on the smallest item size x a factor for the highest/largest Density, And also the largest cell, for the lowest density.
- The collision system has some limitations, and performance depends on the Density and the difference between your smallest item and the largest.
10. Limitations:
Fill Surface - Overlapping Surfaces:
Area Placement will do a top-down projection to determine what surface is below for calculating and then generating Objects. It cannot place any Objects where the surface overlaps.
This is by design. You would generally not want Objects overflowing into possible internal spaces.
 |
 |
If that was required, then create/model the two surfaces with different material names so each can be specifically selected and used in the Area Placement.
In most cases, different surfaces of the same name can be selected at once (see earlier):
11. FAQ
11.1: How can I get some more screen space - room to see what I am doing with the Area Placement?
You can now close the Library Picker - freeing up space to better see and tweak your items:


11.2: Can you use Area Placement to plant a wall for a Vertical Wall planting?
11.2.1: The Design Requirements for the Area Placement Tool is not intended for this
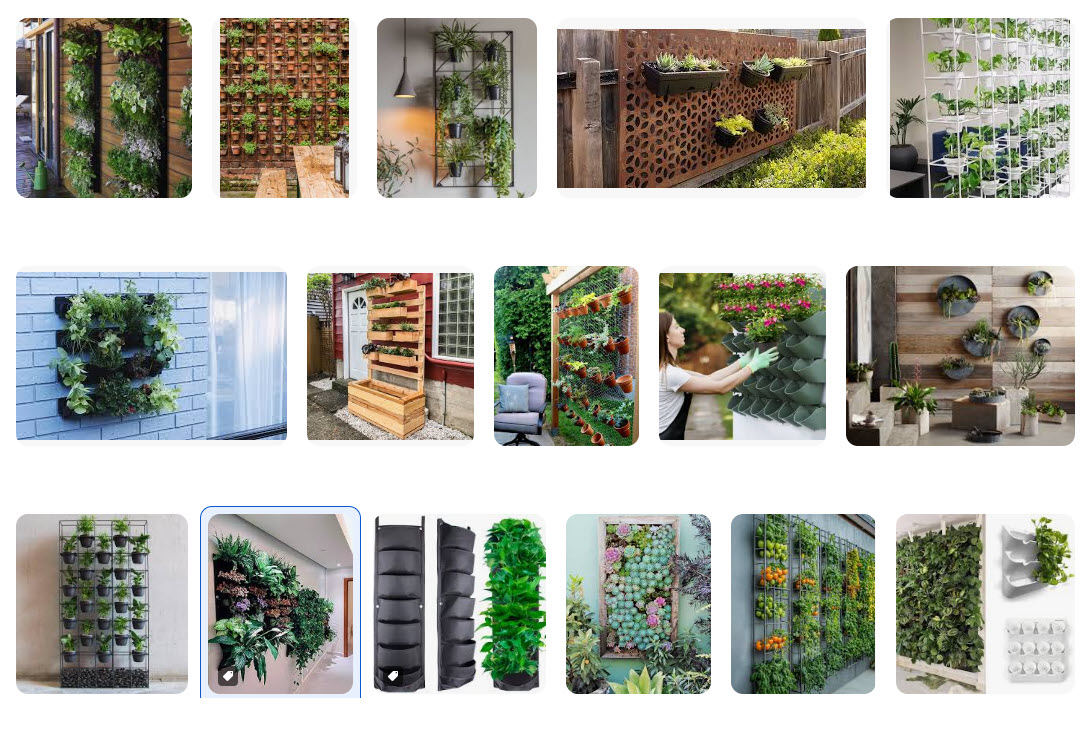
(Credits: image courtesy of Google Images search)
Vertical Wall plantings/vertical surfaces or shapes are not a usage intended. Also, it will ignore any surfaces that are pointing sideways (there's a cutoff).
There is a performance gain using the methodology chosen for the tool. But, that does of course, have some limitations when it comes to somewhat exotic scenarios.
We strongly suggest making use of specific assets designed for use in vertical landscaping design. See also:
-
Website: Tips and Guides: A quick guide to building a green wall in Lumion
11.3: How does it work for an Angled Surface?
You can place Objects on up to near-vertical surfaces. However, the closer to vertical, the more linear spacing there is. In effect, there is no top down surface to look at and apply to.
|
At 85 degrees:
|
At vertical, 90 degrees:
|
| Setting the Randomness to a lower value may change how lined this layout becomes. |


We suggest that where needed, you first do your placements on an horizontal area. Then Group and change the Pitch to vertical. Un-group and alter the Objects again for any variations in vertical alignment wanted.
 |
 |
 |
 |
OTHER LINKS:
- Tips and Guides: 5 essential tools for faster asset placement
In the Guide:
-
Lumion Website: Tips and Guides: 5 essential tools for faster asset placement
Date: Oct 15, 2024
- Arrange assets with ease.
- Paint placement.
- Line placement.
- Cluster placement.
- Gizmo.
- Auto snap.
Inspiration:
Need some inspiration on how to set up your scenes? Follow our Visualization Guides:


