
Menu:
2.1: Quick checklist: “My lights are not visible in the day”.
2.2: Building the Scene with Artificial Lighting - important articles to also see.
2.3: On Emissive Material for Lighting.
2.4: Short guide: making lights visible in daytime Scenes (Lumion 2023+).
3. The Lighting System in Lumion 2023 and newer.
4. Example of Adjusting the Scene for Direct Lighting and then artificial lights.
6. Case Study: Strength of Area Lights and a backlit Emissive Material are not strong enough.
7. For additional information.
1. Background:
Here are some typical questions about the visibility of artificial lighting.
-
Why are my lights not visible in the day?
-
How do you make artificial lighting visible during the daytime?
-
You find that in Build Mode and also Photo/Movie Mode, that the artificial lighting you have placed in your Scene is not visible in the daytime.
-
How do you improve the visibility of artificial lighting during the day?
-
How do you improve the rendering of artificial lighting for day time renders?
-
How do you set the artificial lighting to show during the daytime in Build Mode?
-
I feel like my artificial lights aren't doing anything to the interior scene. And that the Lens Flare Effect isn't giving them a glow either.
2. Summary:
Reducing the direct light levels allows for artificial lights to be seen better. You may also need to increase the artificial lights Brightness. And adjust the Color Correction Effect early on to make it easier to finalize light levels.
2.1: Quick checklist: “My lights are not visible in the day”
Are one or more of these true.
- Is your Scene using a very bright, clear Real Sky with high Brightness / Sun Intensity?
- Is the Sun Height high (midday or close to) with strong Sun Brightness?
- Are you previewing in Build Mode only, or in Photo/Movie Mode with the full Effect Stack?
- Are your lights and emissive materials using sensible Lumen/Nit values, but still invisible?
2.2: Building the Scene with Artificial Lighting - important articles to also see
In this article we go over some basics about how to work with Build Mode when adding in your artificial lights.
2.3: On Emissive Material for Lighting
Emissive materials can cast light (Lumion 2023 +) as well as have a glow. But how do you get the settings right so the light is seen?
- Knowledge Base: How do you Manage the Emissiveness of a Material [for Lighting]
2.4: Short guide: making lights visible in daytime Scenes (Lumion 2023+)
2.4.1: Why this happens
In Lumion 2023+ the lighting system is more realistic: midday Sun and Sky are much brighter than any artificial light or emissive material. If you leave the Sun/Sky at full strength, interior lights, facade uplights and emissive strips will look very weak or invisible, even at higher Lumen/Nit values.
2.4.2: To make your lights more visible in daytime Scenes:
- Lower Sun / Sky / Real Skies Brightness until your artificial lights and Emissive materials start to show clearly. The less sun/sky light there is, the brighter artificial lighting will appear.
- In Photo/Movie Mode, choose an appropriate Style (Day, Interior, Overcast) and a Real Sky that isn’t the brightest clear‑midday option, then adjust its Brightness and Sun Intensity.
- Enable Ray Tracing and follow the interior‑lighting tips from the “How to render realistic interior scenes” and “How to achieve authentic natural lighting in Lumion” guides so natural and artificial light are balanced.
- Add the Lens Flare Effect, and possibly the Bloom Effect to adjust how the camera sees the brighter regions and control the 'glow' that you are after.
2.4.3: Method to fix: rebalance Sun/Sky vs artificial lights
-
Work in Photo/Movie Mode, not just Build Mode.
-
Lower daylight first:
- Use the Sun effect to reduce Sun height and Sun brightness.
- In Real Skies/Sky, reduce Brightness, Background brightness, and Sun intensity.
- From “How to render realistic interior scenes”: the less sun/sky light there is, the brighter artificial lighting will appear.
-
Then adjust your lights:
- Enable Ray Tracing so lights and emissive materials behave physically and cast proper shadows.
- Set spot/omni lights to sensible lumen values and emissive materials to reasonable nits, then increase only as needed once daylight is under control.
>>Result: The Scene still looks like “day”, but artificial lights and Emissives are clearly visible.
2.4.4: Interior and exterior recipes - Lumion Premade Style Effects
-
Daytime interiors with visible fixtures
- Style: Interior or Daytime.
- Softer Real Sky; lower Sun/Sky brightness; then bring up downlights, pendants, and emissive strips.
-
Daytime exteriors with visible facade lighting/signage
- Style: Day/Overcast.
- Reduce Real Skies brightness and Sun intensity; lower Sun height slightly.
- Increase facade uplights and emissive signage only after that.
If emissive strips/signage are invisible in exteriors, lower Sun and Sky Brightness another step.
- Knowledge Base: How do you Manage the Emissiveness of a Material [for Lighting]
2.4.5. Other - Day‑to‑night clips
For Scenes that go from day to night:
- Animate Sun / Sun Study and Real Skies Brightness so daylight gradually decreases.
- Optionally keyframe light intensities and Bloom/Lens flare so lights are readable in the “day” part but don’t explode once it’s fully dark.
2.4.6: Want to Lighten up your Photo or Clip or 360 Panorama?
Color Correction Effect: consider using Gamma with a small adjustment usually between +0.05 and +0.5.
Do this early on, then adjust Exposure if/as needed. Gamma will whiten the whites and let you then set any adjustment to Exposure more easily. As well as the other Color Correction Effect settings and provide a render base for any changes to your artificial light values such as Brightness.
In Detail.
3. The Lighting System in Lumion 2023 and newer:
The Lighting System underwent significant changes to enhance realism in version 2023. With the new engine, artificial lighting competes with the Brightness of the Sky and Sun, just like in real life. This means that artificial lighting may appear less prominent during very bright daylight scenes compared to previous versions.
With Ray Tracing, light behaves in a more natural way, interacting with objects in a scene with greater accuracy, creating more detailed shadows, reflections, and highlights. This results in a more lifelike visual experience, especially when working with complex lighting scenarios.
To elaborate: the new engine has a unified lighting system based on real-world units (Lumens or Nits), which differs from the previous versions (Lumion 12 and older) where lights were controlled by different shaders with 'imaginary' units. As a result, adjustments to the Sky and Sun, as well as the units of measure for artificial light sources were necessary for optimal and true-to-life lighting outcomes. This was also required to integrate Ray Tracing lighting behavior into Lumion.
Sunlight, Spotlights, Omni Lights, Area Lights, HDR skies, and Emissive Materials are now using the same unified system. And cast light and shadows.
Fill Lights are not included for Ray Tracing. They cast no shadows and are only useable for the Rasterization rendering pipeline. If you had used or need to use a Fill Light then replace it with an OmniLight with no IES Profile.
To give you an example of how light is now calibrated:
- The noonday Sun in Lumion measures around 1,600,000,000 Nits and the night sky around 0.001 Nits.
- An Emissive Material has a maximum of 10,000 Nits .
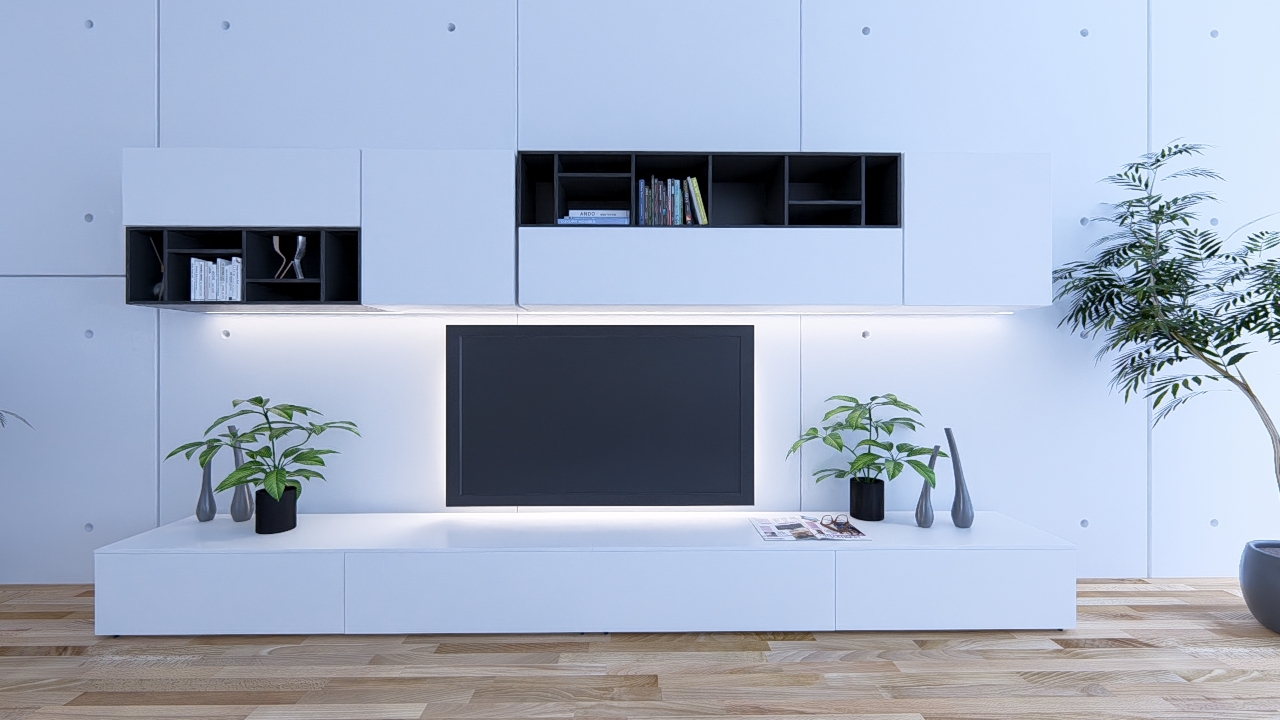
- Area Lights a maximum of 100,000 Nits (the average for a TV is 500-1500 Nits).
- Spotlights and OmniLights have a max of 100,000 Lumens. (1.0 Lumen = 0.29188 Nits, 1 Nit = 3.426 Lumens)
So, If the rest of the world's light is overpowering the light from the artificial lights, then they will appear diminished. If you decrease the Real Skies slider for Sky Brightness and/or Sun Intensity in the Sun Effect, it will enable better visibility of the light from the artificial lights.
(The results you could achieve during daytime in previous Lumion versions weren't really possible in real world situations. This means there will be a difference when comparing 12.x renders and Lumion 2023 renders that are during daytime.)
Shadows also play a critical part of the overall quality of the render. Need guidance to make softer shadows for artificial lights and for direct Sun light?

So, If the rest of the world's light is overpowering the light from the artificial lights, then they will appear diminished. If you decrease the Real Skies or Sky and Clouds Effects slider for Sky Brightness and/or Sun Intensity in the Sun Effect, it will enable better visibility of the light from the artificial lights.
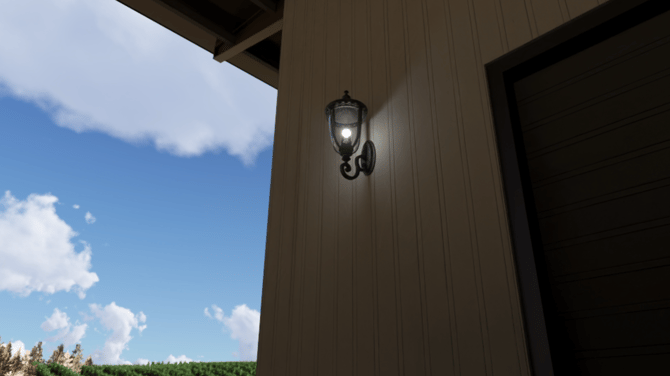
For example, here's a lamp with a 1000 Lumen Omni Light in a very sunny daytime scene.
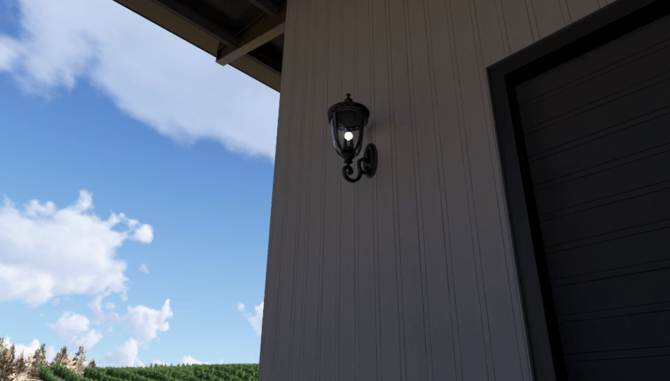
The light is not very visible or glowing because the Skylight and Sunlight Brightness are 'eclipsing' the light from the Omnilight.
Rather than increasing the Omnilight's Brightness, I can decrease the Sun and Sky Brightness to balance the ambient lighting and make the lamp's light more visible:
Lastly, to compensate for a darker Sky (if needed), you can increase the Background Brightness slider in the Sky/Real Skies Effects to increase the Sky Map's Brightness without affecting the overall ambient lighting.
This forum topic may help you understand the levels to set for artificial lights.
- Lumion Community: Lighting in RT???
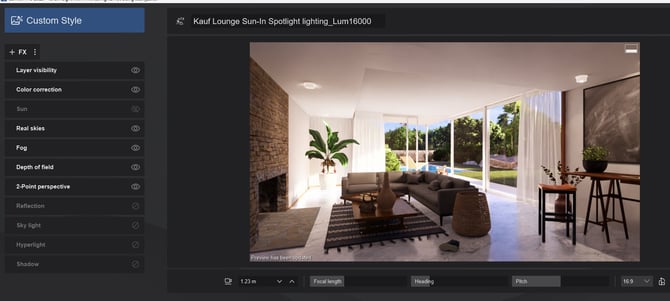
4. Example of Adjusting the Scene for Direct Lighting and then artificial lights:
The same Real Skies Setting of: except for Heading change to show with lots of direct light in the room and no direct light in the room
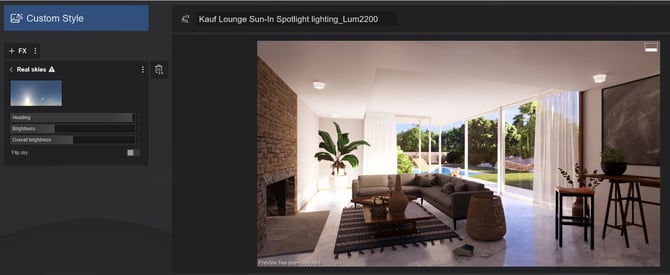
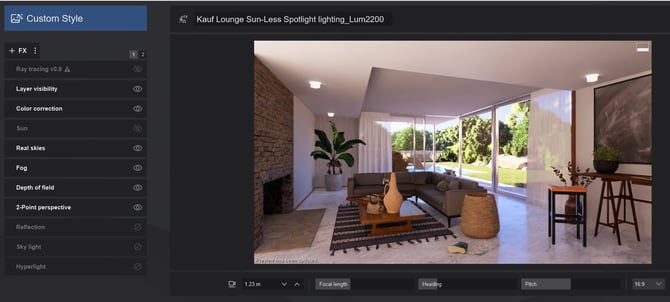
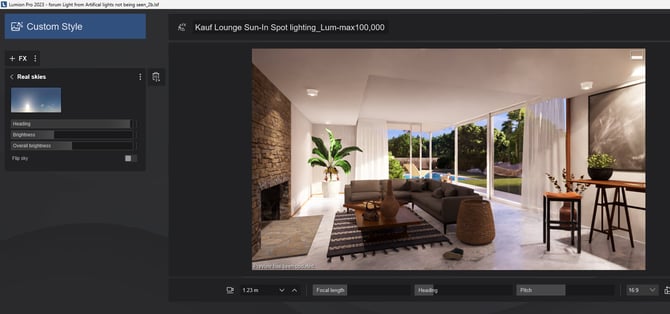
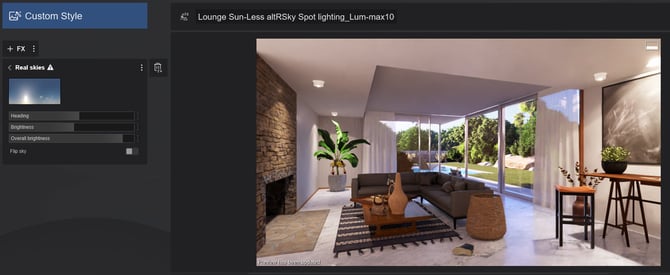
RT - Preview 3: Spotlight light seen more, see right hand side where in darker parts of the room, Lumens 16000 direct Sun in room:
RT - Preview 4: Spotlight light seen some Stronger Lighting and umbra form lights Lumens 16000 No direct Sun in room:
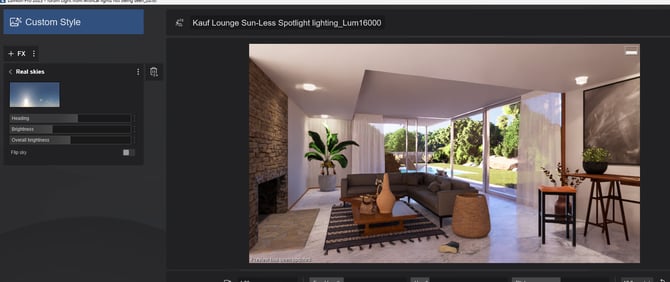
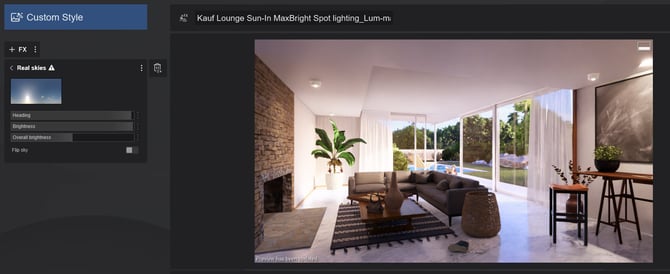
RT - Preview 5: Spotlight lighting light and umbra well seen Lumens max 100.000 direct Sun in room:
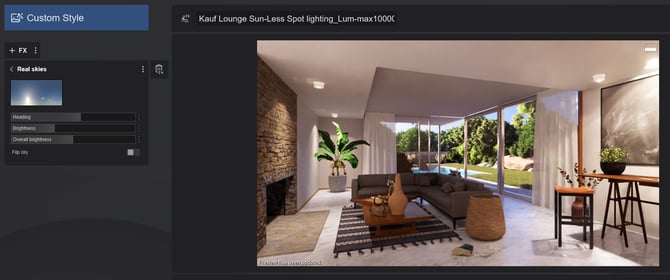
Ray Trace - Preview 6: Spotlight light well seen with umbra Lumens max 100,000. No direct Sun in room, umbra clearly stronger than in above Preview when sun is direct in room.
This one is to test a change and have up to maximum Real Skies Brightness where you might want to overbright the sky.
To bring up the interior of the room lightness.
And for a basic comparison in Rasterization, where Spotlight lighting is clearly visible throughout most settings in Spotlight Brightness or Real Skies Brightness or Heading: Raster - Preview - Spotlight light seen Lumens 2200:
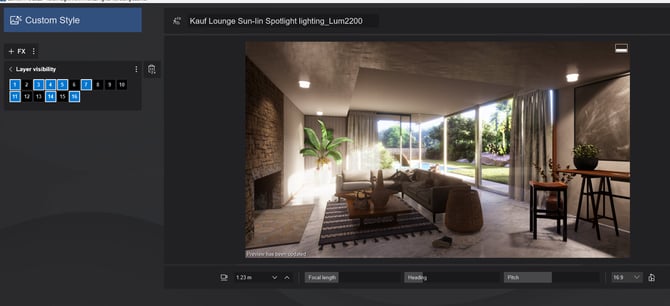
This used the Real Skies Effect settings of lower Brightness as earlier in tests. Maybe it could be higher but it lets you see some blue sky, especially as the area itself here is small. you can always do further adjustments to manage how the Sky looks itself without affecting the lighting by using the Background Brightness.
5. Other Related Questions:
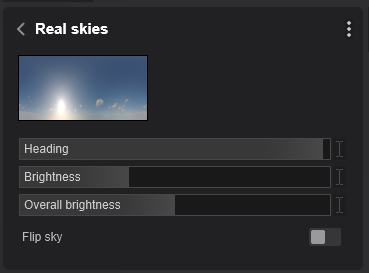
5.1: On the lighting when using the Real Skies Effect
What do the Real Skies Effect sliders for Sky Brightness and Background Brightness do?
-
Sky Brightness: This is the amount of light coming from the sky. Skylight is spread out, softer, and has a cooler tone than sunlight.
-
Background Brightness: This controls how bright the Sky Map is. It does not directly affect the lighting in the scene, only the RealSky map. You would use this to compensate for having to lower/increase the Sky Brightness to control the lighting.
-
Sun Intensity: Controls the intensity of the sunlight, which is a warmer, more direct light that casts sharper shadows compared to skylight.
5.2: How do you brighten the whole interior space without having to increase the artificial lights Brightness?
If you want to brighten up the whole kitchen, I would actually recommend slightly increasing the Exposure slider in the Color Correction Effect.
Exposure refers to the overall brightness of your scene, much like how a camera adjusts the amount of light that reaches the sensor. By increasing the exposure, you're allowing more light to illuminate the scene, making everything appear brighter without altering the individual light sources.
I understand your concern about maintaining accurate lighting according to the manufacturer's specifications. However, using the Exposure slider doesn't compromise this accuracy; it just adjusts how the scene is visually represented, much like adjusting the exposure on a camera. It ensures that your scene is well-lit and visually pleasing without misrepresenting the actual light intensities.
See also the note about setting Gamma, here.
5.3: Is there any way to get a lights to work on an afternoon view, not too dark a sky?
To increase artificial light's visibility on daytime scenes, you need to decrease the Sun/Sky Brightness.
This is explained in the article below, I recommend giving it a read:
- Learning Pathways: Lighting
Sun intensity = 100%
Sky Brightness = 60%
Sun Intensity = 5%
Sky Brightness = 35%
6. Case Study: Strength of Area Lights and a backlit Emissive Material are not strong enough
6.1: Customers Problem with the Scene
If I try to tweak the lighting to make the backlit emissive material, it looks like a night scene. I am facing the same problem with area lights.
6.2: Assessment:
Certainly one key aspect about the new lighting in Lumion 2023 and newer, is to do with the strength of direct sun light compared to that of any of the artificial or Emissive lights.
From your renders the Emissive and Area light cast is very weak. In fact for the Emissive it hardly appears in the front facing render and I can only see part of the light at the some corners for the angled render.
And, yes, in order for the lights to appear stronger it is quite possible that the total direct lighting needed is almost at night time. So clearly not workable.
However there are a few things that you can do to manage the lighting and what is finally rendered.
6.3: Solution:- Key changes needed
-
Direct and/or Indirect/Ambient Lighting > Adjust the level of lighting for the Real Skies Effect and/or Sun Effect.
-
And adjust any artificial light sources - usually upward by increasing the Brightness.
6.4: Number of Light Sources
Avoid having many light sources all at once as that can produce undesired results.
The more lights are enabled/visible the noisier the output will be.
This is because the rays that are shot from the camera are randomly assigned to each light source. Fewer light sources mean that you get more rays per light, which might result in a better and less noisy image.
Recommend:- reducing the number of (extra) Area Lights and changing the brightness of Emissive materials.
6.5: Manage the Real Skies Settings for Lighting
6.5.1: Choice of Sky
Which sky you choose will significantly affect the amount of indirect light and from where it is strongest.
Choosing one with more cloud such as the Cloudy Real Skies will have a big impact on how much artificial light is seen. For example: In the Example Project - Villa Cabrera a Line Light at 500 Nits roughly 1700 Lumens has been added.
This room has a single main source of light from the large lounge/pool ranch windows with further light from the spaces at the back of the camera. Every space will be different in terms of how much direct light there is.
With the Clear 2 sky - bright sunny almost clear sky, the Line Light is hardly visible:
6.5.2: Sky Brightness
Where you have a sky type that you need to adjust the lighting for the desired level of artificial light, then you can adjust the Sky Brightness. You would do that when the camera does take in a view including the sky.
Control the light, then match the look to the level of brightness you originally wanted.
Note: that only the Sky/Real Sky - Sky Brightness settings affects the lighting (total number of Nits emitted by the Sky) in the scene - this is what impacts the visibility of artificial lighting.
The Background Brightness slider only affects the look of the Sky.
So you might need to adjust both sliders to get the desired result.
If you lower the Sky Brightness in order to make artificial lights more visible, that will also make the Sky look darker, but you can increase the Background Brightness slider to compensate for the look of that (and vice-versa).
6.5.3: Lighting values
Compared to previous versions, the lights are much less visible during the day in Lumion 2023 and newer. This is because artificial lighting, just as in real life, cannot compete with the Sun's Brightness, by orders of magnitude.
-
The noonday Sun in Lumion measures around 1,600,000,000Nits and the night sky around 0.001Nits.
-
Emissiveness has a maximum of 10,000Nits and Area Lights a maximum of 100,000Nits (the average for a TV is 500-1500Nits).
-
Spotlights and OmniLights have a max of 100,000Lumens. (1.0Lumen = 0.29Nits).
-
The Falloff value has also been removed for all Lights since it's not a real-world property - However, you can still use it with the Volumetric Lights Effect.
6.5.4: Final Adjustment: - Exposure for the Camera - Color Correction Effect
Managing Exposure, as with any camera, will help control the allowable light level ranges.
Always start with a Color Correction Effect that is at Defaults. If not, then change or delete and add back in. This gives you the base starting level to then tweak for the final look. (Use a preset LUT once you are happy with the settings here, so that the conditions of your Scene first determine how the values will be set
Finally if needed, if the amount of light cast for the Line Light is still under what you are really wanting, then choose to increase the Brightness above the standard values for realistic lighting values for your spaces.
-
Knowledge Base: Reference: Artificial Lighting values
-
Lumion Community: Lighting in RT???
Note: these were done with 16 Samples and 3 Bounces: increase the Samples for improved (but more softened) Emissive and artificial light pixels in the render. (click to view 1920x1080 render)
At 96 Samples and 6 Bounces:
Return to the Summary for a simple overview of steps required.
7. For additional information:
-
Knowledge Base: Transitions: How to Set up Lumion 2023 for Good renders
-
Knowledge Base: Reference: Artificial Lighting values
Please see section 2.8 in this article for a more in-depth explanation and solution:
- Knowledge Base: Transitions: Why does my Project look different in Lumion 2023 compared to previous versions
-
Learning Pathways: Lighting
-
Video Tutorial: Lumion 2023: How to achieve realistic interior lighting with ray tracing in Lumion 2023
-
Knowledge Base (External Video Tutorial): Lumion 2023: Interior lighting tips ft. Architecture Inspirations
-
Lumion Community: Lights at Max Lum not Visible in Build, Preview, or Render