
Menu:
3. On the level of Artificial Light Sources and Natural/Direct Light.
4. Emissive as a Light Source.
5. How to make an Emissive Material clearly visible and glowing.
6. Examples of the behavior of the Emissive Property for Materials.
7. How do you make an Emissive (surface) Glow?
8. For Further Tips and Guides.
1. Summary:
The Emissive property in a material is now capable of casting light, not only adding brightness for the surface. It can also be given a glow. (Lumion Pro 2023 and newer).
Determine the values for artificial lights for the given lighting from the Sun and Sky. With more sunlight, there is an increase needed in the artificial lighting values, balanced with using the Sky Brightness.
The overall and quick way is to use the Sky Brightness.
Lowering the Sky Brightness will make for a darker-looking sky. Adjust the sky look by increasing the Background Brightness to the level where the sky looks much the same as it was before lowering the Sky Brightness.
2. Introduction:
Cases and Questions:
-
How do you get the settings right so the light is seen for an emissive material in Lumion 2023 and newer?
-
I have a huge problem making a material emissive and becoming a light source.
-
The light in the attached image does not appear to be glowing even when the material light setting is set to maximum. Specifically, I'm troubled by the fact that I cannot see the effect of the light on the exterior wall. (Build Mode or rendered).
-
The glow effect for self-illuminating materials is not displayed. Is this a standard feature in Lumion? Or is there a setting to enable these effects?
-
The user reports that even when setting the emission strength of a material to maximum in Lumion (sic 2024), the glow appears weak and does not look like it is emitting light.
-
How do you create lighting for curved or non-linear light emitters?
Why You Might Think Emissive “Doesn’t Work”
Because Emissive light is:
-
Subtle.
-
Physically accurate.
-
Easily washed out by bright skies.
-
Dependent on exposure and bloom.
-
Only visible within a small radius.
So even though it is a real light source, it often looks like it isn’t doing anything unless the scene is dark and the camera is tuned correctly.
3. On the level of Artificial Light Sources and Natural/Direct Light:
The Lighting System in Lumion (2023+)
In Lumion 2023 and newer, an Emissive Surface for a Material uses a physically based light system measured in Nits, which represents the brightness of the surface. Because these units reflect real-world values, Emissive Materials often appear "dim" or invisible against the sun's light, which is millions of times brighter.
One of the key differences in the changes from Lumion 2023 and newer is the new unified lighting system is the impact of Sunlight and the Real Skies effect on artificial lighting. Artificial lights appear less visible (if at all in some cases) when the scene has strong natural light. If the sun or sky brightness is too high, artificial lights and emissive materials may seem much weaker.
See sections 2.4: Short guide: making lights visible in daytime Scenes (Lumion 2023+): > 2.4.1: Why this happens. And 3. The Lighting System in Lumion 2023 and newer in:
-
Knowledge Base: How do you improve the rendering of artificial lighting for day time renders?
-
Knowledge Base: How do you set the artificial lighting to show during the daytime in Build Mode
In other words, there is a requirement to determine the values for artificial lights for the given lighting from Sun and Sky. With more sunlight, there is an increase needed in the artificial lighting values, balanced with using the Sky Brightness. The overall and quick way is to use the Sky Brightness.
Lowering the Sky Brightness will make for a darker-looking sky. So if the level of lighting works to improve the visibility of the artificial lights, then also adjust the sky look by increasing the Background Brightness to the level where the sky looks much the same as it was before, lowering the Sky Brightness.
The strength of an Emissive material goes up to a pre-defined maximum level. However the actual visibility of it depends on the Scenes lighting conditions. Especially direct light (Sun) and indirect ambient light (Sky and Clouds).
You can affect how strong/intense the light is seen in the renders by:
-
Decreasing the Sky Brightness value.
-
Increasing the Emissive value, so long as it does not over bright (its own surface) for the space it is in..
So lowering Sky Brightness in the Real Skies Effect (or Sky and Clouds Effect) and some increase in the Emissive value will give stronger results for the light cast.
If you need more glow, use the Lens Flare Effect for the camera to change from the defaults.
4. Emissive as a Light Source:
In Lumion 2023 and newer, an Emissive Material is a real light source, casting light (and shadow). Its illumination is measured in Nits (up to 10,000).
4.1: The way Emissive materials cast light is
- Soft
- Short‑range
- Surface‑based
- Not as strong as Spot/Omni/Area Lights
They are physically accurate, but not powerful. For stronger illumination, combine emissive materials with Spotlights, Omni Lights, or Area/Line Lights.
The brightness for the surface can result in (expected) Glow when combined with the Lens Flare Effect or Bloom Effect, and Ray Tracing.
See this sub-article for an example of the light emitted and also comparing that to other artificial lights:
4.2: What the 10,000‑Nit Maximum Means
- Emissive max = 10,000 Nits, 1 Nit ≈ 3.426 Lumens, so 10,000 Nits ≈ 34,260 Lumens.
- Nits measure surface brightness, not projected light.
A 10,000 Nit emissive surface is extremely bright, like:
- LED signage → 5,000–8,000 Nits.
- HDR displays → 1,000–4,000 Nits.
- Neon tubes / High‑end signage → 10,000 Nits.
- Backlit panels
But it does not behave like a 34,000 Lumen spotlight. Why?
Because Emissive light is diffuse, non‑directional, and falls off extremely quickly.
t does not mean the Emissive Material casts 34,000 Lumens of actual light into the Scene. This is why Emissive Materials look bright but don’t strongly illuminate walls or floors.
4.3: Emissive casts real light (Lumion 2023+) …but only
- At very close range.
- With soft shadows.
- With limited intensity.
- With Ray Tracing giving the most visible effect.
Tip: Do not expect Emissive to replace Spotlights/Omnis/Area Lights. It will never:
- Light a whole room.
- Produce strong shadows.
- Project light over distance.
- Compete with the sun.
- Replace artificial lights for interiors.
4.4: Seeing the Emissive Surface Brightness and Glow in Build Mode - change the Suns Height
An obvious and quick way to see the glow from an Emissive material is to simply lower the Height of the Sun. Note that the Default Lens Flare that applies in Build Mode might be different from any Lens Flare Effect settings you have in your Photos or Clips.
This suggestion is more of a temporary Build Mode setting change. Its easy to increase the Suns Height at any time when you do not want to work on Build Mode tasks in low sun light.
Emissive Example for Build Mode - no Light or Glow Before any Emissive applied:

After Maximum Emissive (10,000) it is still not that noticeable:

For Build Mode: lower the Suns Height:

Also See: (Important):
Sometimes in Build Mode the artificial lights do not show strongly enough on screen for you, so how can you fix that.
Changes to the Lighting System required for implementing Ray Trace rendering:
Also we have supporting articles for renders and creating a Scene.
5. How to make an Emissive Material clearly visible and glowing:
5.1: Adjust Material Settings
5.1.1: Emissive Slider: Material Editor, > Settings tab. > Emissive Property
Increase the Emissive slider higher or to its maximum of 10,000 Nits for the most intense glow (required: in combination with Lens Flare Effect).
5.1.2: Colorization
Brighten the material's color or add colorization in the material settings. A pure white or highly saturated color will emit more light than a darker one.
5.1.3: Emissive Map
Use an Alpha Channel (emissive mask) on your texture to control exactly which parts of a surface glow.
5.2: Balance Scene Lighting
5.2.1: Lower Ambient Light
Reduce Sun Brightness and Sky Brightness (in the Real Skies or Sun effect). Artificial lights and Emissive surfaces are most visible in darker, dusk, or night-time scenes because they no longer get washed out under daylight from the sun.
5.2.2: Exposure: (Color Correction Effect)
If the scene is dark but you want it to look bright while still seeing the Emissive glow, use the Exposure effect to brighten the overall image after you have lowered the sun and sky values.
5.3: Use Supporting Effects
5.3.1: Ray Tracing
Add the Ray Tracing effect in Photo or Movie mode. This allows emissive surfaces to cast realistic light and shadows onto surrounding objects.
5.3.2: Bloom:- to create a visual "glow" or halo around the light source
Recommended, use the Lens Flare Effect: Set the amount of Bloom you want.
Slightly increase the Master Brightness within the Lens Flare Effect to simulate the way a real camera lens reacts to bright light sources. Reduce the Isolate Bright Pixels slider to reduce the camera lens sensitivity to bright or over-bright pixels so that get included in the glow.
Alternatively or in combination, you can use the Bloom Effect.
5.4: Others to check
5.4.1: Editor Quality
Ensure your Editor Quality is set to 3 or 4 stars (press F3 or F4); otherwise, the glow might not be visible in Build Mode or the Preview window for Photo and Movie Modes.
5.4.2: Surface Area
Larger Emissive surfaces emit more total light than smaller ones. If a small strip isn't casting enough light, you may need to supplement it with an additional artificial light such as an OmniLight or Area Light (see below).
5.5: Why We Suggest Adding Other Artificial Lights
Even though emissive is a real light source, you might want your Scene to be lit to levels above that provided by the Emissive Material as a source.
We suggest, but with care (adding further light sources might increase the demand for a lot more Ray Trace Samples and/or cause other artifacts/blotchy/patchy renders. See Important Notes here):
Use emissive for the glow, and add a small Omni/Area Light for the illumination. This gives you:
-
The correct visual glow.
-
Realistic lighting on walls/floors.
-
Control over brightness and shadows.
-
Consistent results in all lighting conditions.
5.6: If your emissive material looks dim, also check these things, they are sometimes overlooked
- Color Correction Effect > Exposure: +0.2 to +0.6
- Bloom: 0.3–0.6. (Bloom Effect or using the Lens Flare Effect - main camera lens control of other lens properties)
- Vignette: Off (it darkens edges and kills emissive glow, if using that Effect)
-
In Real Skies: (as elsewhere)
- Reduce Brightness a little.
- Increase the Background Brightness so that it retains the same look of a brighter sky as you were wanting earlier on.
- Increase Sun Brightness only if needed
- Avoid overly bright HDR skies — they wash out emissive materials
-
For the Material:
-
Color: Pure white or saturated color
-
6. Example of the behavior of the Emissive Property for Materials:
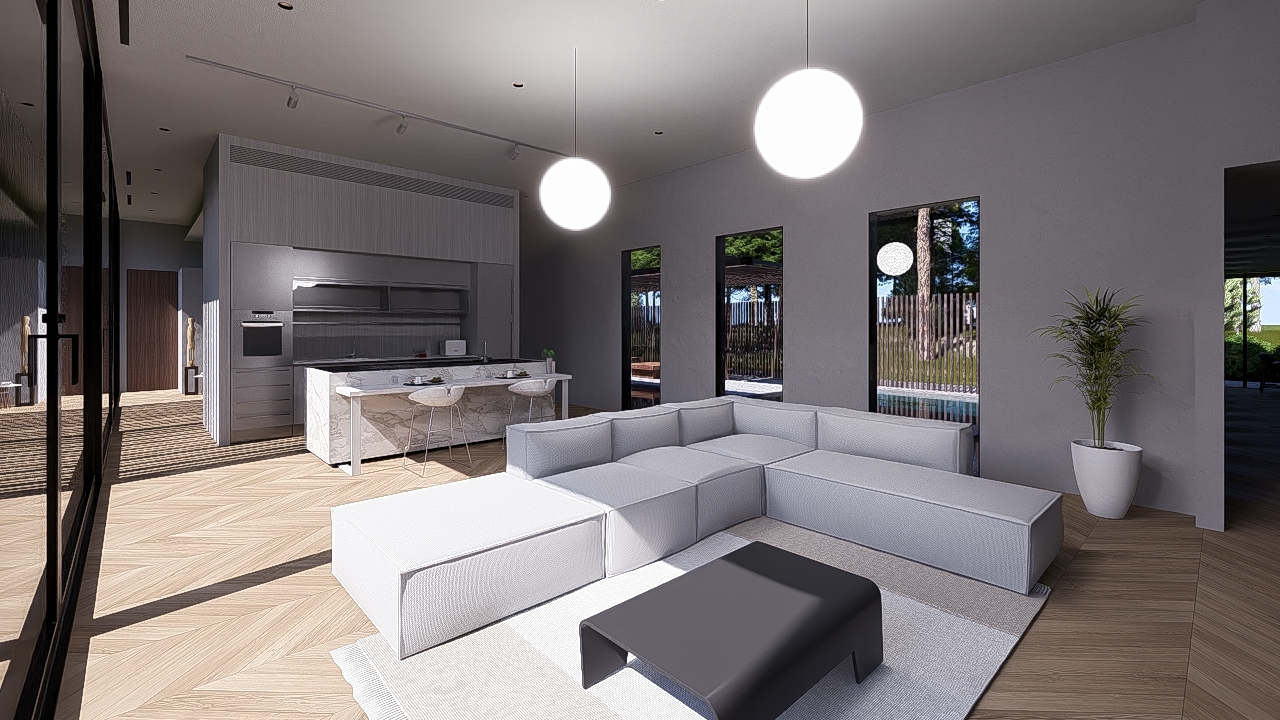
Here's an example of scene lighting differences that affect how much light is seen as emitted for the Emissive: Material. In reality, we would usually add an OmniLight for each globe lamp, and then also look to including some Emissiveness for the material.
Ray Tracing Effect: Samples 32, Bounces 5.
Example Project - House of Time: lamps with no Emissive value:

No light cast or glow:

Emissive added to 5000 Nits. HQPreview, ceiling is lit:
Lowered Sun Intensity, lowered Real Skies Sky Brightness, adjusted Background to keep same brighter look of the sky, Sun Intensity is determined by the Sun Effect higher in order than Real Skies effect. Lens Flare Effect - off - using default for renders.
Adding the Lens Flare to now control the glow, tweaked the Bloom:
 |
 |
 |


7. How do you make an Emissive (surface) Glow?
7.1: Balancing the lighting to get the glow
You need to reduce the overall lighting for the Emissive material to be seen as glowing (also depending on the value you have used for Emissive).
In Build Mode that would clearly be the Sun and time of day.
Its sometimes best though to adjust the Emissive Material and lighting in your Photos/Clips and use Build With Effects to see the closest approximate result.
Adjusting lighting will usually require reducing the Sky Brightness in the Real Skies Effect (if using).
There is some more overall guidance in our article on the material property for the Standard Material. See section 9.1: Emissive Strength:
7.2: Control the Glow via the Lens Flare Effect
7.2.1: For Rasterization
Nominal, glow from the camera lens via Default Lens Flare:

Glow when using the Lens Flare Effect: affected by: Bloom, Master Brightness, Isolate Bright Pixels.

7.2.2: Ray Tracing
Ray Tracing -Samples 32, Bounces 5:

Strong Glow when using the Lens Flare Effect: affected by: Bloom, Master Brightness, Isolate Bright Pixels.

Same Lens Flare Effect settings as for Rasterization:
Important:
Make sure to not over-brighten the Scene with artificial lights, such as the Emissive Material.
Too much added light - too many additional lights can cause other issues such as artifacts/blotches.
8. For Further Tips and Guides:
- Lumion website (Tips and Guides): How to render realistic interior scenes [Oct 11, 2023] (talks about Emissive Materials)
- Lumion website (Tips and Guides): Guide to visualizing interior designs [Oct 09, 2023]
- Lumion website (Tips and Guides): Guide to visualizing exterior designs [Oct 09, 2023]
See Also:
- Knowledge Base [Learning Pathways]: Lighting
See also: section 9. Settings Tab (Extended Properties), 9.1: Emissive Strength: in
Usually, you can also keep the artificial lights at the values they need to be for the space, following this guide:-
Knowledge Base: Reference: Artificial Lighting values
This forum thread covers these changes, although now looking at Lumion 2023 the management of light values is still the same:
-
-
Lumion Community: 2023 Emissive Material setting.
-
Other Supporting Articles:
-
Knowledge Base (Video Tutorial): Lumion 2023: Interior lighting tips ft. Architecture Inspirations
And these two article are aimed to help move your understanding forward to using Lumion 2023 and newer.
- Knowledge Base: Transitions: Why does my Project look different in Lumion 2023 and newer compared to previous versions?
- Knowledge Base: Transitions: How to Set up Lumion 2023 for Good renders