---
title: How do you use Lumion Cloud Ai Enhancer?
description: Turn baseline renders into polished visuals with Lumion Cloud AI Enhancer. Refine lighting, materials, atmosphere, and detail in minutes.
---
Solutions
[Architectural design All you need to bring your residential, commercial or institutional designs to life](https://lumion.com/product/architectural-design) [Landscape architecture Beautiful terrains and fine-detailed nature for any climate or season](https://lumion.com/product/landscape-architecture)
[Interior design Realistic light, high-quality textures, and an extensive asset library](https://lumion.com/product/interior-design) [Students and Faculties Lumion is free for students, educators, and faculties around the world](https://lumion.com/product/educational-licenses)
[SketchUp](https://lumion.com/compatibility/sketchup-rendering) [Revit](https://lumion.com/compatibility/revit-rendering) [ArchiCAD](https://lumion.com/compatibility/archicad-rendering) [Rhino](https://lumion.com/compatibility/rhino-rendering) [Autocad](https://lumion.com/compatibility/autocad-rendering) [See more](https://lumion.com/compatibility/)
Product
[Discover Axogram New Live architectural diagramming](https://lumion.com/product/axogram) [Lumion Cloud Where design meets collaboration](https://lumion.com/product/lumion-cloud)
[Lumion Pro Advanced visualization solution](https://lumion.com/product/lumion-pro) [Discover AI tools New AI built for architectural work](https://lumion.com/product/ai)
[Lumion Pro 2026.1 is out now! 🚀](https://lumion.com/product/latest-version-pro) [Compatibility](https://lumion.com/compatibility/) [System Requirements](https://lumion.com/product/system-requirements) [Roadmap](https://lumion.com/product/roadmap)
[Pricing](https://lumion.com/product/buy) Resources
[Made with Lumion Get inspired by the stories behind the designs](https://lumion.com/made-with-lumion)
[Tips & Guides Make the most out of Lumion with helpful guides and tutorials](https://lumion.com/tips-guides)
[Knowledge base](https://support.lumion.com/knowledge-base?hsLang=en-us) [Community](https://community.lumion.com/index.php) [Downloads](https://support.lumion.com/downloads?hsLang=en-us)
About
[Who we are Learn about our story and mission](https://lumion.com/about) [Careers - We're hiring Let's build the future of architectural visualization](https://lumion.com/about/careers)
[News Discover the latest product news and more](https://lumion.com/news)
[Find your local reseller](https://lumion.com/about/find-reseller) [Contact us](https://lumion.com/about/contact)
[](http://lumion.com)
[My Account](https://account.lumion.com)
Solutions
[Architectural design](https://lumion.com/product/architectural-design) [Interior design](https://lumion.com/product/interior-design) [Landscape architecture](https://lumion.com/product/landscape-architecture) [Students and Faculties](https://lumion.com/product/educational-licenses)
---
[SketchUp](https://lumion.com/compatibility/sketchup-rendering) [Revit](https://lumion.com/compatibility/revit-rendering) [ArchiCAD](https://lumion.com/compatibility/archicad-rendering) [Rhino](https://lumion.com/compatibility/rhino-rendering) [Autocad](https://lumion.com/compatibility/autocad-rendering) [See more](https://lumion.com/compatibility/)
Product
[Axogram New](https://lumion.com/product/axogram) [Lumion Cloud](https://lumion.com/product/lumion-cloud) [Lumion Pro](https://lumion.com/product/lumion-pro) [Discover AI tools New](https://lumion.com/product/ai)
---
[Lumion Pro 2026.1 is out now! 🚀](https://lumion.com/product/latest-version-pro) [Compatibility](https://lumion.com/compatibility/) [System Requirements](https://lumion.com/product/system-requirements) [Roadmap](https://lumion.com/product/roadmap)
[Pricing](https://lumion.com/product/buy) Resources
[Made with Lumion](https://lumion.com/made-with-lumion) [Tips & Guides](https://lumion.com/tips-guides)
---
[Knowledge base](https://support.lumion.com/knowledge-base?hsLang=en-us) [Community](https://community.lumion.com/index.php) [Downloads](https://support.lumion.com/downloads?hsLang=en-us)
About
[Who we are](https://lumion.com/about) [Careers - We're hiring](https://lumion.com/about/careers) [News](https://lumion.com/news)
---
[Find your local reseller](https://lumion.com/about/find-reseller) [Contact us](https://lumion.com/about/contact)
[My Account](https://account.lumion.com)
[Submit a request](https://support.lumion.com/hc/en-us/requests/new?hsLang=en-us)
Lumion Knowledge Base: Lumion Cloud
How can we help?
- There are no suggestions because the search field is empty.
[Skip to content](https://support.lumion.com/lumion-cloud/how-do-you-use-lumion-cloud-ai-enhancer#main-content)
English - United States
Show submenu for translations

Open main navigation
Close main navigation
- English - United States
Show submenu for translations
- Contact us
Contact us
How can we help you?
- There are no suggestions because the search field is empty.
1. [Lumion Cloud](https://support.lumion.com/lumion-cloud?hsLang=en-us)
2. [Lumion Cloud](https://support.lumion.com/lumion-cloud/lumion-cloud?hsLang=en-us)
3. [Feature Guides](https://support.lumion.com/lumion-cloud/lumion-cloud?hsLang=en-us#feature-guides)
# How do you use Lumion Cloud Ai Enhancer?
## Enhance architectural images, compare results, and manage your creations in Lumion Cloud.
***Lumion Cloud*** ***AI Enhancer*** uses generative AI to refine architectural visualizations directly within the Lumion Cloud workflow. Upload your render, select an AI model, then use either a ***Guided Mode*** or a custom ***Expert Mode*** prompt to enhance materials, lighting, atmosphere, and other visual details.
The ***AI Enhancer*** is especially useful for applying final polish, exploring alternative visual directions, or making targeted changes that would otherwise require returning to the original ***Scene*** or using separate image editing tools. Depending on the image and selected model, this could include refining materials, adding or removing visual elements, or correcting unwanted details and visual limitations that became apparent during the modeling or rendering process, without having to render the ***Scene*** again in Lumion Pro.
Enhanced results can be compared with the original, downloaded, or saved back to a***Project*** as a new version or variation, keeping presentation alternatives organized within the same review and collaboration workflow.
Ready to try it yourself? Open [**Lumion Cloud**](https://cloud.lumion.com/?__hstc=212388875.b42ab096281a0b7b606cf5c85a1edd05.1786409484954.1786409484954.1786409484954.1&__hssc=212388875.1.1786409484954&__hsfp=2c8692082fcae7b5a952ecf2e5562774)and start enhancing your own architectural visualizations.
### Menu:
| 1. [Start Using the AI Enhancer](https://support.lumion.com/lumion-cloud/how-do-you-use-lumion-cloud-ai-enhancer#H1_Start_using_the_AI_Enhancer) 2\. [Check Image Compatibility](https://support.lumion.com/lumion-cloud/how-do-you-use-lumion-cloud-ai-enhancer#H2_Check_Image_Compatibility) 3\. [Choose the Enhancement Settings](https://support.lumion.com/lumion-cloud/how-do-you-use-lumion-cloud-ai-enhancer#H3_Choose_the_Enhancement_Settings) 4\. [Review, Compare, and Save](https://support.lumion.com/lumion-cloud/how-do-you-use-lumion-cloud-ai-enhancer#H4_Review_Compare_and_Save) | 5. [View and Manage Your Creations](https://support.lumion.com/lumion-cloud/how-do-you-use-lumion-cloud-ai-enhancer#H5_View_and_Manage_Your_Creations) 6\. [Current Limitations](https://support.lumion.com/lumion-cloud/how-do-you-use-lumion-cloud-ai-enhancer#H6_Current_Limitations) 7\. [See Also](https://support.lumion.com/lumion-cloud/how-do-you-use-lumion-cloud-ai-enhancer#H7_See_Also) |
| --- | --- |
### **How the AI Enhancer works**
The ***AI Enhancer*** processes your image using one of two AI models:
- [FLUX \[Pro\]](https://bfl.ai/models/flux-pro-ultra)
- [ChatGPT Images 2](https://openai.com/index/introducing-chatgpt-images-2-0/)
Both AI models support two workflows:
- [Guided Mode](https://support.lumion.com/lumion-cloud/how-do-you-use-lumion-cloud-ai-enhancer#H3.1_Guided_Mode) - provides predefined controls for preserving elements and adjusting the time of day.
- [Expert Mode](https://support.lumion.com/lumion-cloud/how-do-you-use-lumion-cloud-ai-enhancer#H3.2_Expert_Mode) - lets you describe the required enhancement using a custom AI prompt.
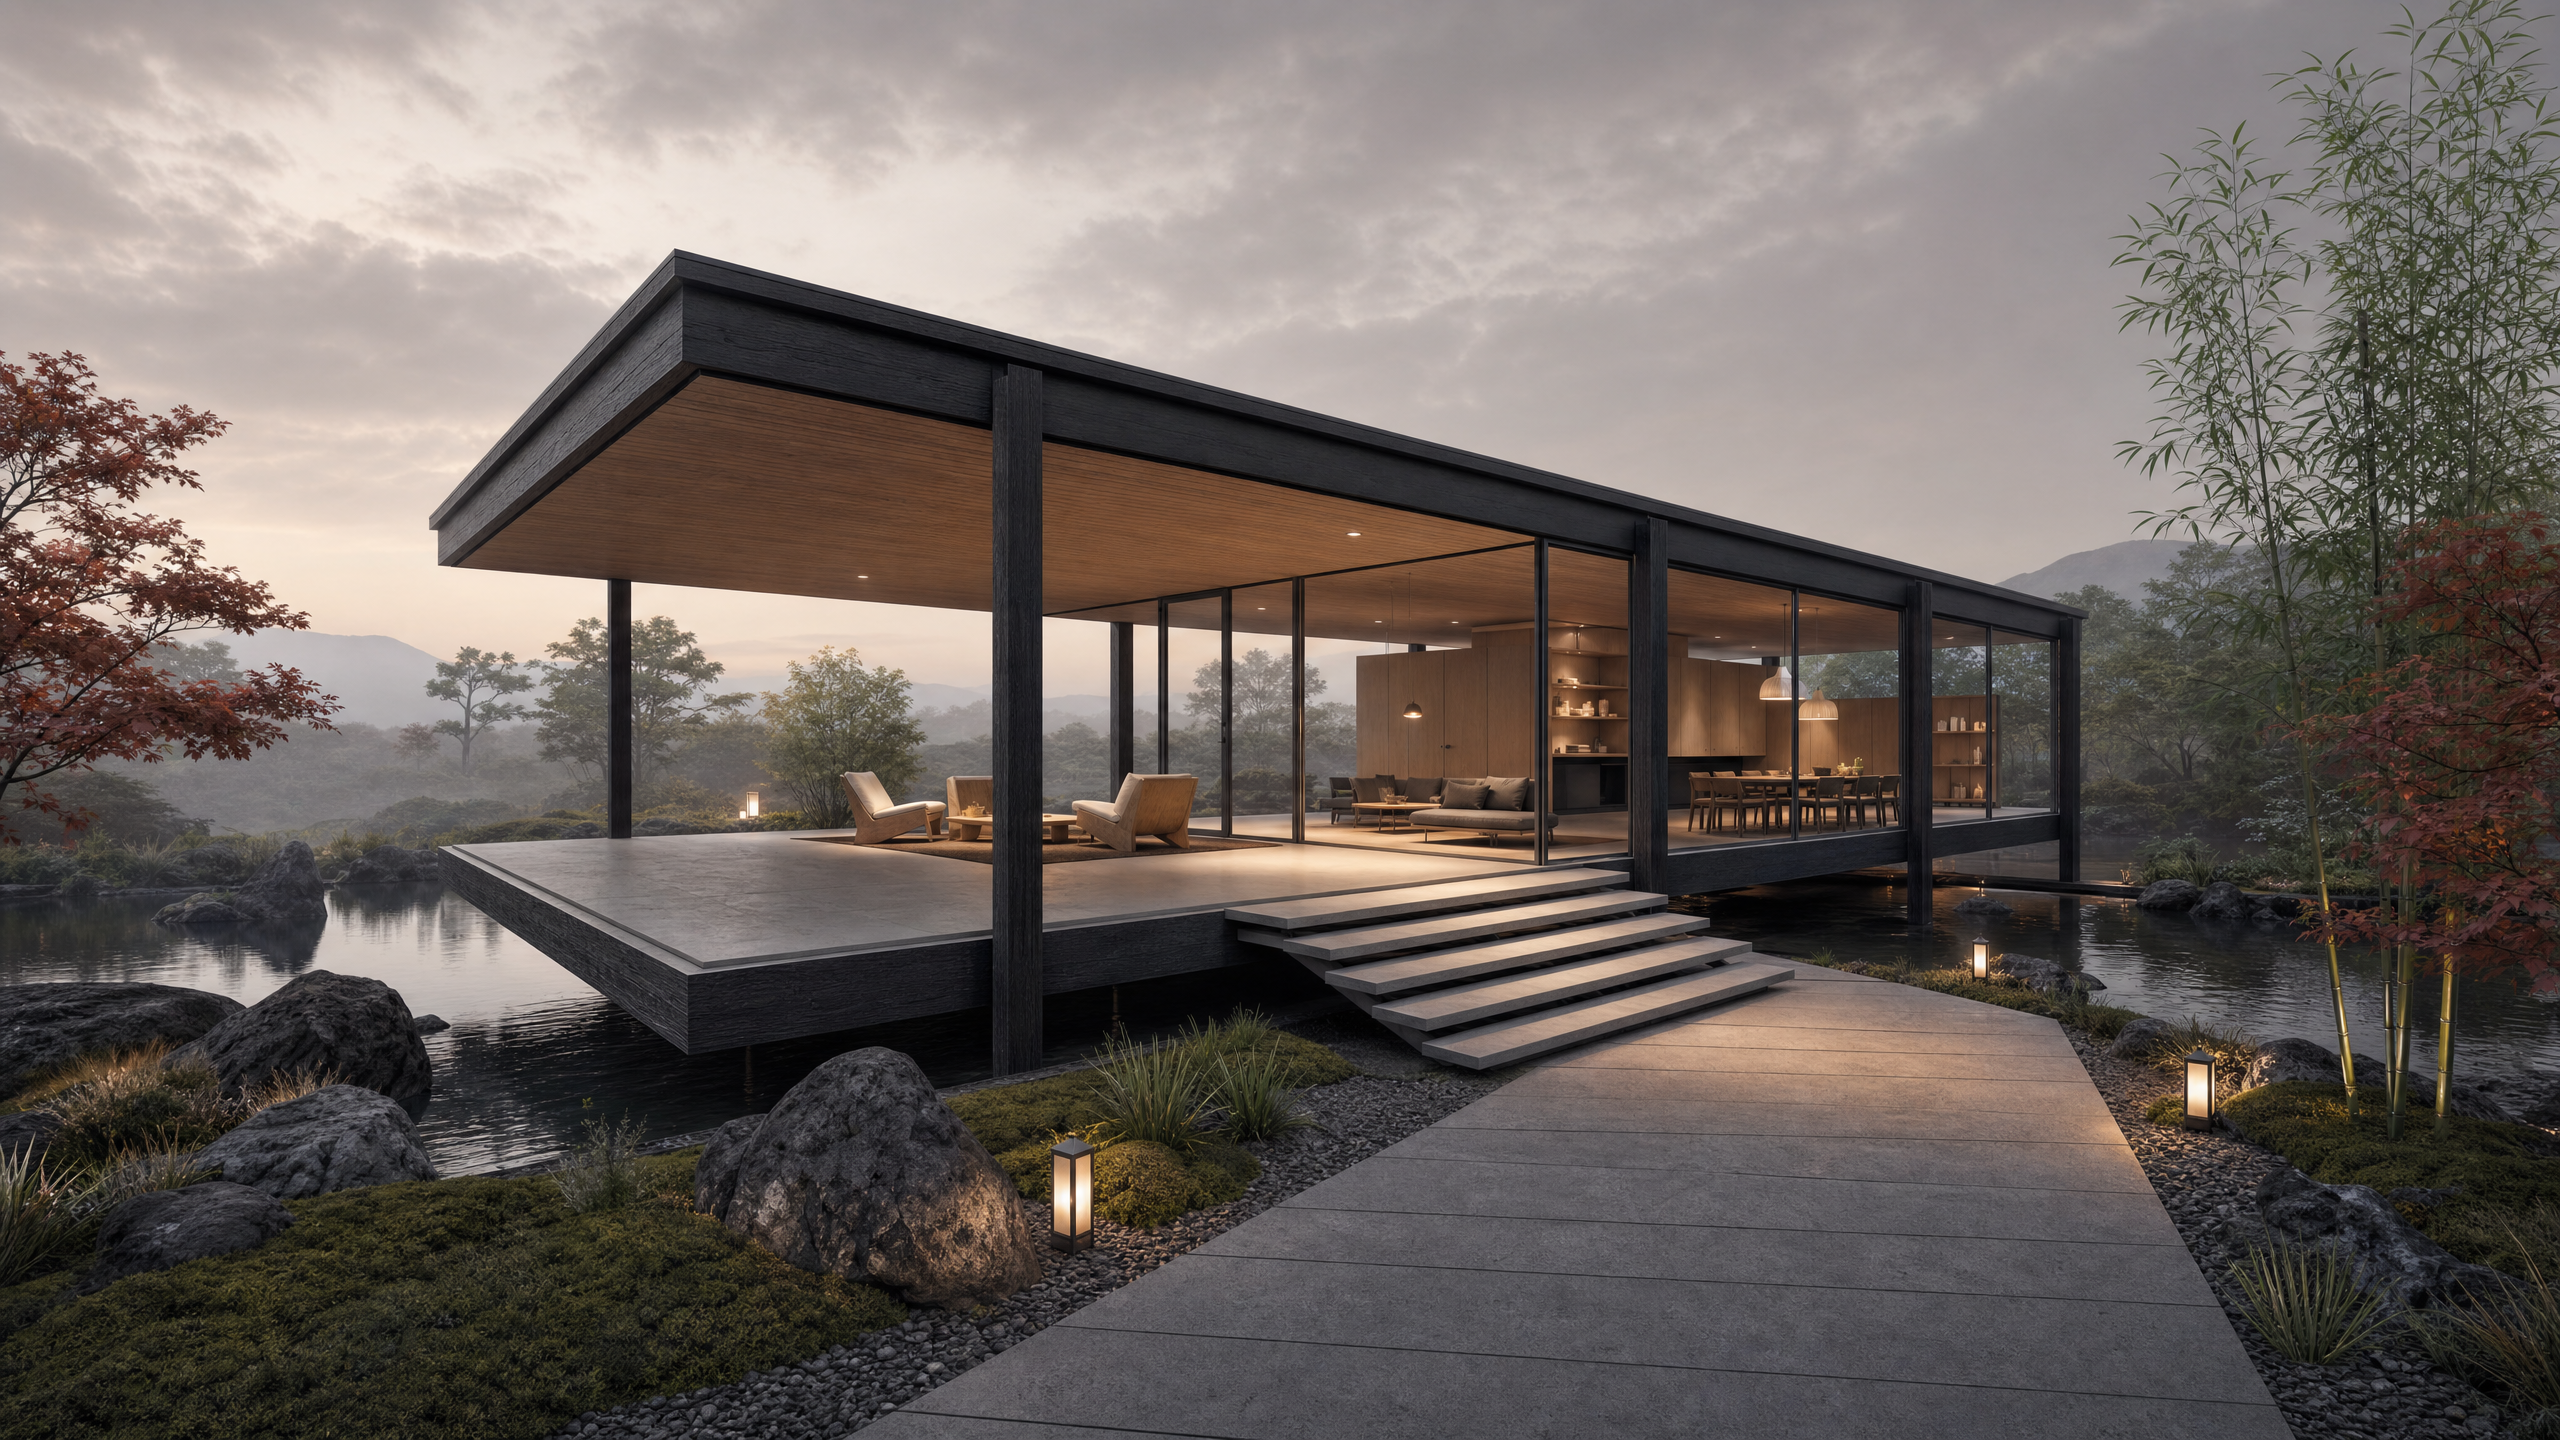
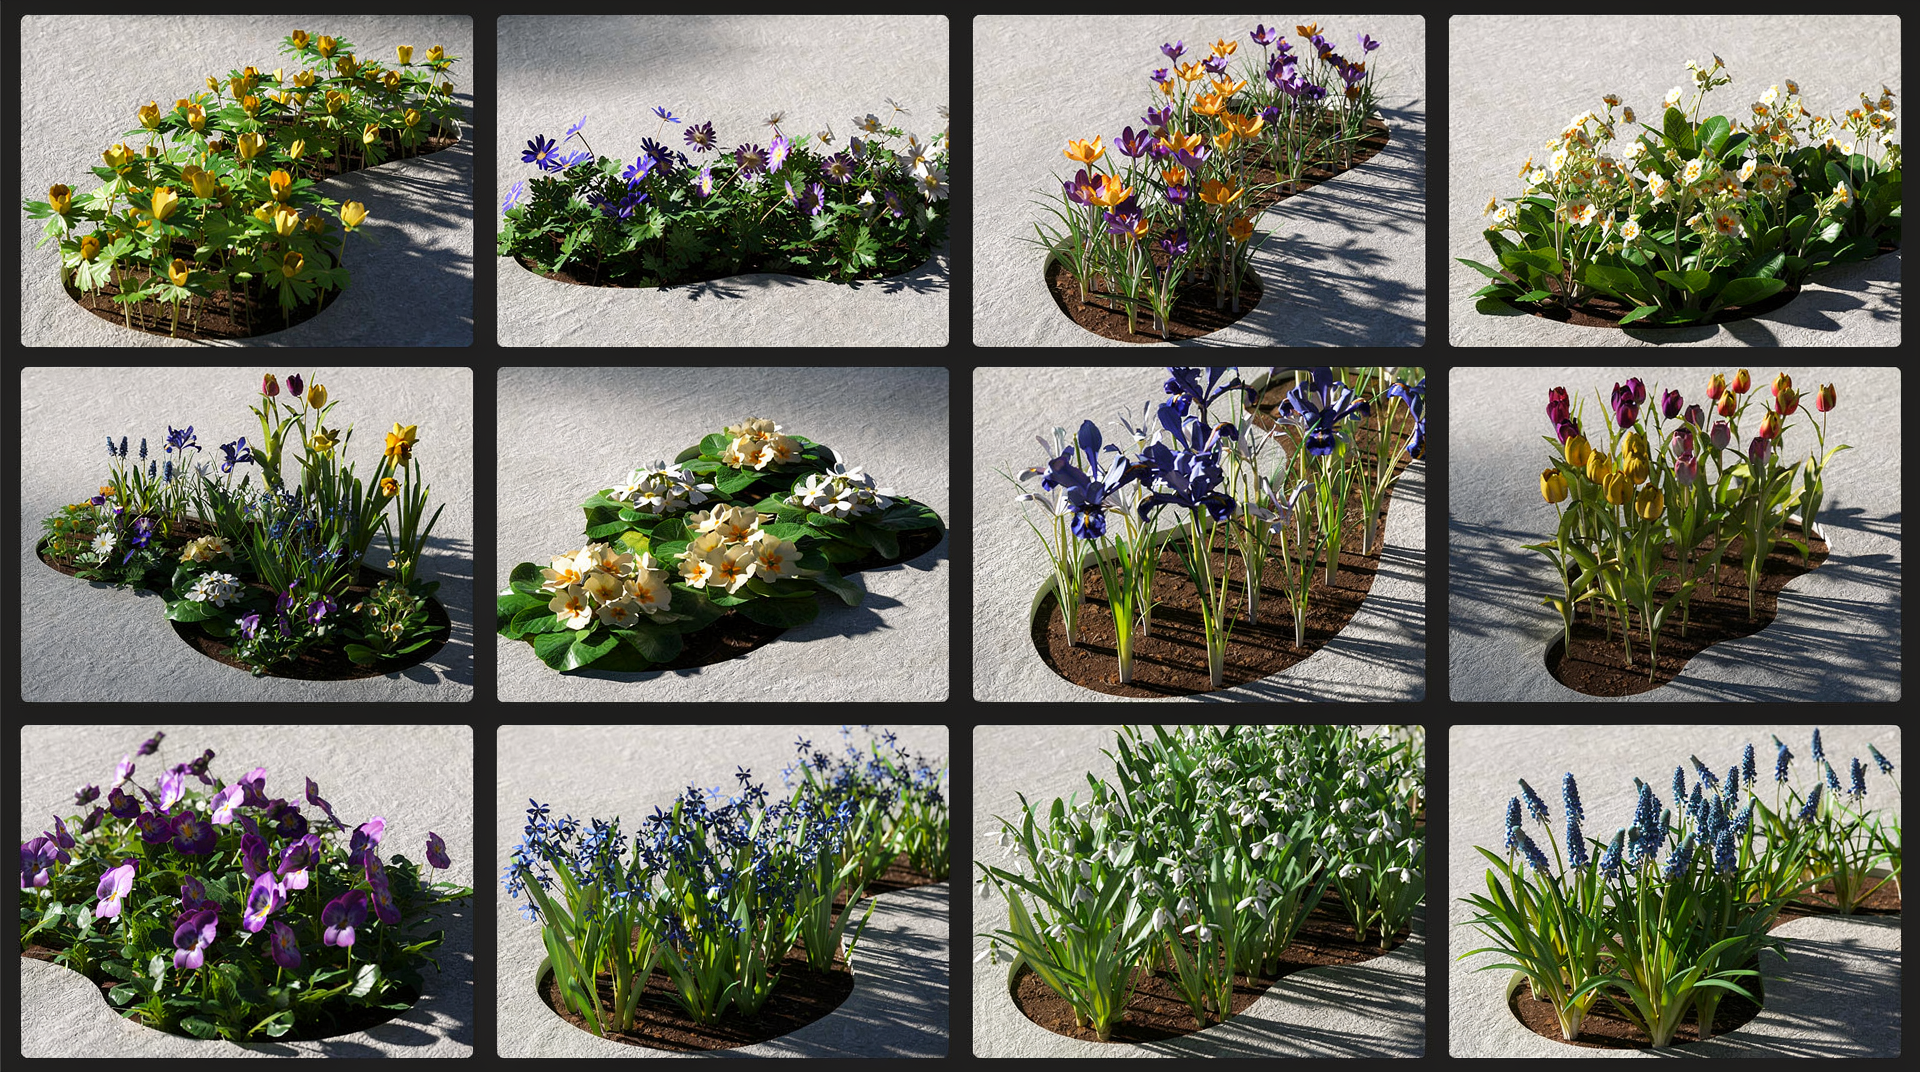
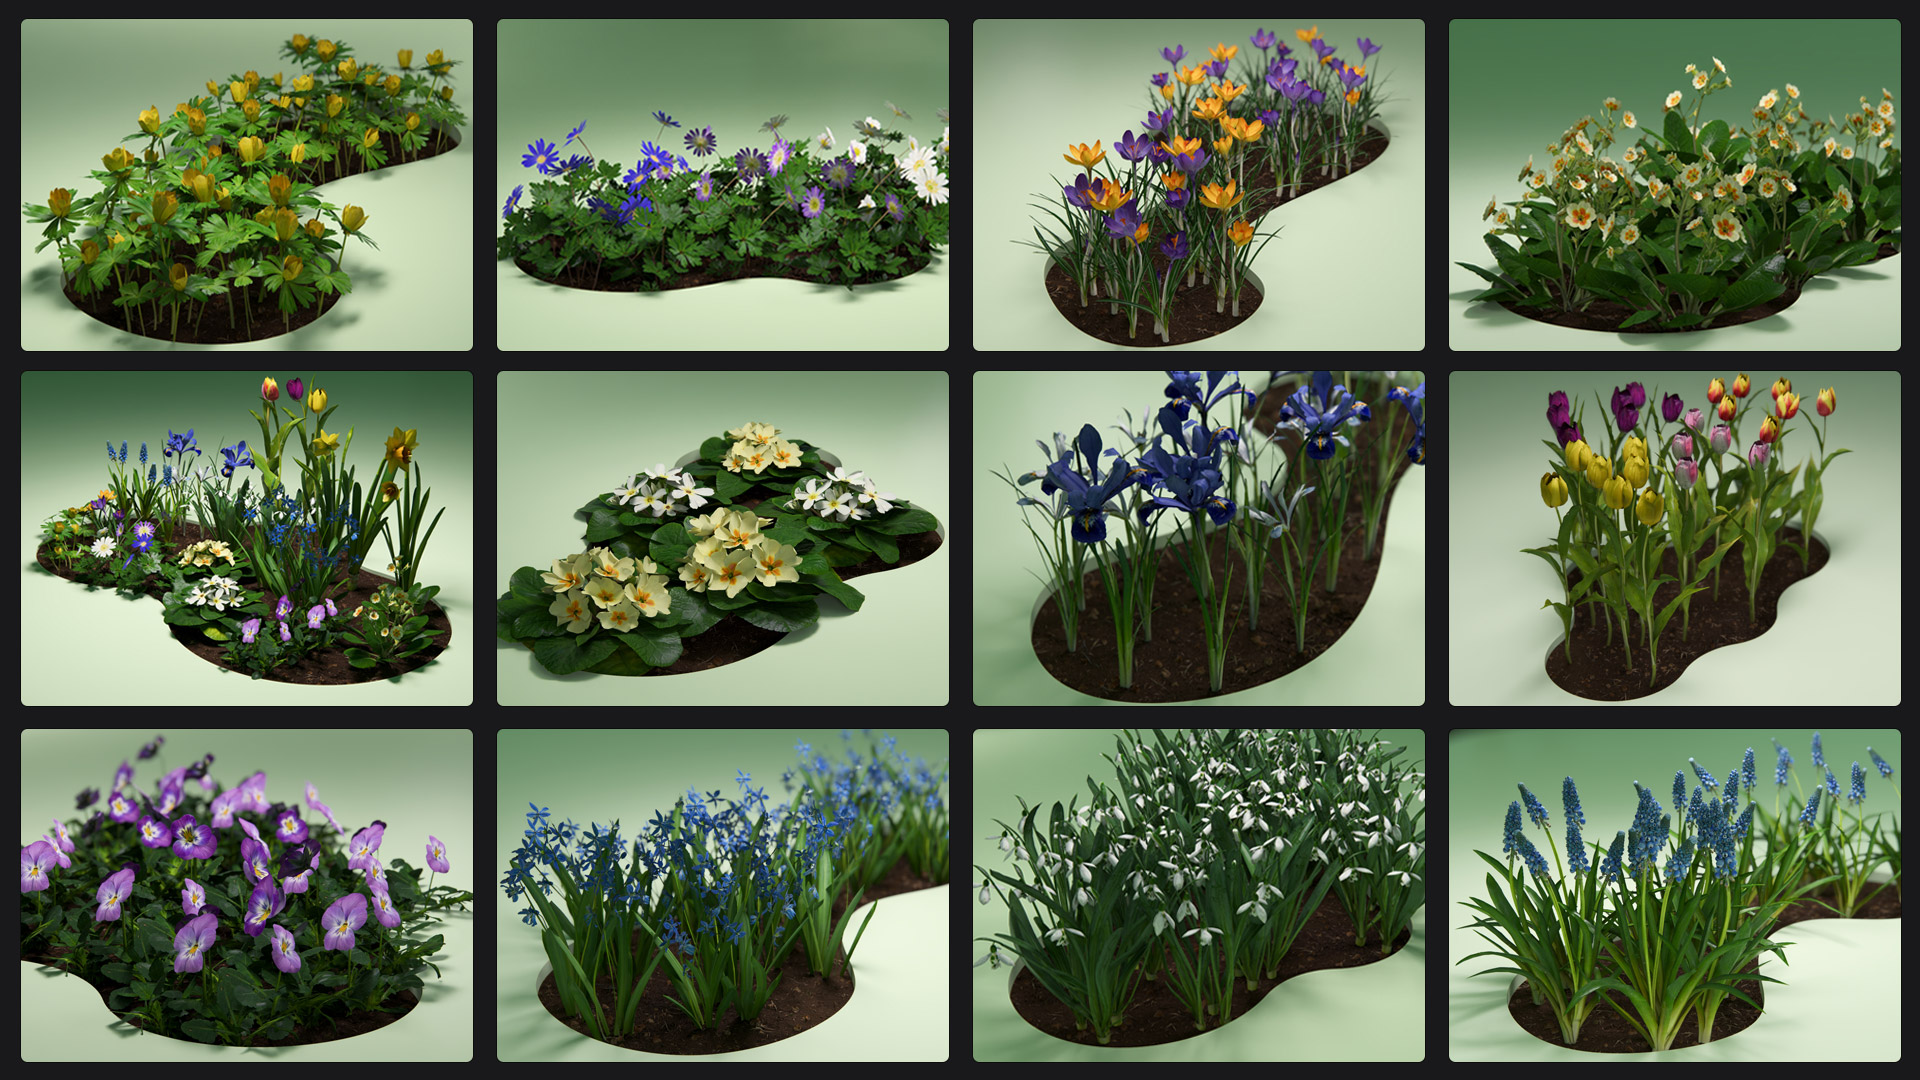
The scene below uses ***Expert Mode*** to demonstrate how the two AI models can interpret the same custom prompt differently.
The same source image (below) and Japanese-themed prompt were used with each AI model. Although the ***AI Enhancer*** is designed to preserve the original composition and architectural intent, generative AI may still alter geometry or other details.
#### Example Scene: Farnsworth
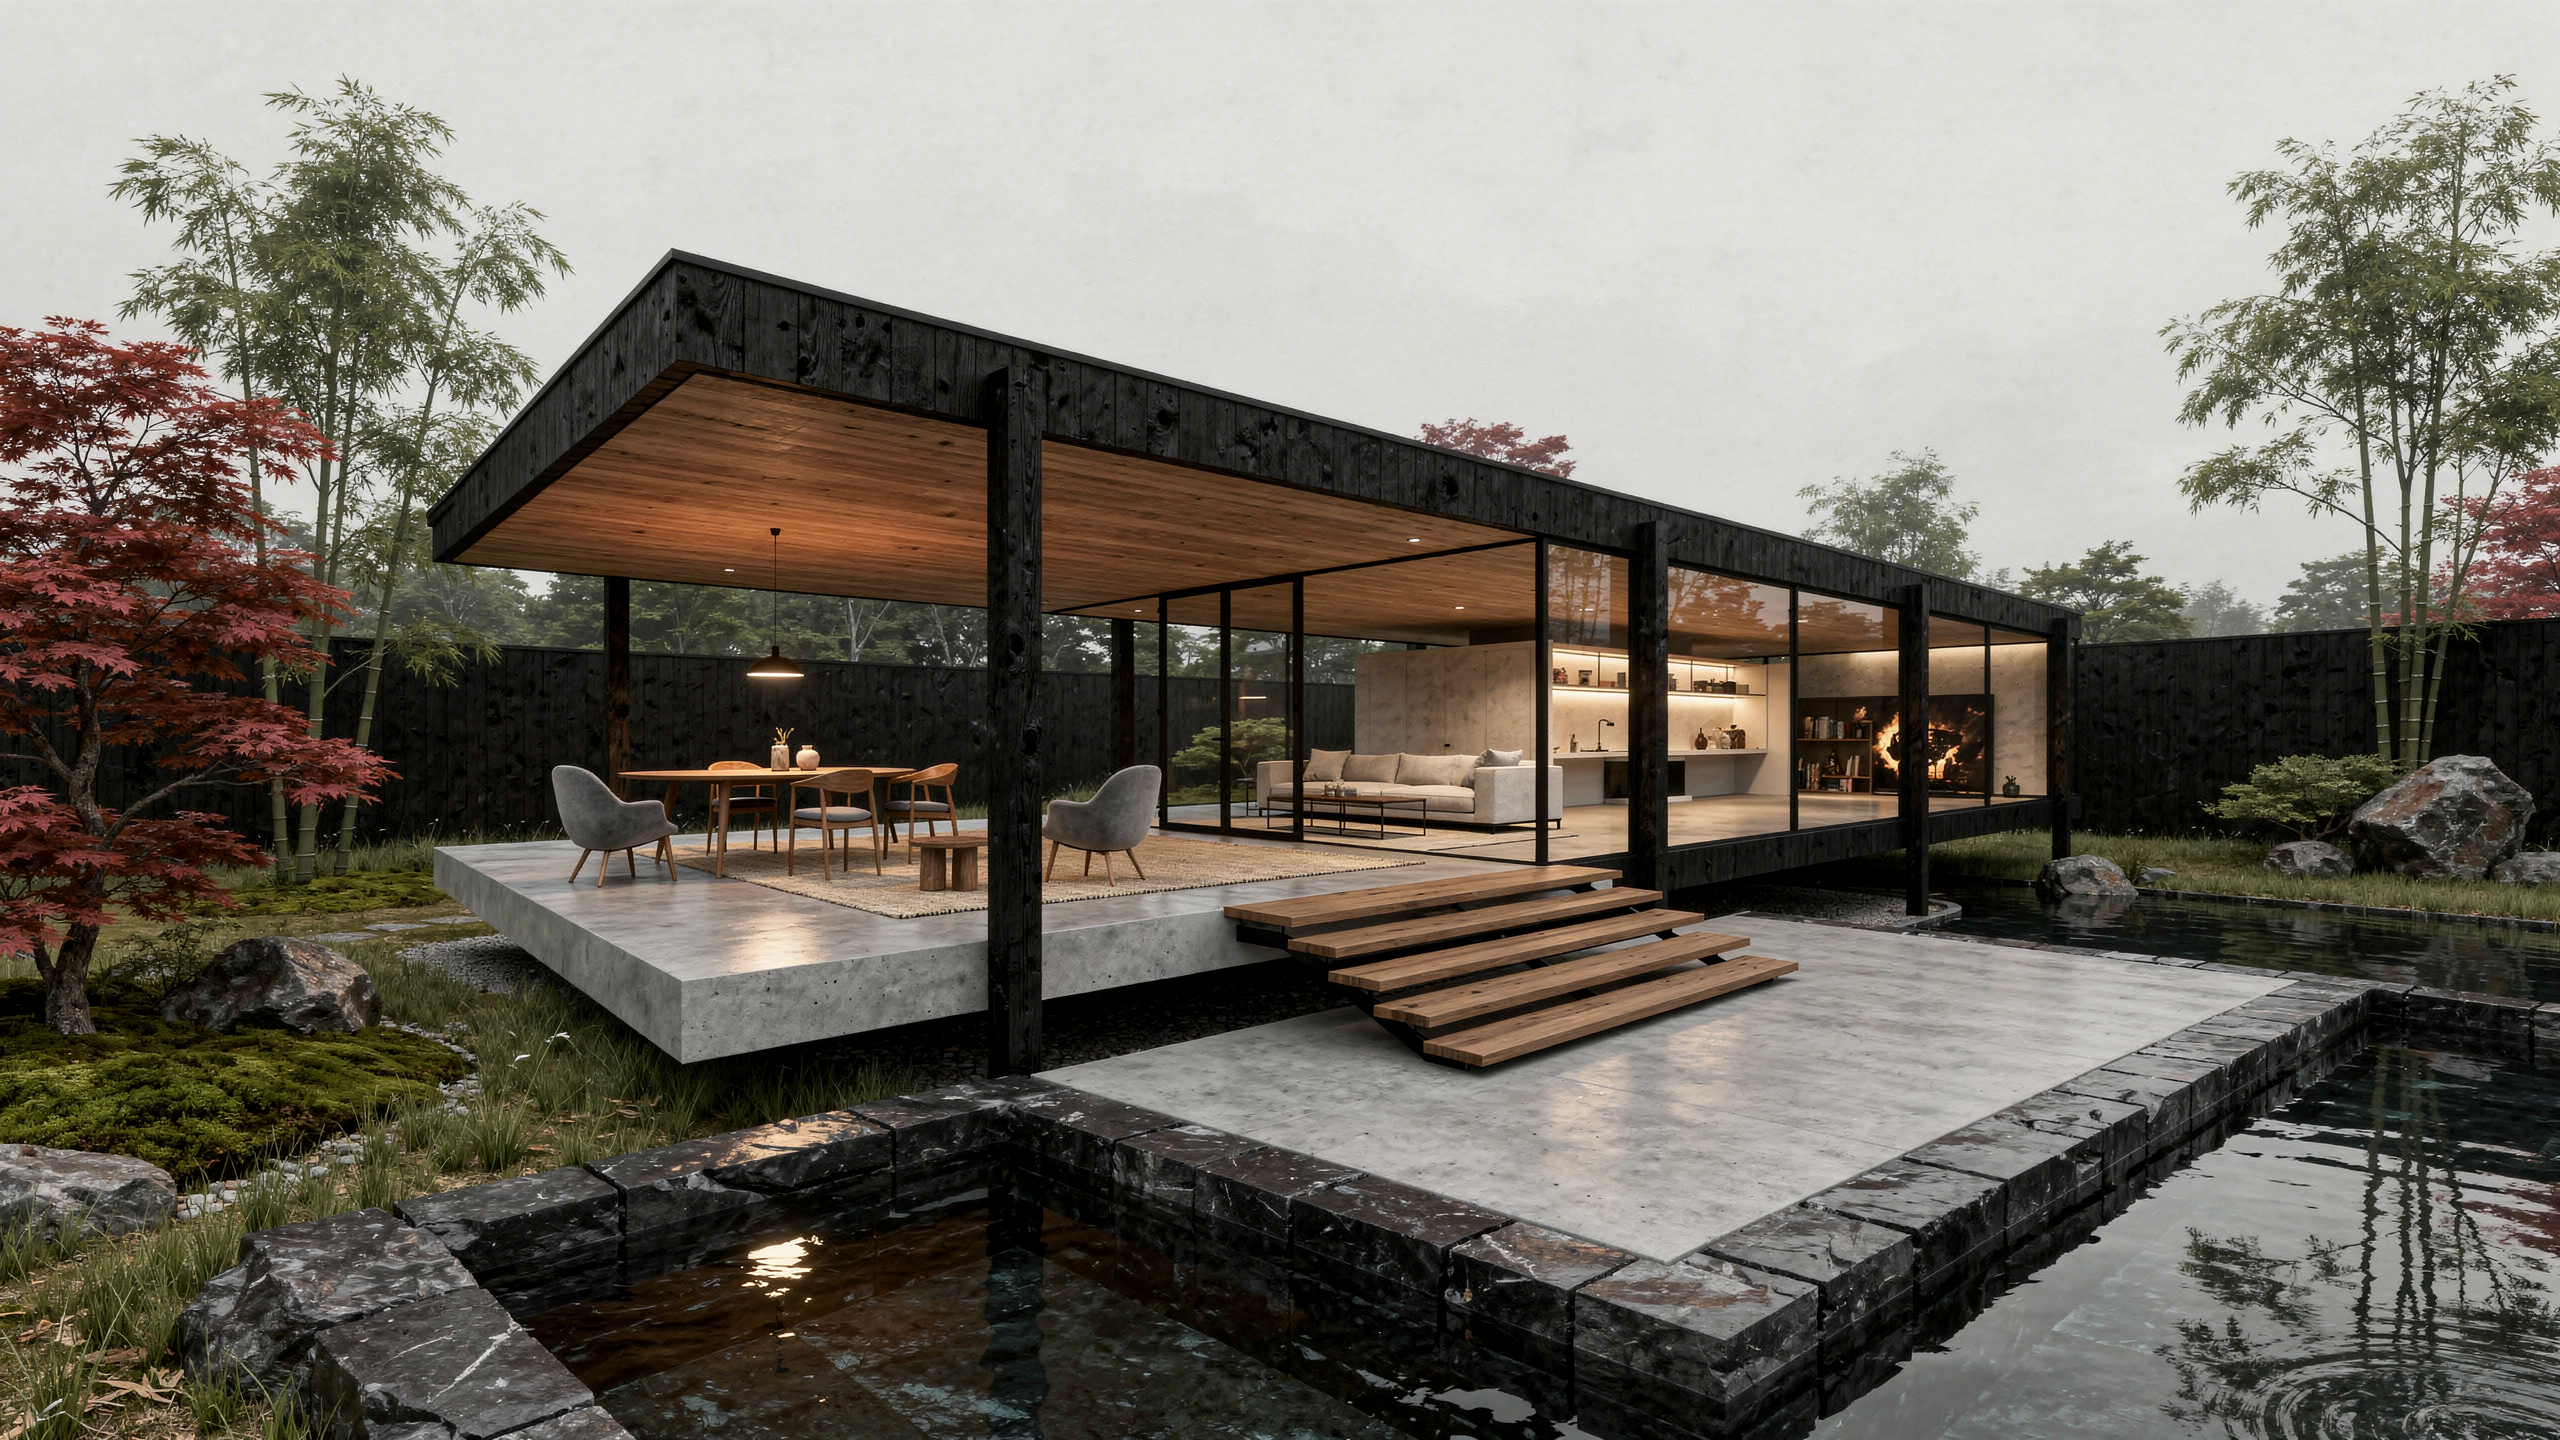
FLUX \[Pro\]
ChatGPT Images 2
1\. Start using the AI Enhancer
You can start by uploading a local image directly to the ***AI Enhancer***, or by opening an image that is already stored in Lumion Cloud.
#### 1.1 Select an image via Browse or Drag and Drop
Open the ***AI Enhancer*** from the Lumion Cloud navigation toolbar. Depending on the toolbar view, select either the icon or the expanded ***AI Enhancer*** menu option.
**Supported files:** The ***AI Enhancer*** processes still images only. You can upload a **JPG, JPEG, or PNG** file up to **50 MB**. Other file types are not supported.
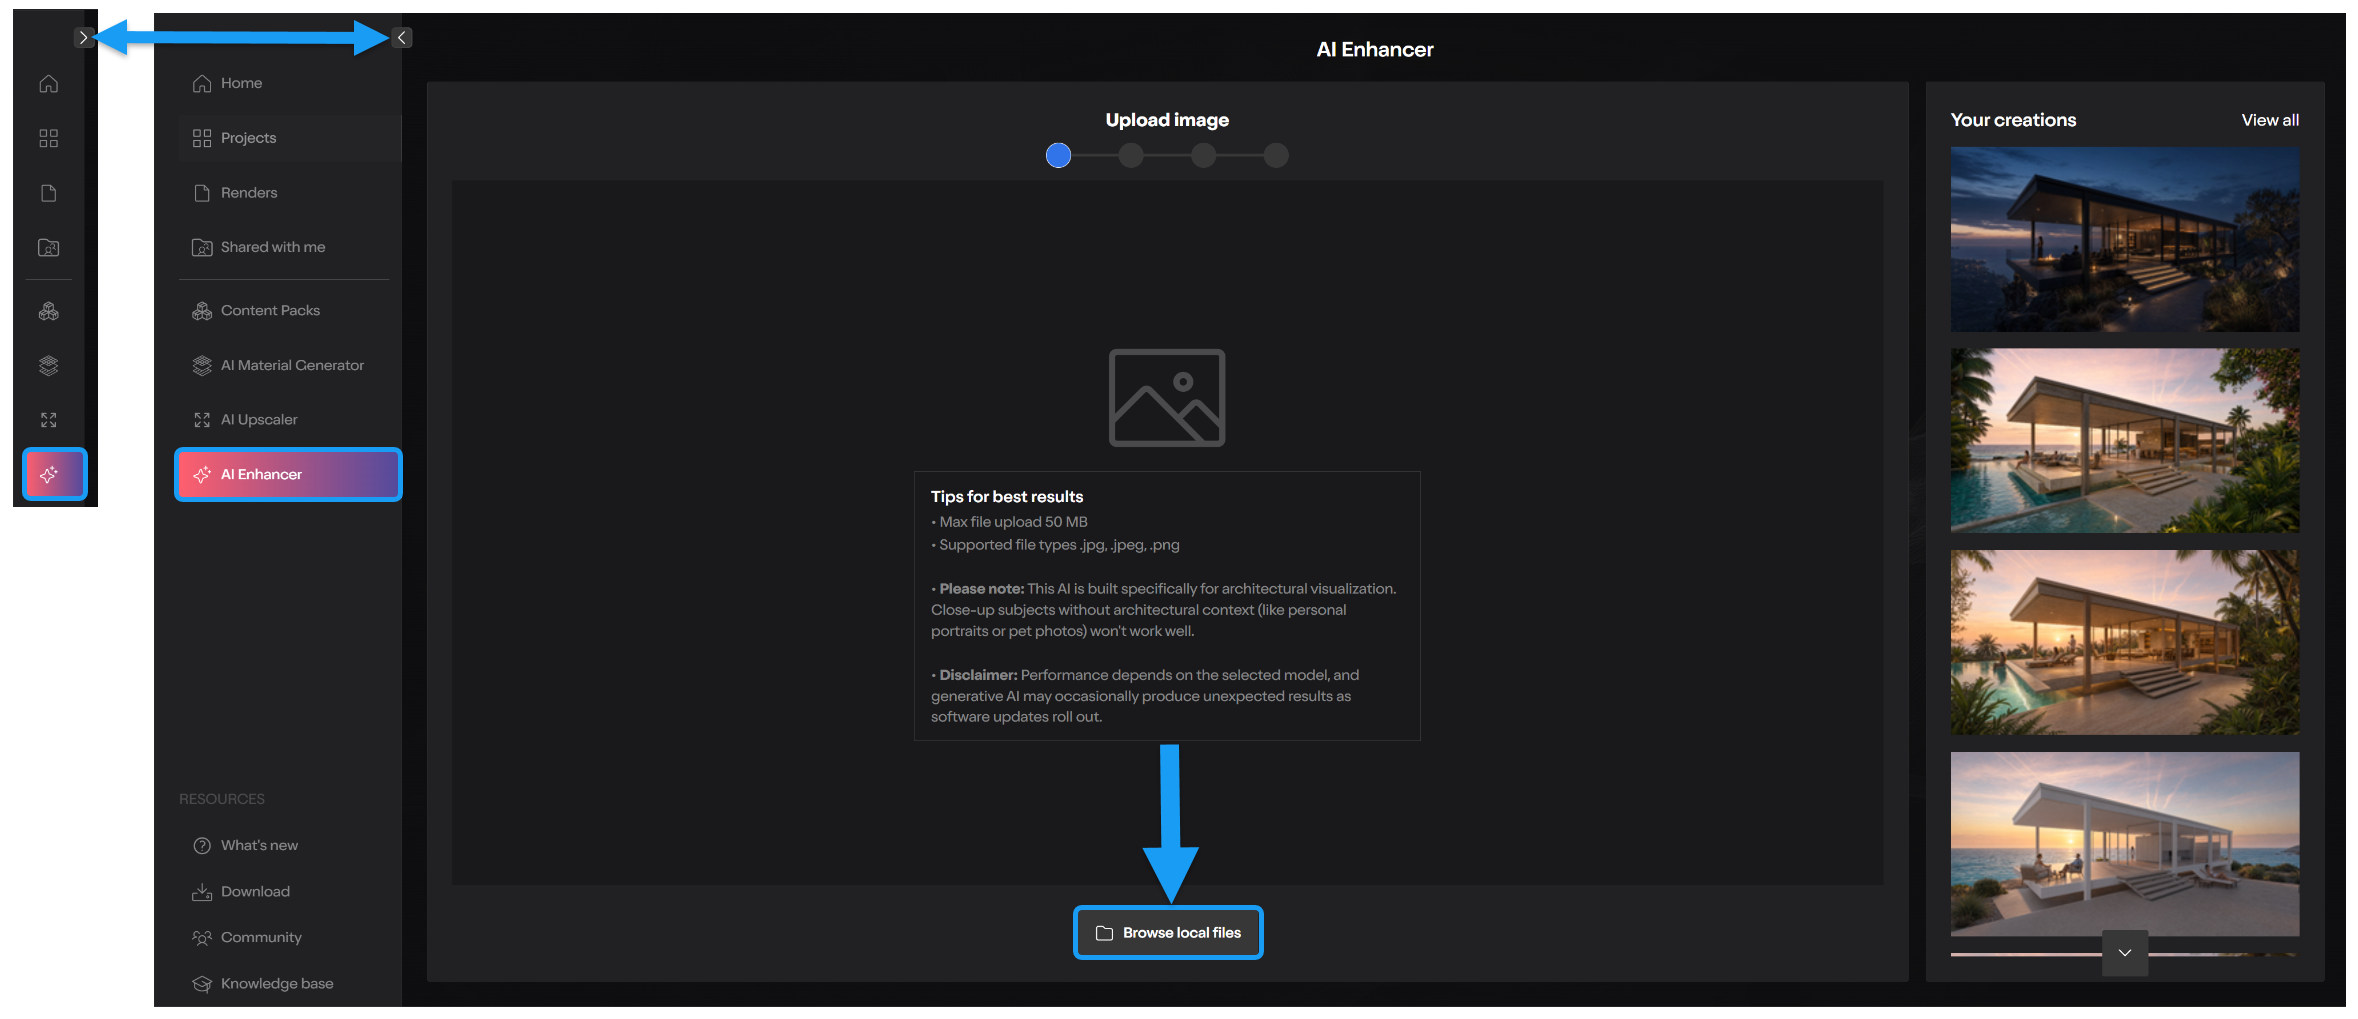 *(Expanded Toolbar View)*
From the ***AI Enhancer*** page, drag and drop an image into the upload area or select ***Browse local files***.
The upload page also displays your recent ***AI Enhancer*** creations. These results cannot be enhanced again directly from your***Creations***. To reuse one, first save a copy to a ***Project*** or ***Renders*** folder.
#### 1.2 Select an image already in your Project or Renders folder
Alternatively, open an existing image from the ***Renders*** folder or from a ***Project*.** From the image preview, you can access the available image-refinement tools:
**Important:** Starting a new ***AI Edit*** overwrites any current edits applied to the image. Save a copy before proceeding if you want to retain them. ***AI Edit*** actions cannot currently be stacked within the same window process.
##### 1.2.1 Select AI Edits ****
Select the **AI Edits** button to open the available AI editing tools.
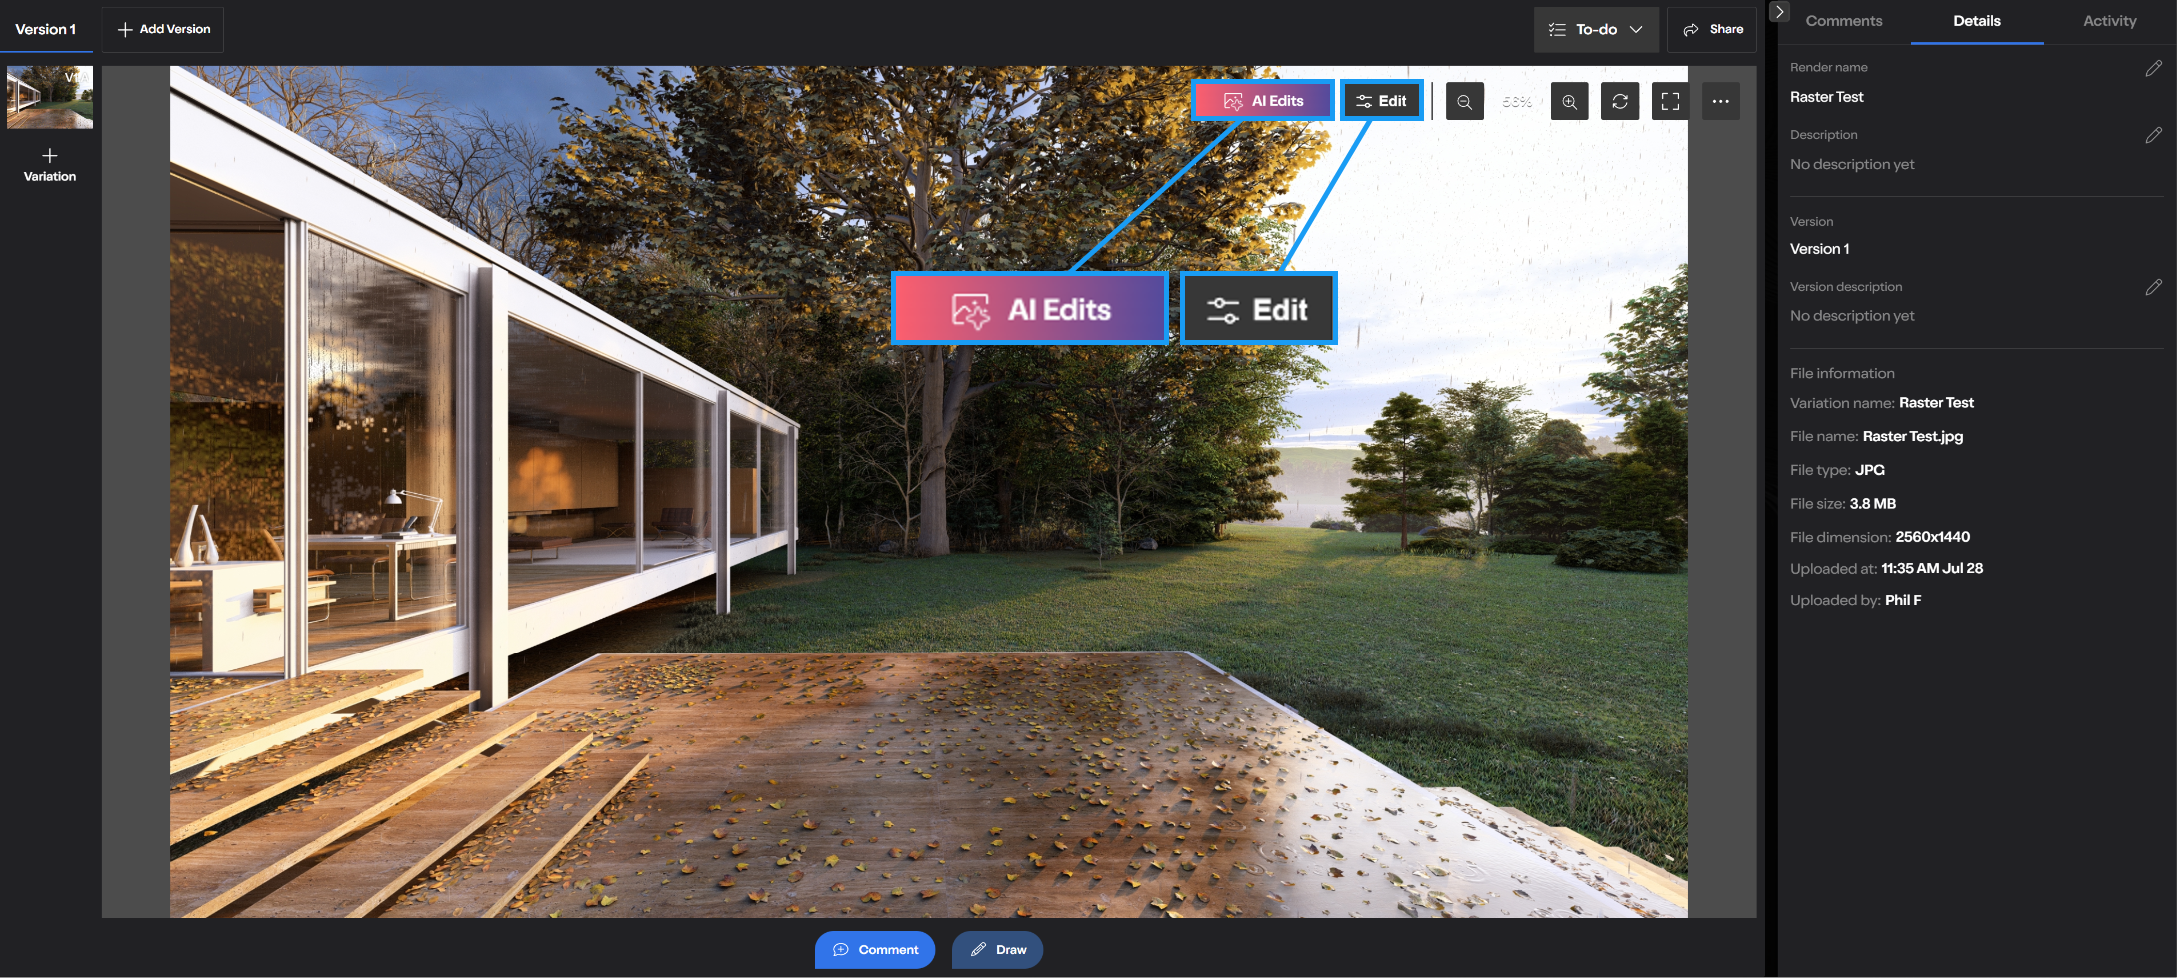
##### 1.2.2: Choose Enhance or Upscale:
The ***AI Edits*** window provides two options:
- ***Enhance** -* uses generative AI to refine lighting, color, detail, and other visual elements.
- ***Upscale** -* increases image resolution while maintaining sharpness.
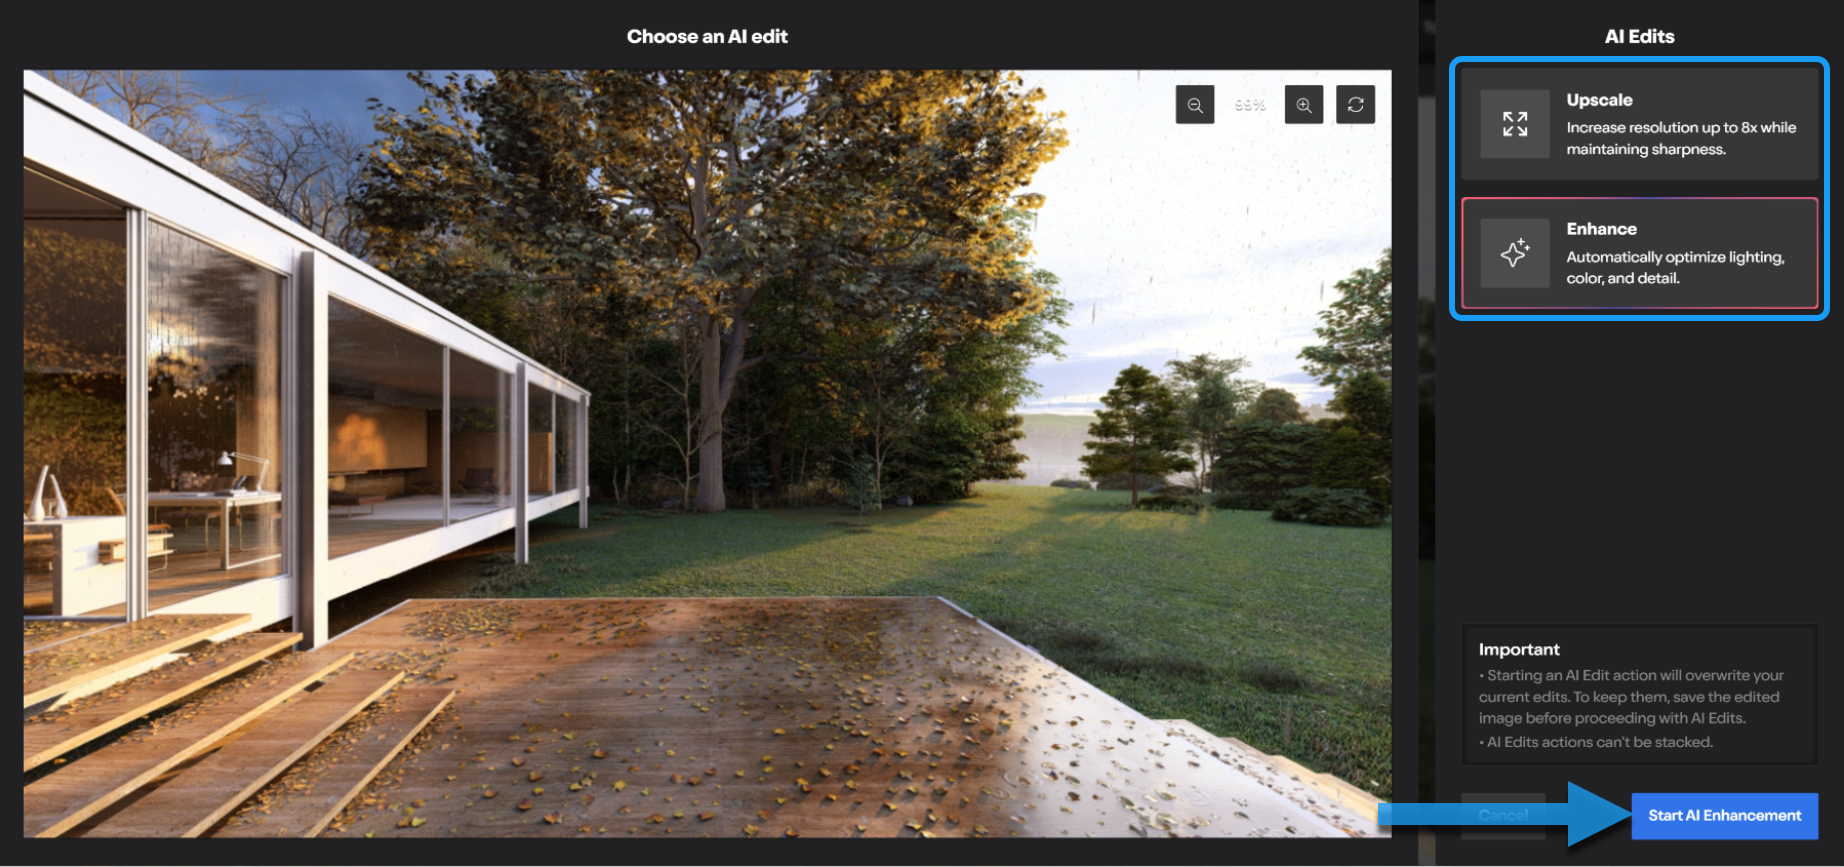
For more information about the Lumion Cloud ***AI Upscaler,*** check out this article:
- **Knowledge Base:** [How do you use the AI Upscaler in Lumion Cloud?](https://support.lumion.com/lumion-cloud/how-do-you-use-the-ai-upscaler-in-lumion-cloud?hsLang=en-us)
To continue with the ***AI Enhancer***, select **Enhance**, then select **Start AI Enhancement**. This opens the ***AI Enhancer***, where you can select an AI model, check the image compatibility, and configure the enhancement settings.
##### 1.2.3 Post-Processing editor 
The image preview also includes the new **Post-Processing** editor for non-generative adjustments such as cropping, straightening, image adjustments, presets, and LUTs.
The **Post-Processing** editor is separate from the ***AI Edits*** workflow and is not required to continue with the ***AI Enhancer*.** To find out more, see this article:
- **Knowledge Base:** [How do you use Post-Processing in Lumion Cloud?](https://support.lumion.com/lumion-cloud/how-do-you-use-post-processing-styles-in-lumion-cloud?hsLang=en-us)
2\. Check Image Compatibility
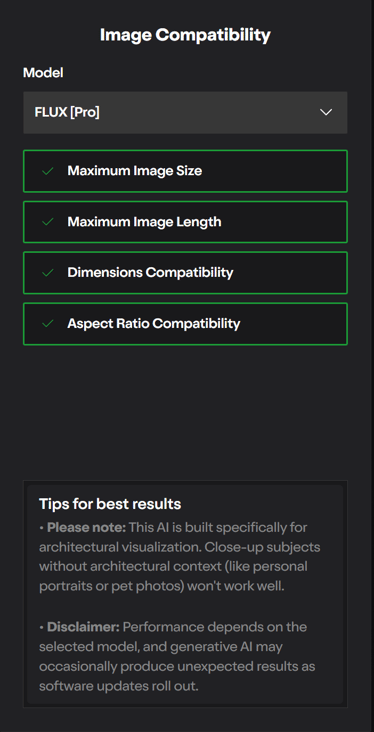
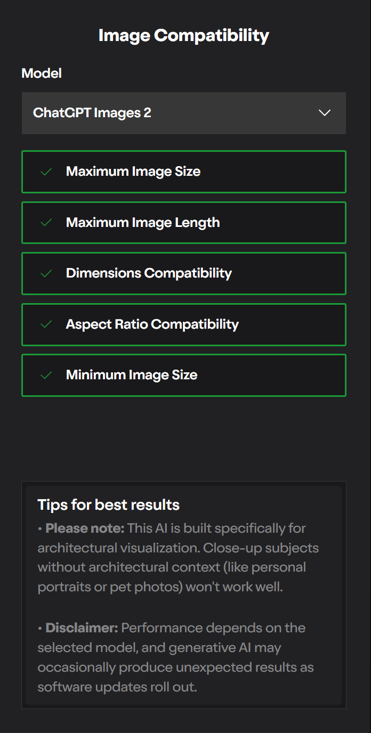
After selecting an AI model, Lumion Cloud checks the uploaded image against that model’s processing requirements. The available checks and limits vary by model.
#### 2.1 Select an AI model
| #### FLUX \[Pro\] | #### ChatGPT Images 2 |
| --- | --- |
#### 2.2 Compatibility status
Each requirement is highlighted according to its current status.
| 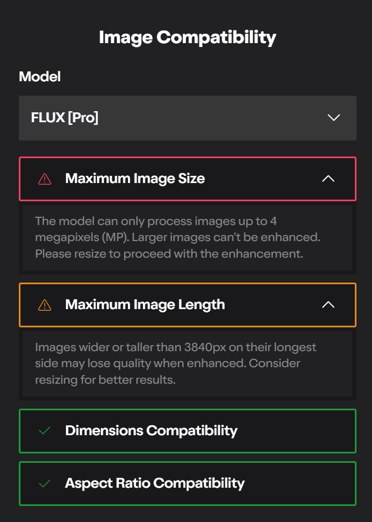 | 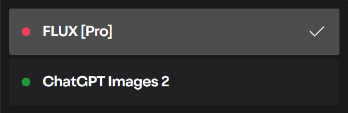 - **Red:** The image does not meet the model’s requirements and must be adjusted before you can continue. - **Orange:** The image falls slightly outside the preferred range, but you can still continue. The final result may differ in quality or dimensions. - **Green:** The image meets the requirements. |
| --- | --- |
#### 2.3 Adjusting an image with Fix It (If required)
Most images will either meet the selected model’s requirements or be blocked for falling outside its supported size limits.
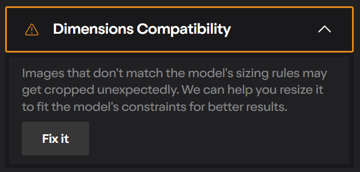
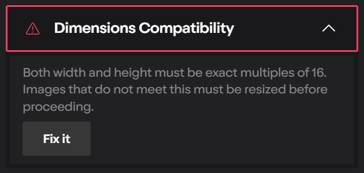
In some instances, Lumion Cloud displays a ***Fix it*** button if your image dimensions are not divisible by 16. This option appears only when the image can be adjusted to compatible dimensions using the built-in crop tool.
**Important:** The crop controls are only available after ***Fix it*** has been selected. Review the crop before selecting **Continue**, as only the area inside the crop frame will be sent for processing.
##### 2.3.1 How each model handles the warning
The way this compatibility issue is handled depends on the selected AI model:
- With **FLUX \[Pro\]**, the warning is highlighted in orange. You can use ***Fix it*** button,or continue without manually adjusting the image. The FLUX model can accept a slight difference from the preferred dimensions, although the output is not guaranteed to match the original dimensions.
- With **ChatGPT Images 2,** the issue is highlighted in red because the model has stricter dimension requirements. You must select **Fix it** and confirm a compatible crop before continuing.
##### 2.3.2 Adjusting the crop
After selecting *Fix it*, the crop tool opens and suggests a balanced crop using dimensions supported by the selected AI model.
Before continuing, you can:
- Move the crop frame to select a different part of the image.
- Move the image behind the crop frame.
- Resize the crop frame horizontally, vertically, or diagonally.
- Review the resulting pixel dimensions as you make adjustments at the bottom of the crop window.
The crop dimensions snap to values supported by the selected AI model (Divisible by 16 values). This allows you to control which parts of the image are retained and preserve the original composition and aspect ratio as closely as possible.
For example, a **1920 × 1080** image may be cropped to **1920 × 1072** by removing eight pixels evenly on the vertical axis. Alternatively, you could reduce both dimensions to another compatible size, such as **1904 × 1072**, to retain proportions closer to the original 16:9 aspect ratio.
##### 2.3.3 Reviewing and confirming the crop
Use the controls in the crop window to review the image before continuing:
- **Zoom controls:** Inspect the image and crop more closely.
- **Reset view:** Return the preview to its default position and zoom level.
- **Start over:** Discard the current adjustments and return to the initially suggested crop.
- **Continue:** Confirm the crop and proceed to the enhancement settings. After selecting *Continue*, the selected AI model is locked and cannot currently be changed for that enhancement.
**Important:** Once you select ***Continue*** and pass the compatibility stage, the selected AI model becomes locked for that enhancement and cannot currently be changed.
3\. Choose the Enhancement Settings
After confirming image compatibility, choose how to enhance the image. You can use ***Guided* *Mode*** settings or enter your own instructions in ***Expert Mode***.
### **3.1 Guided Mode:**
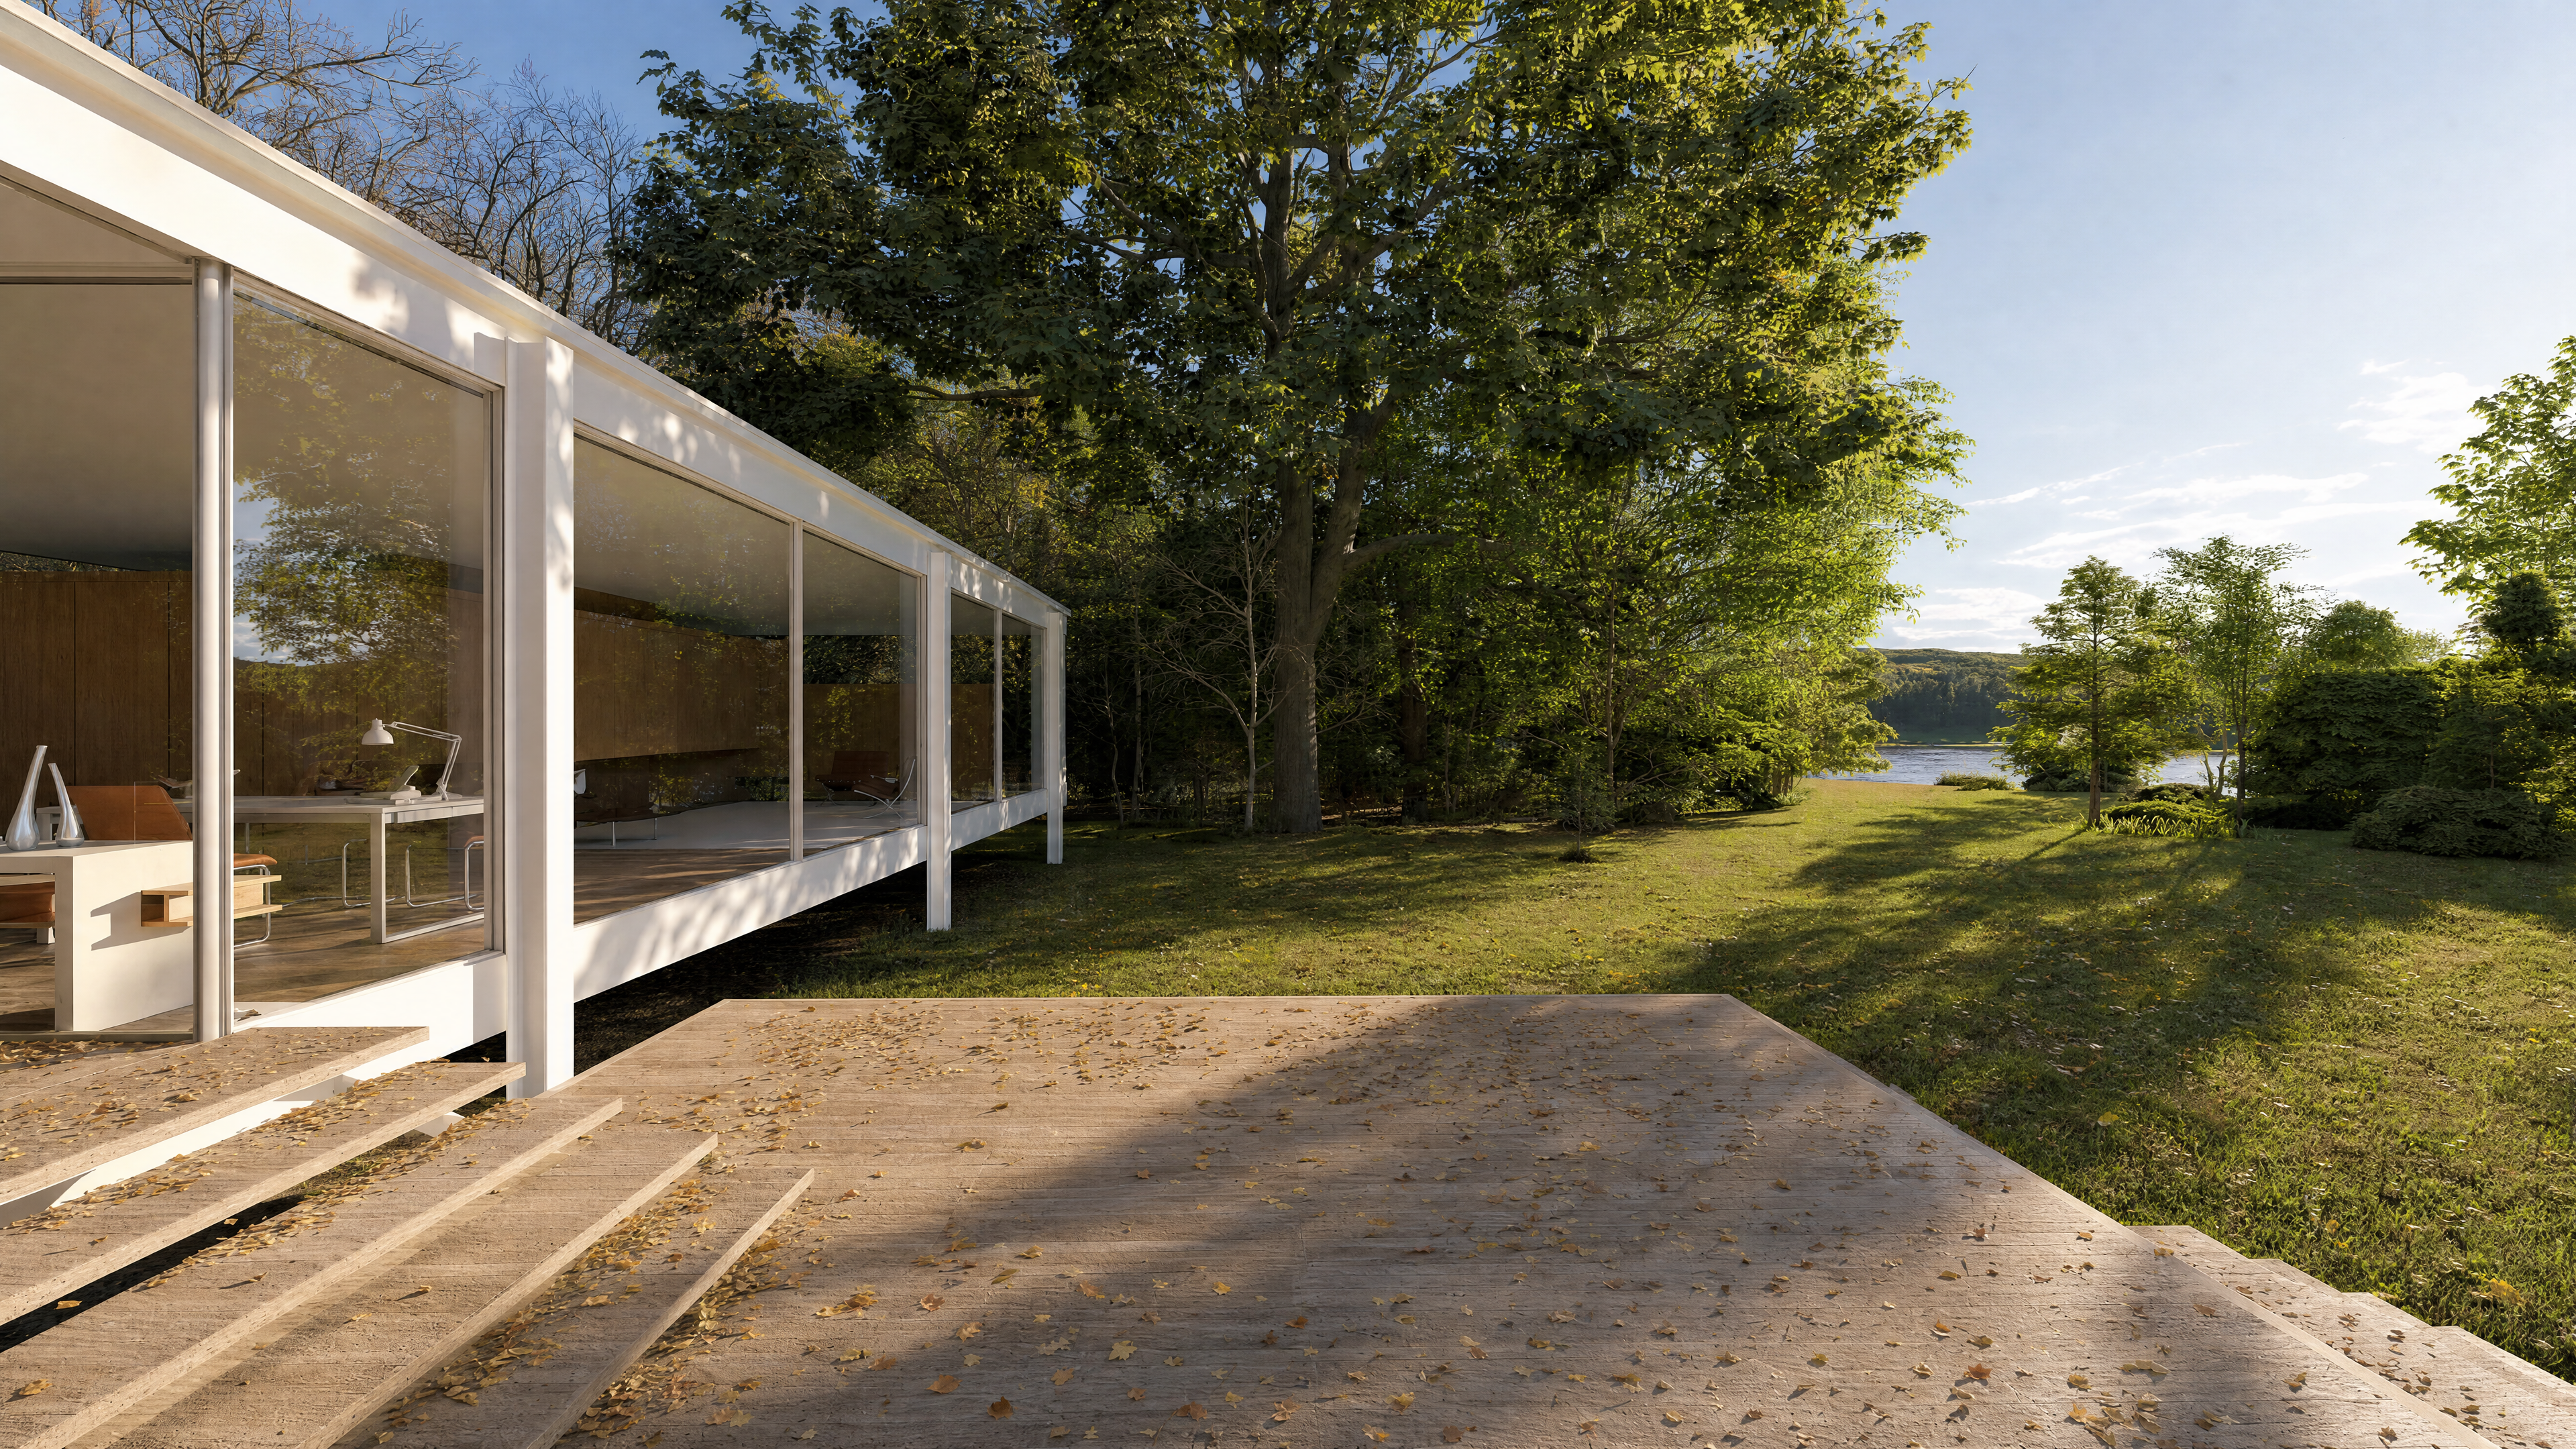
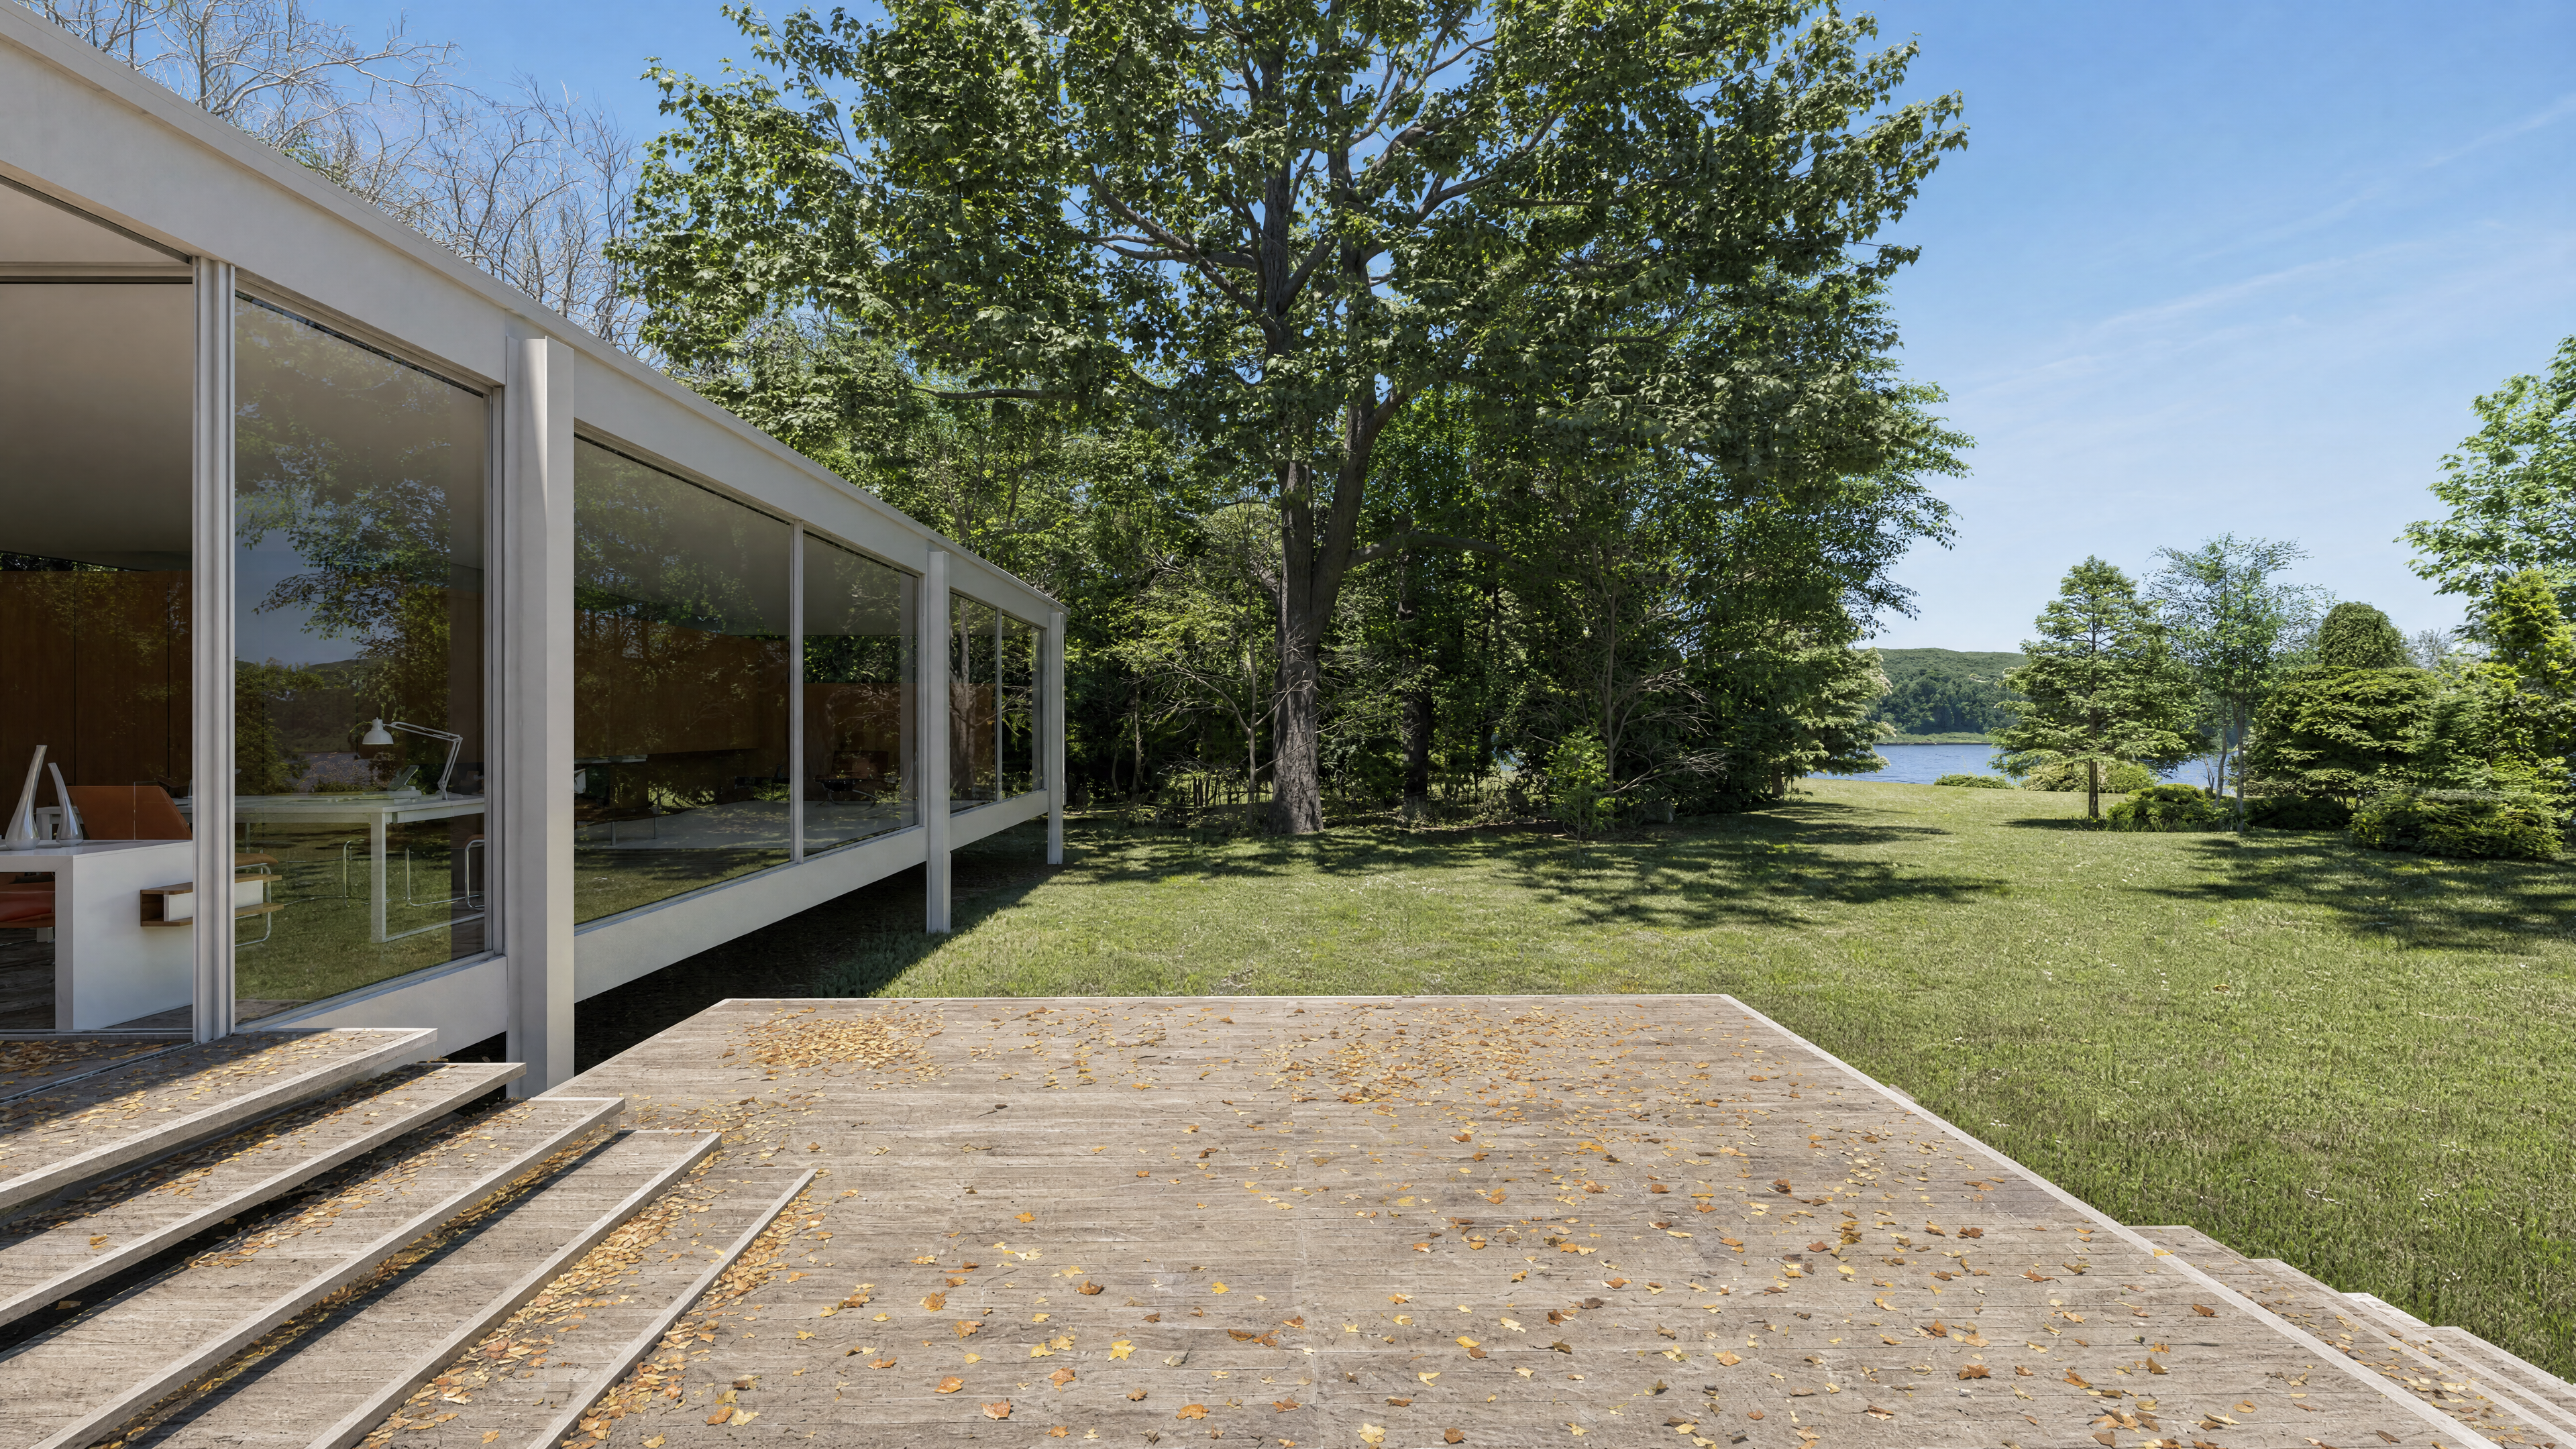
This mode provides predefined controls for preserving selected elements and adjusting the time of day. Element preservation helps protect important parts of the original design while allowing other areas of the image to be enhanced.
| 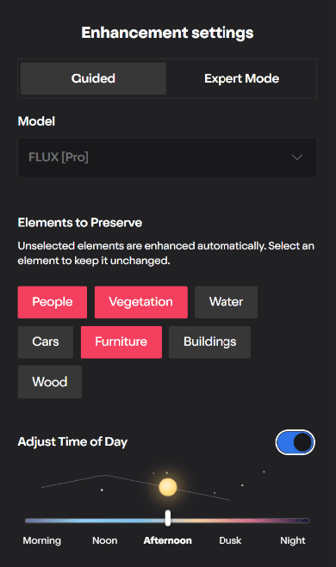 | #### Elements to Preserve - Element preservation guides the model to retain the selected elements, but results should still be reviewed for unexpected changes. - Selected elements are highlighted in pink. - Elements that are not selected are enhanced automatically. #### Adjust Time of Day - Disabled by default to retain the original time of day and lighting. - Enable it to choose between ***Morning***, ***Noon***, ***Afternoon*, *Dusk***, and ***Night***. - The slider snaps to each available setting. |
| --- | --- |
This makes it possible to explore different presentation moods without having to return to Lumion Pro to produce another render.
  .jpg) 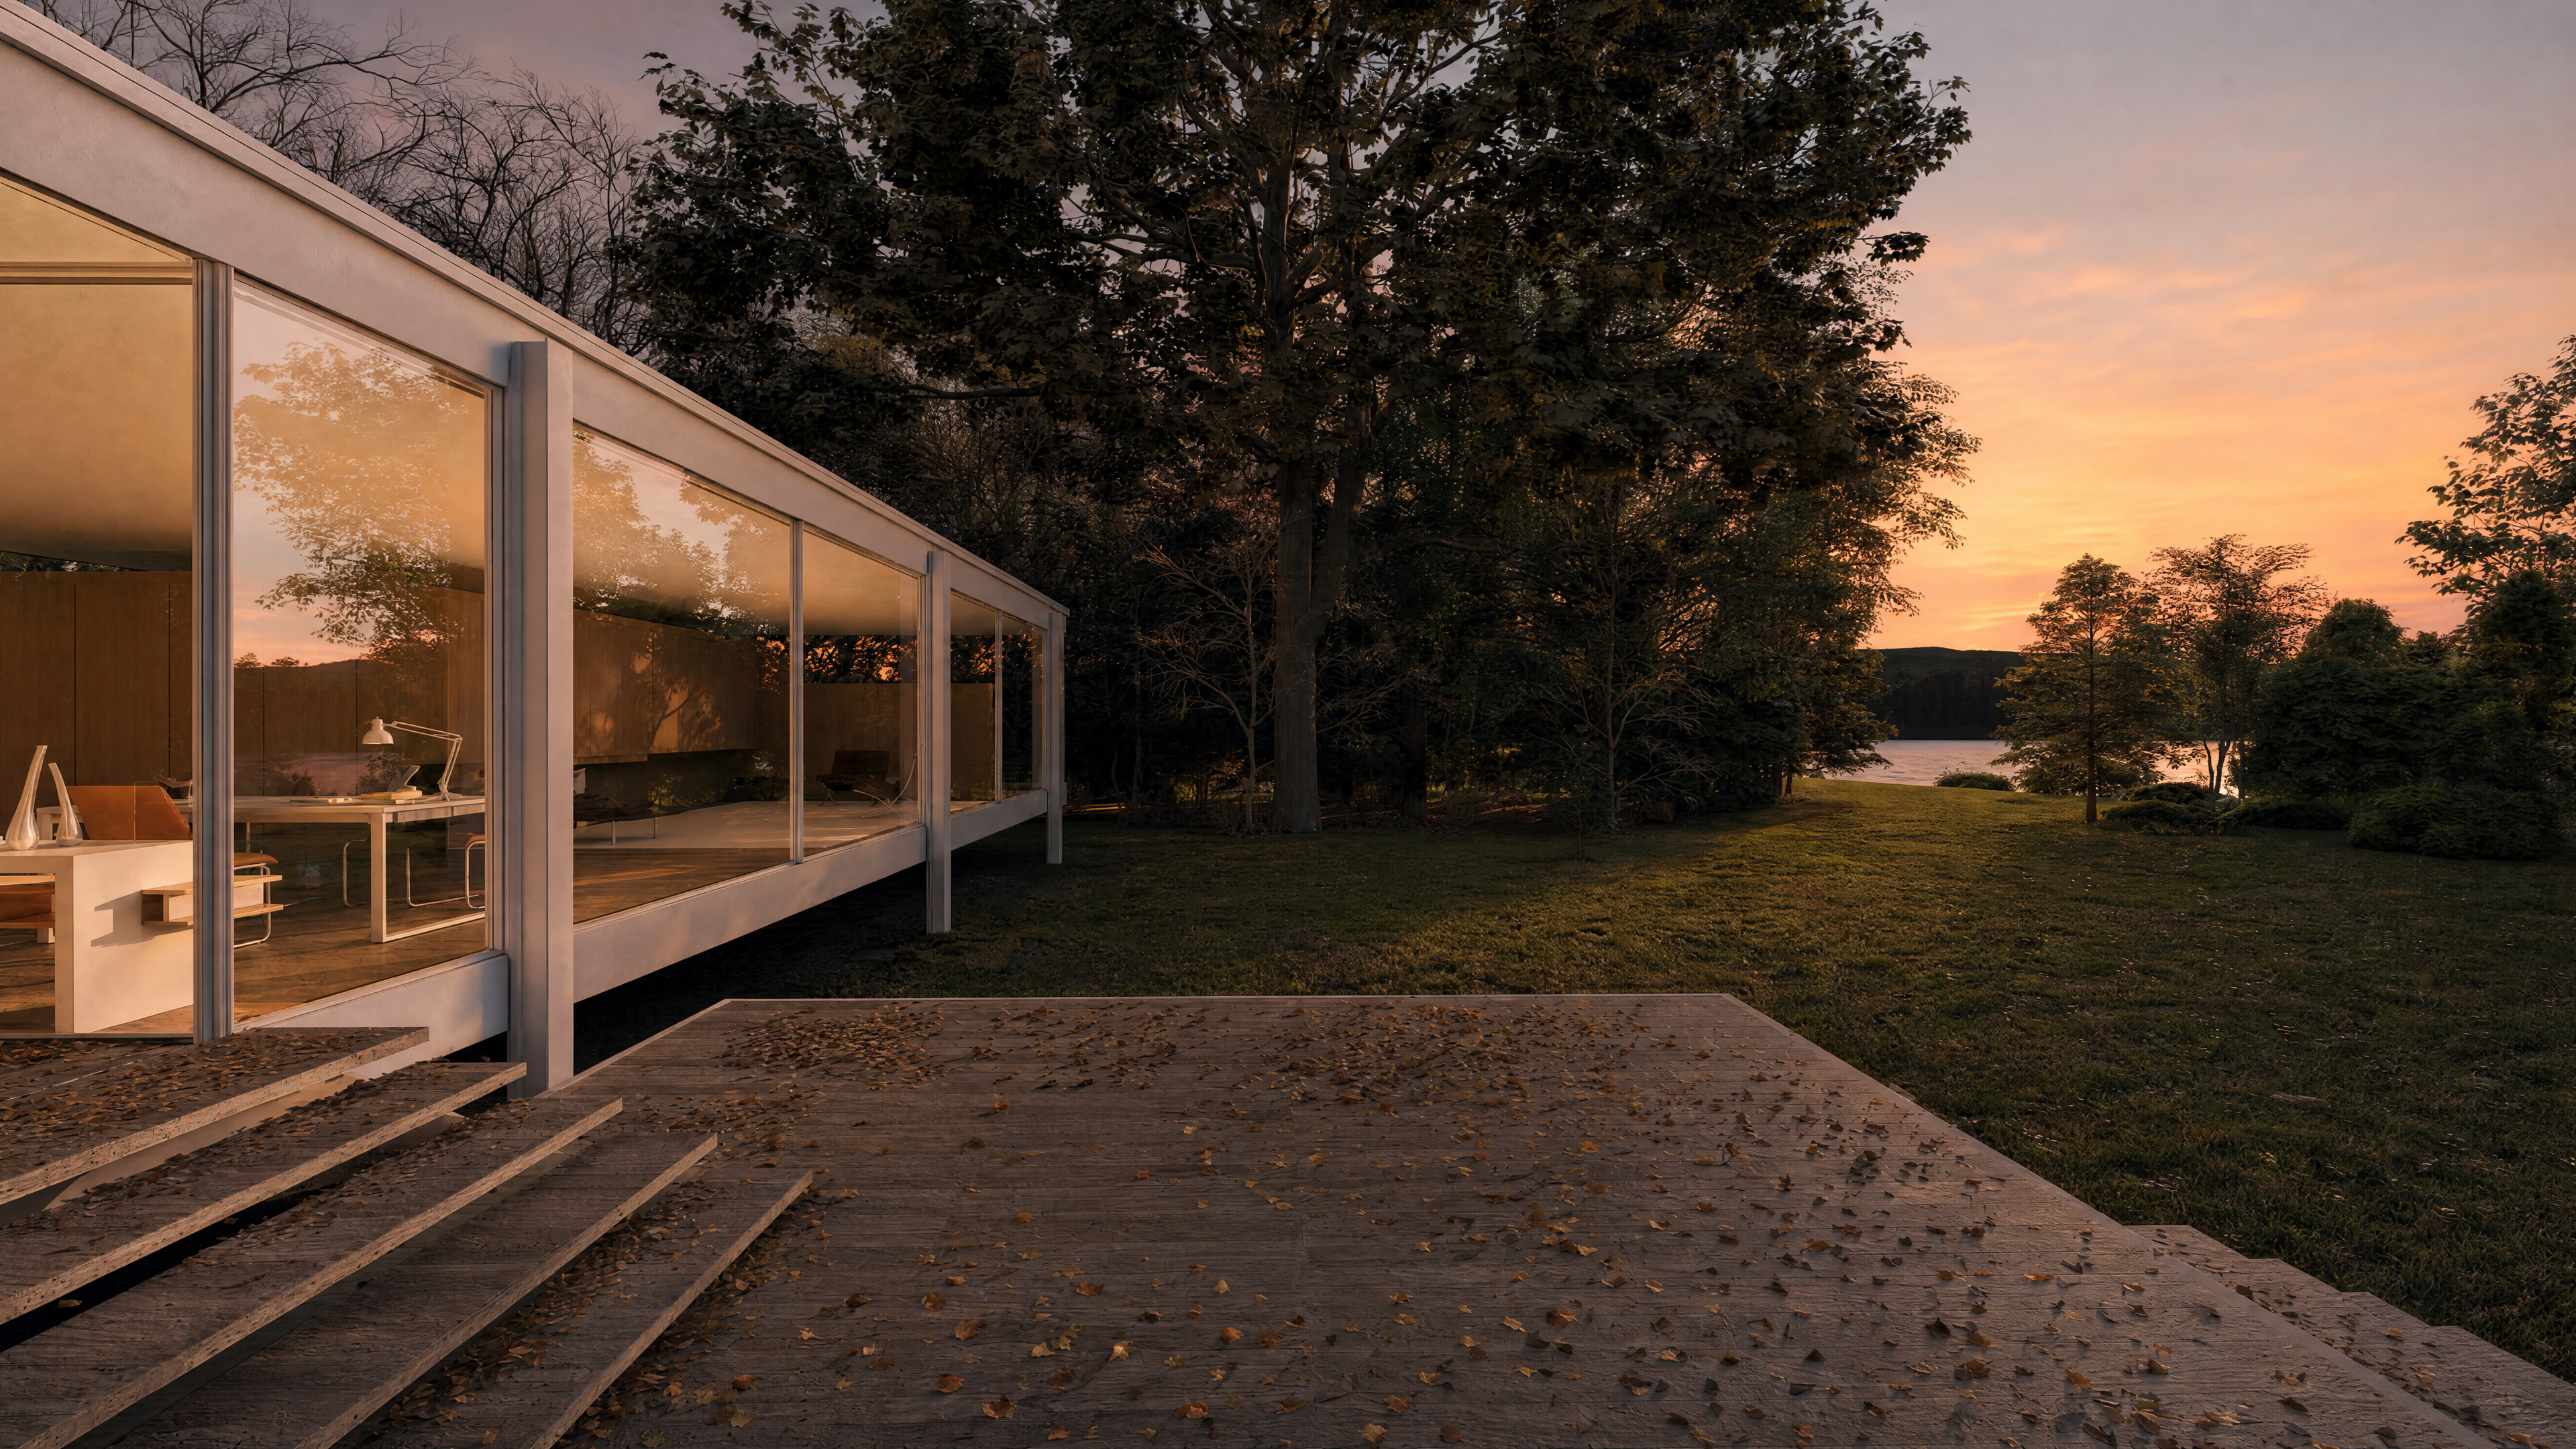 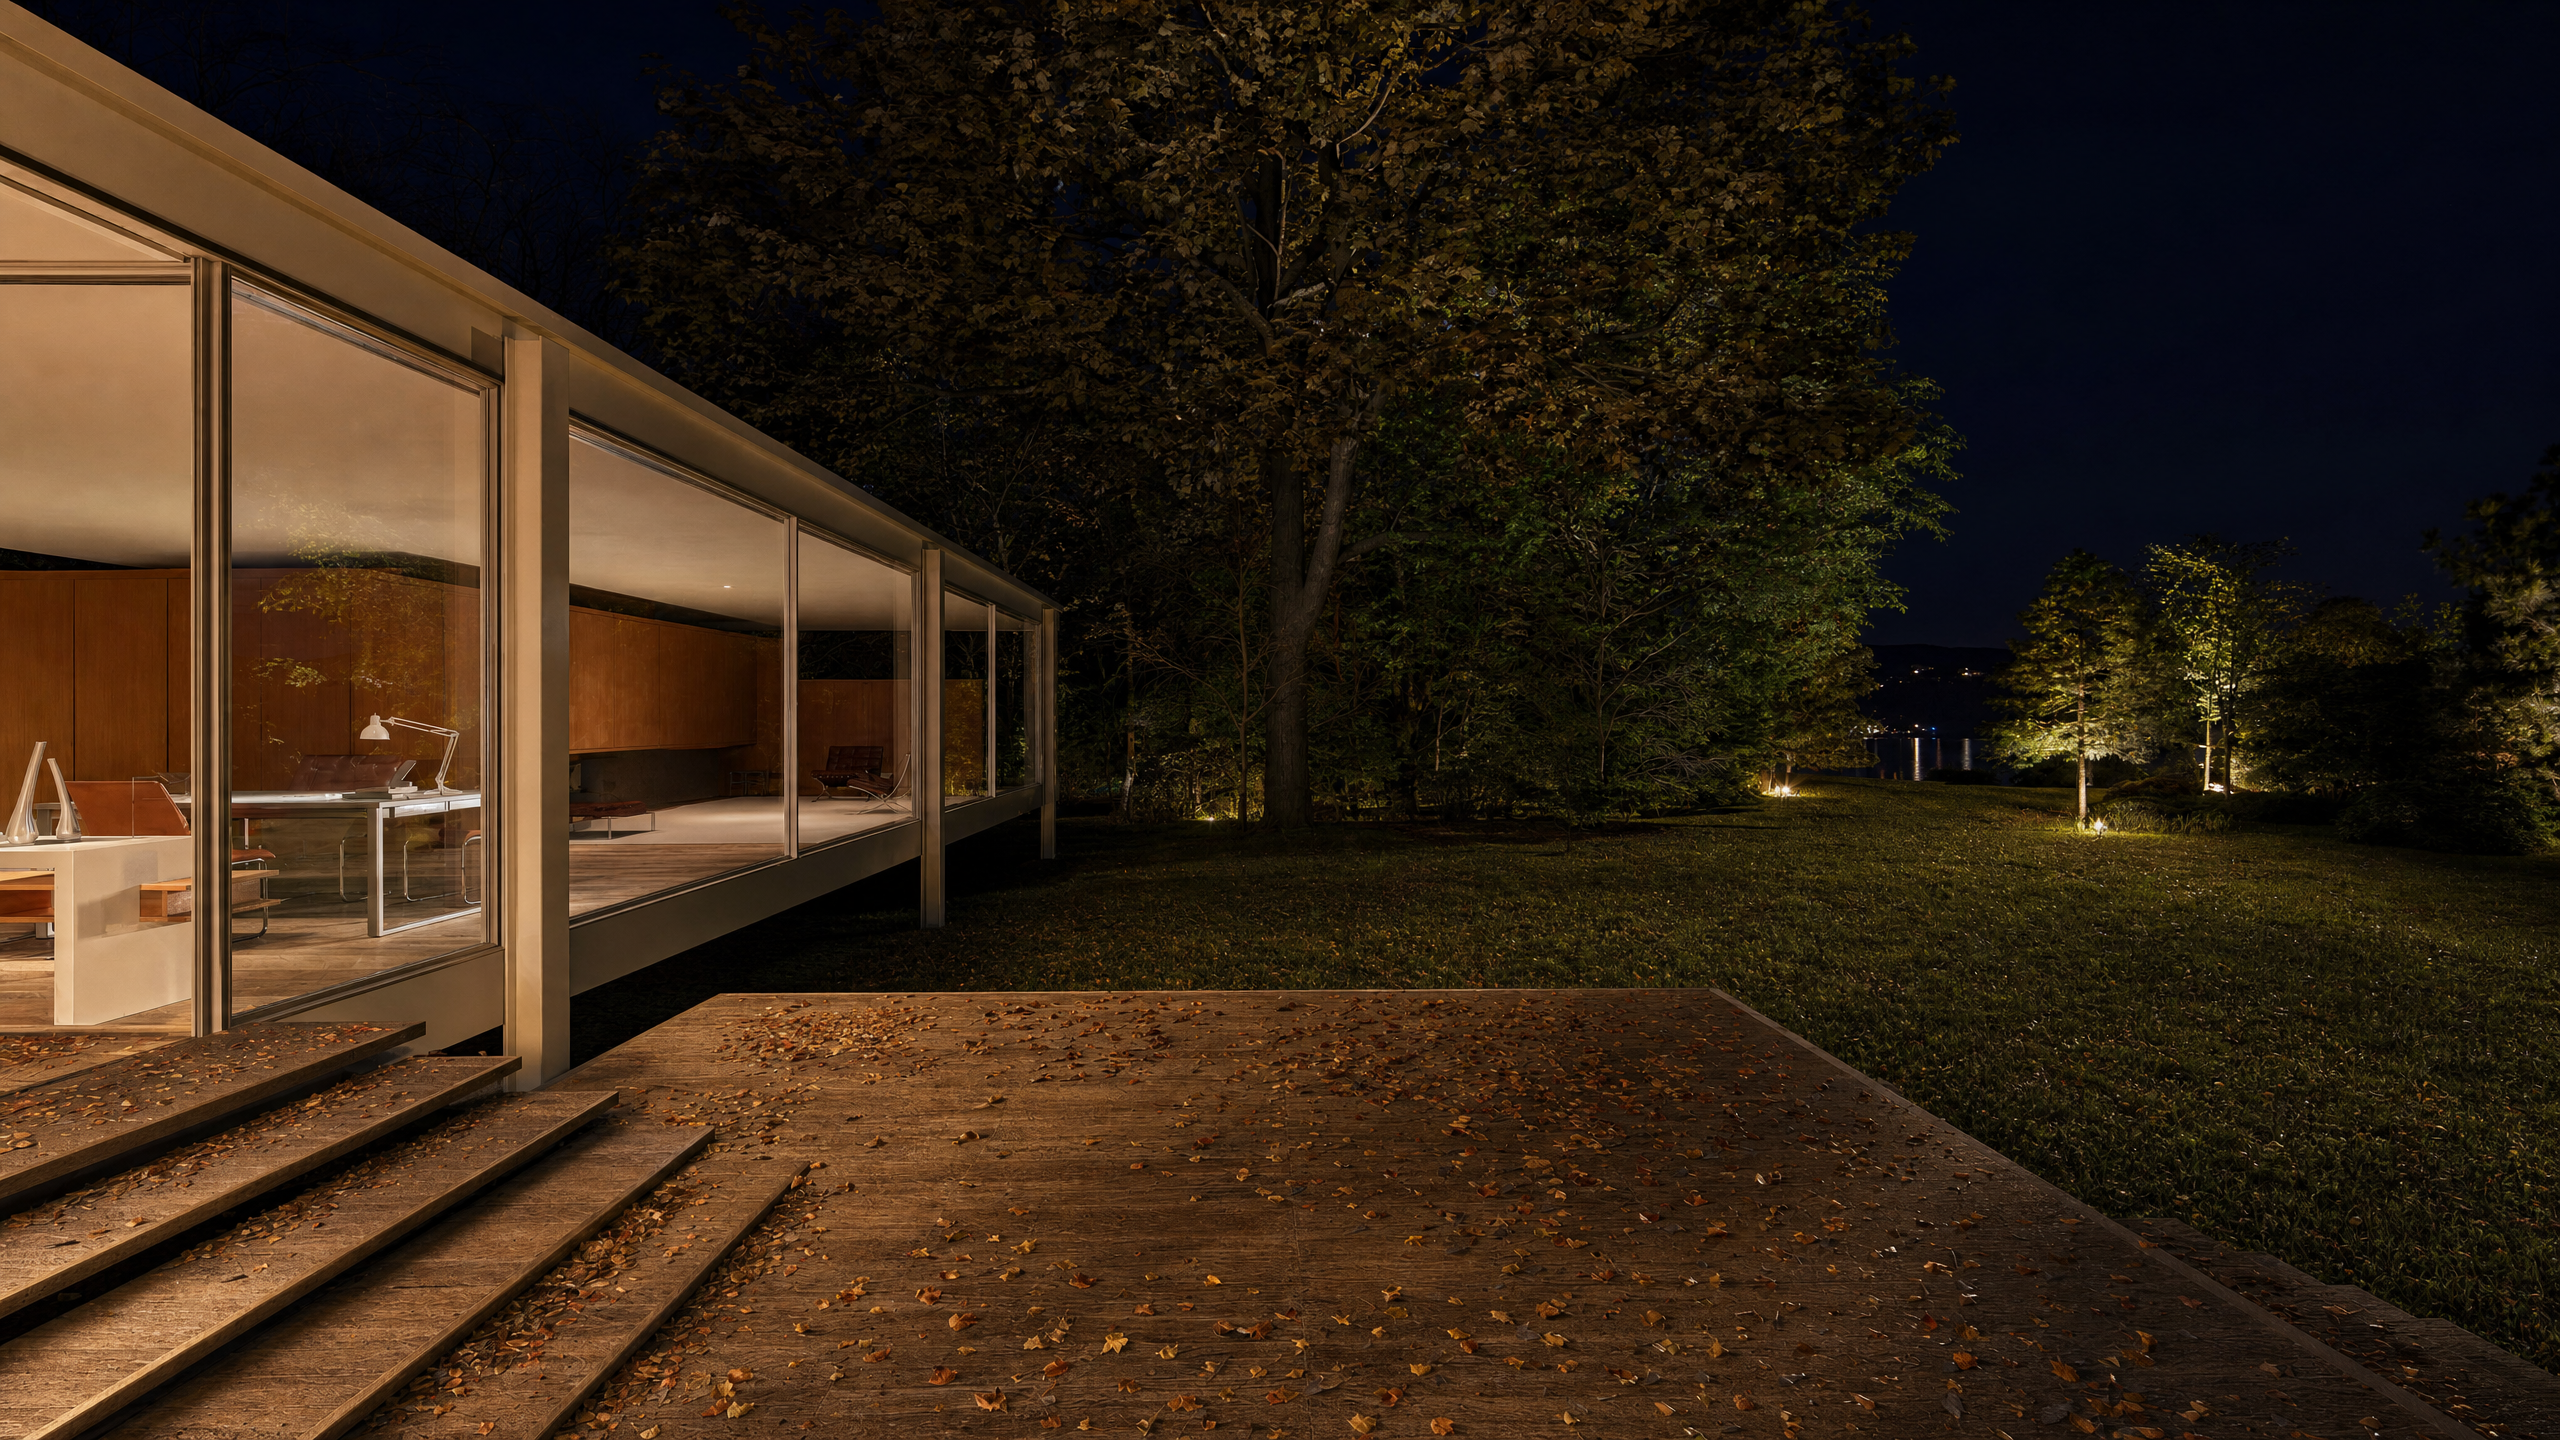
### **3.2 Expert Mode:**
***Expert Mode*** lets you describe the intended result using your own instructions. You can request subtle refinements to lighting and materials, broader changes to the atmosphere or landscaping, or changes to specific visual elements.
Some ideas to consider when writing your prompt include:
- **Materials, textures, and surface details:** Refine concrete, timber, metal, glass, fabric, paving, or other surfaces. You can also request more realistic reflections, weathering, texture variation, or finer material detail.
- **Lighting, time of day, weather, and atmosphere:** Change the scene to sunrise, dusk, night, or another lighting condition. Consider interior illumination, shadows, cloud cover, fog, rain, or a warmer or cooler atmosphere.
- **Vegetation, furniture, people, and other scene elements:** Add, remove, or refine landscaping, outdoor furniture, vehicles, decorative objects, or people. You can also describe their placement, scale, density, or activity.
- **Color balance, realism, and overall visual style:** Adjust contrast, warmth, saturation, mood, or photographic realism. You can also describe a specific presentation style, such as cinematic, minimalist, natural, dramatic, or editorial.
- **Elements that should remain unchanged:** Identify important features such as the building geometry, camera position, perspective, roofline, openings, materials, or access routes that should be preserved.
| 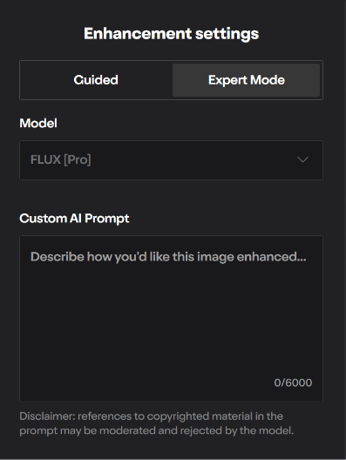 | #### Custom AI Prompt - Enter instructions describing how you want the image to be enhanced. - The prompt can contain up to 6,000 characters. - A prompt must be entered before ***Enhance*** becomes available. - The prompt controls the visual enhancement, but it does not set the exact output dimensions or resolution. |
| --- | --- |
Disclaimer: References to copyrighted material in the prompt may be moderated and rejected by the model.
### Tips for better prompts
The 6,000-character limit is a maximum. Clear, specific instructions generally work better than a long list of loosely connected changes.
A useful prompt structure is:
*"Preserve **\[important elements\]**. Enhance **\[materials, lighting, or details\]**. Add or refine **\[desired elements\]**. Create **\[atmosphere or style\]**. Avoid changing **\[restrictions\]**."*
For example:
*"Preserve the building geometry, camera position, roofline, windows, and doors. Refine the concrete, timber, and glazing materials, and create warm dusk lighting with subtle interior illumination. Add restrained landscaping around the entrance. Maintain realistic scale and straight architectural lines. Do not add people or alter the building openings."*
Select **** to begin processing the image. Once processing begins, you must wait for the enhancement to complete.
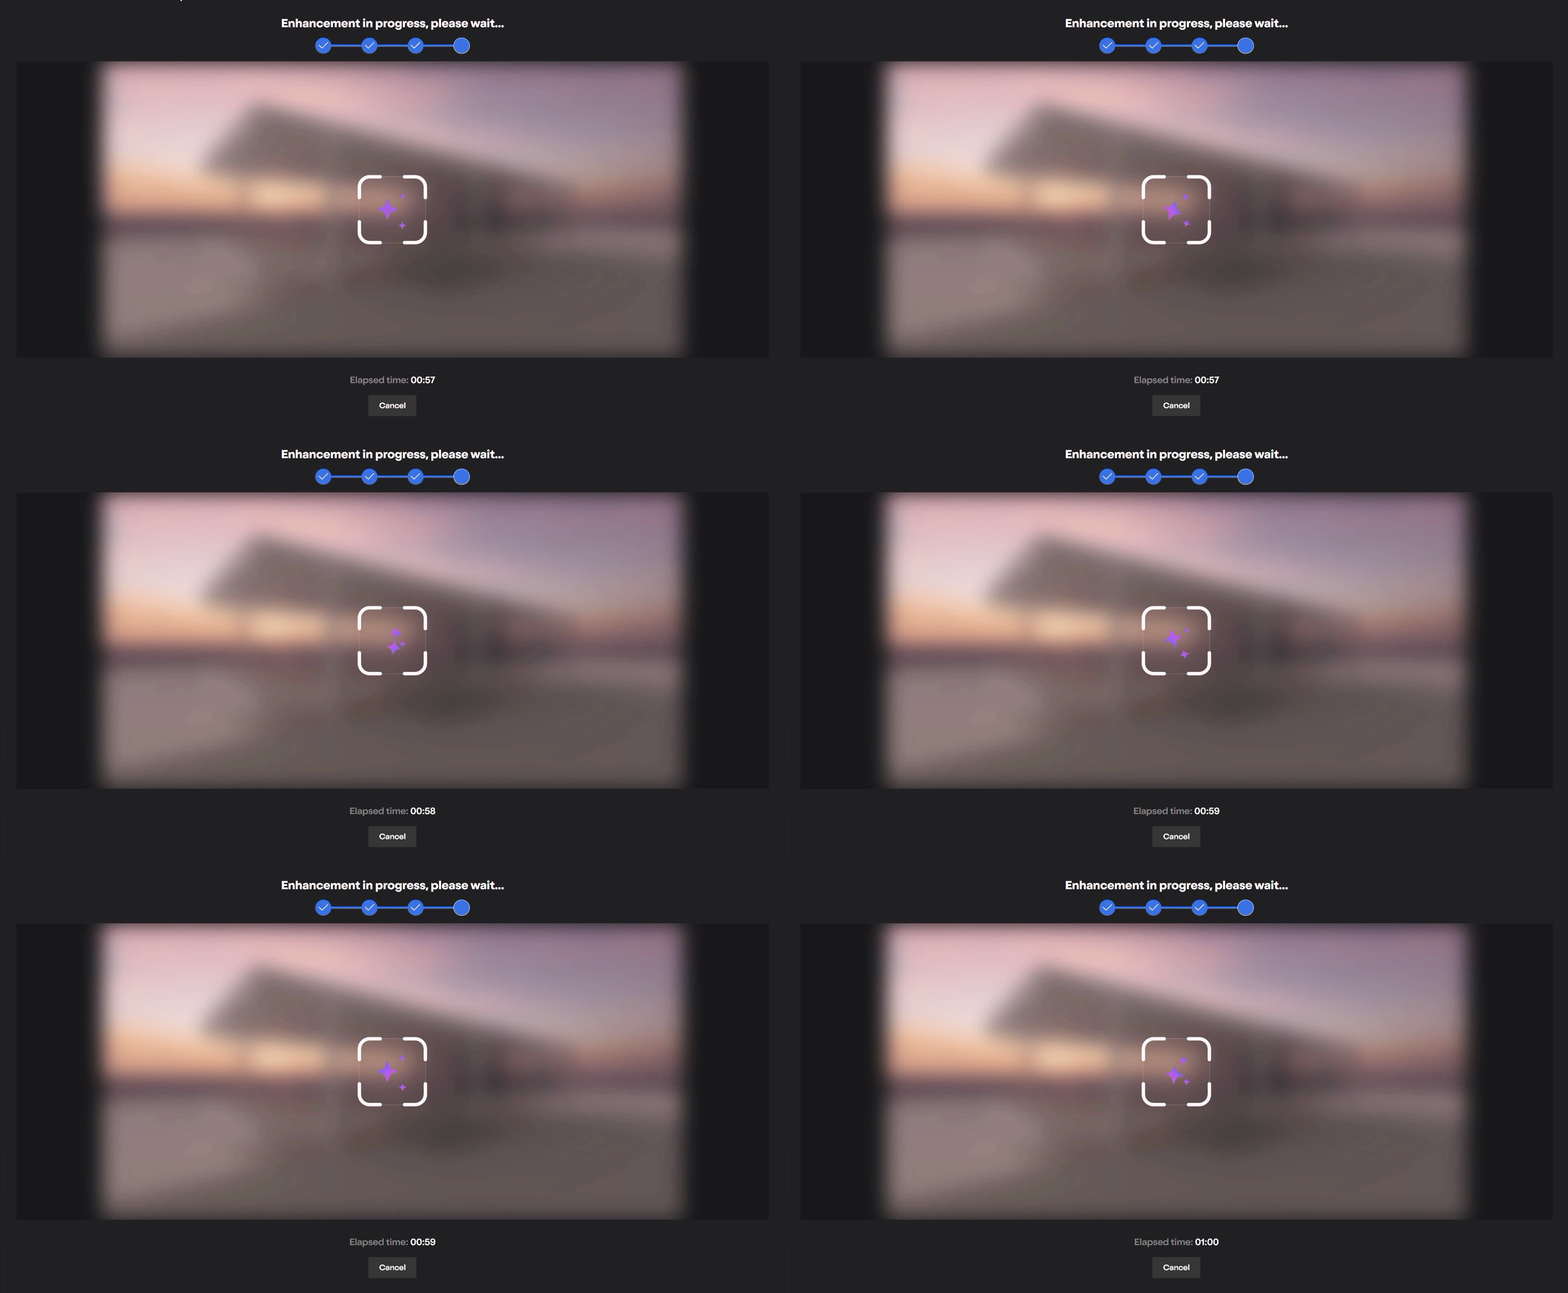
Note: Processing times can vary between models.
4\. Review, Compare, and Save
After selecting ***Enhance***, Lumion Cloud begins processing the image. Once complete, you can review the enhanced result, compare it with the original, generate another variation, or save and download the image.
#### 4.1 Review and compare the result
Once processing is complete, the enhanced result is displayed alongside the original image.
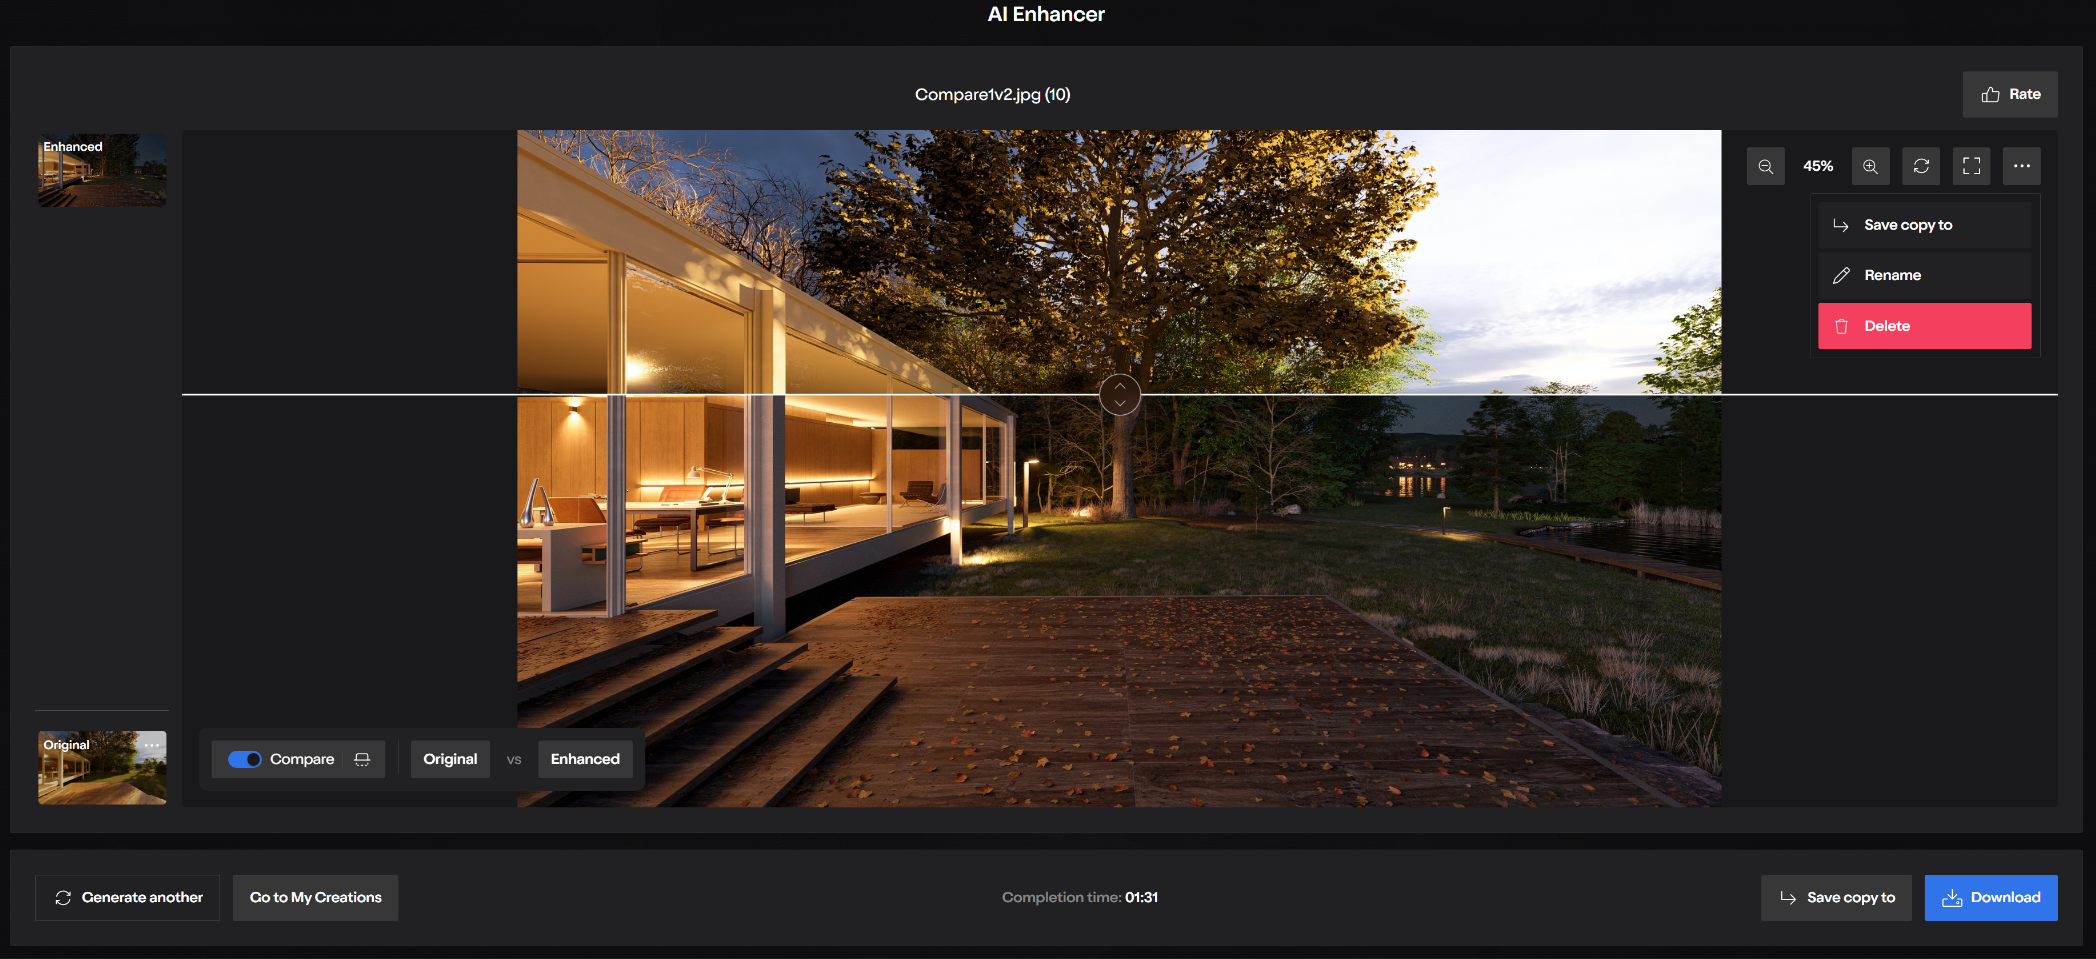
Use the ***Original*** and ***Enhanced*** thumbnails on the left to switch between the two versions. You can also enable ***Compare*** to:
- Drag the divider across the image to inspect the differences.
- Switch between horizontal and vertical comparison.
- Display only the ***Original*** or ***Enhanced*** image
- Zoom in or out.
- Reset the preview.
- Open the image in full screen.
#### 4.2 Save or continue
After reviewing the result, you can:
- Select ***Generate another**,* to create a new variation.
- Select ***Go to My Creations**,* to open your ***AI Enhancer*** gallery.
- Select ***Save copy to****,* to save the result to a ***Project*** or ***Renders*** folder.
- Select ***Download**,* to download the selected image.
- Select***Rate**,* to provide feedback on the result.
- Open the **More** (3 dots) menu to save a copy, rename, or delete the creation.
5\. View and Manage Your Creations
Recent ***AI Enhancer*** results appear under ***Your Creations***. Select **View all**, or go to ***Your Creations***, to open the complete gallery where you can browse, sort, and manage your enhanced results.
#### 5.1 Browse and sort your Creations
The gallery displays each enhanced result as an individual tile. You can sort the gallery by:
**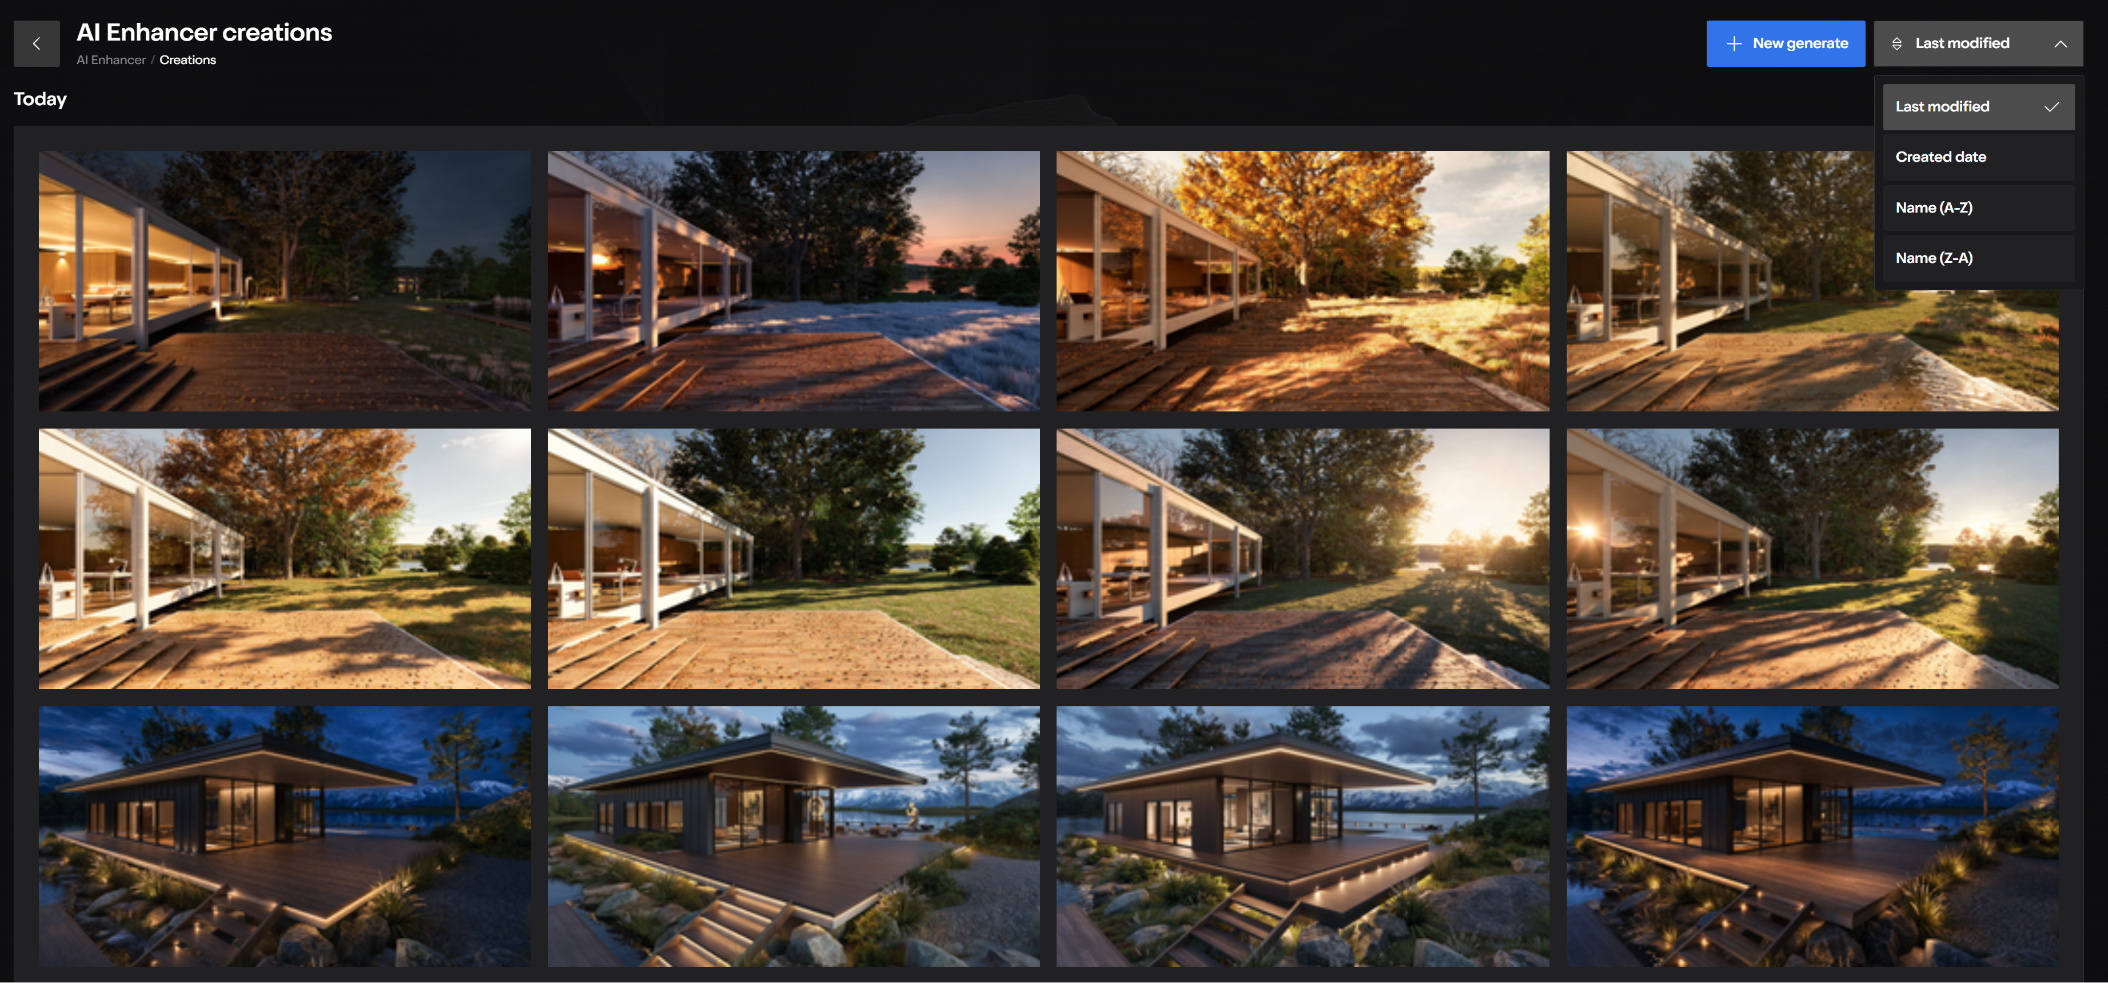**
- **Last modified**
- **Created date**
- **Name (A-Z)**
- **Name (Z-A)**
If you need to create another enhancement, select ***New generate***.
#### 5.2 Manage an individual creation
From the gallery, open the three-dot menu on any creation tile to:
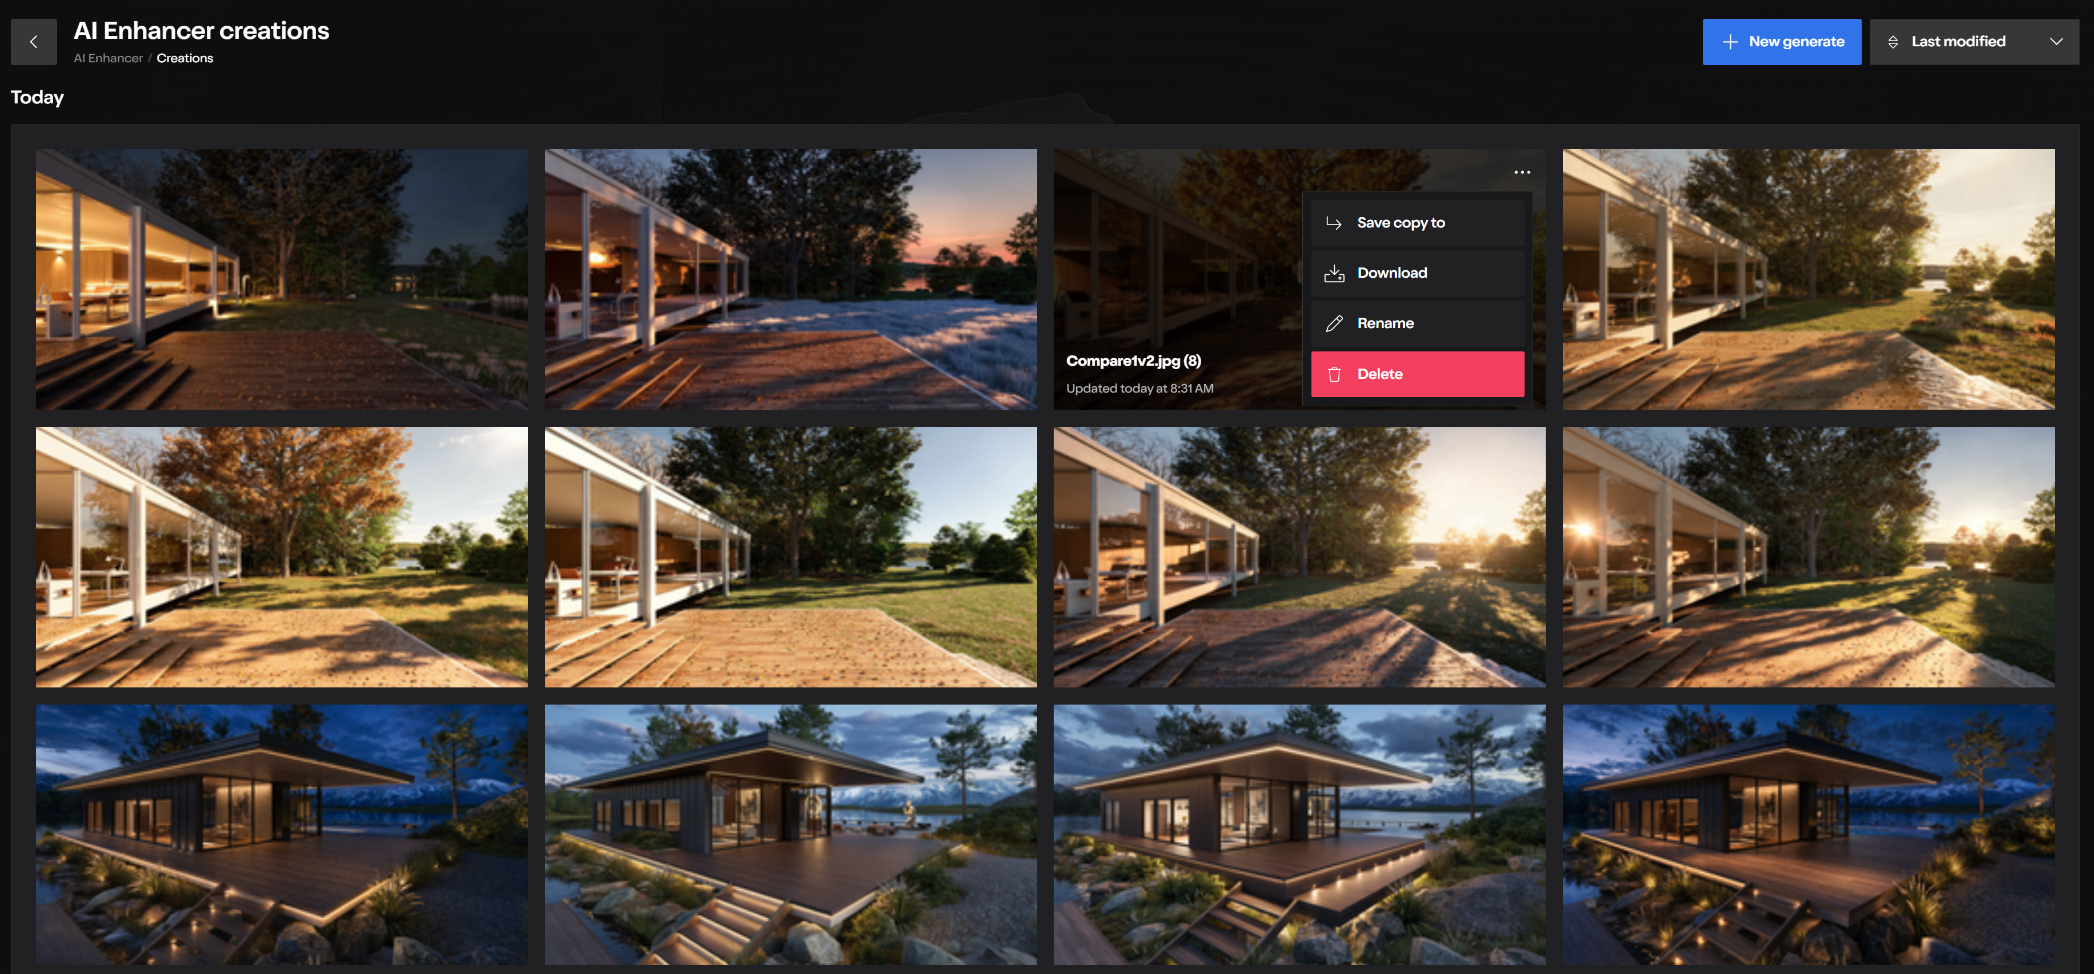
- Select ***Save copy to***, to save the image to a ***Project*** or ***Renders*** folder.
- Select ***Download*** to save the image locally.
- Select ***Rename*** to change the creation name.
- Select ***Delete*** to remove it from your Creations.
You do not need to open the creation before using these options.
#### 5.3 Open and review a creation
Select a creation tile to open it in the detailed view. The carousel at the top provides quick access to your other creations without returning to the gallery.
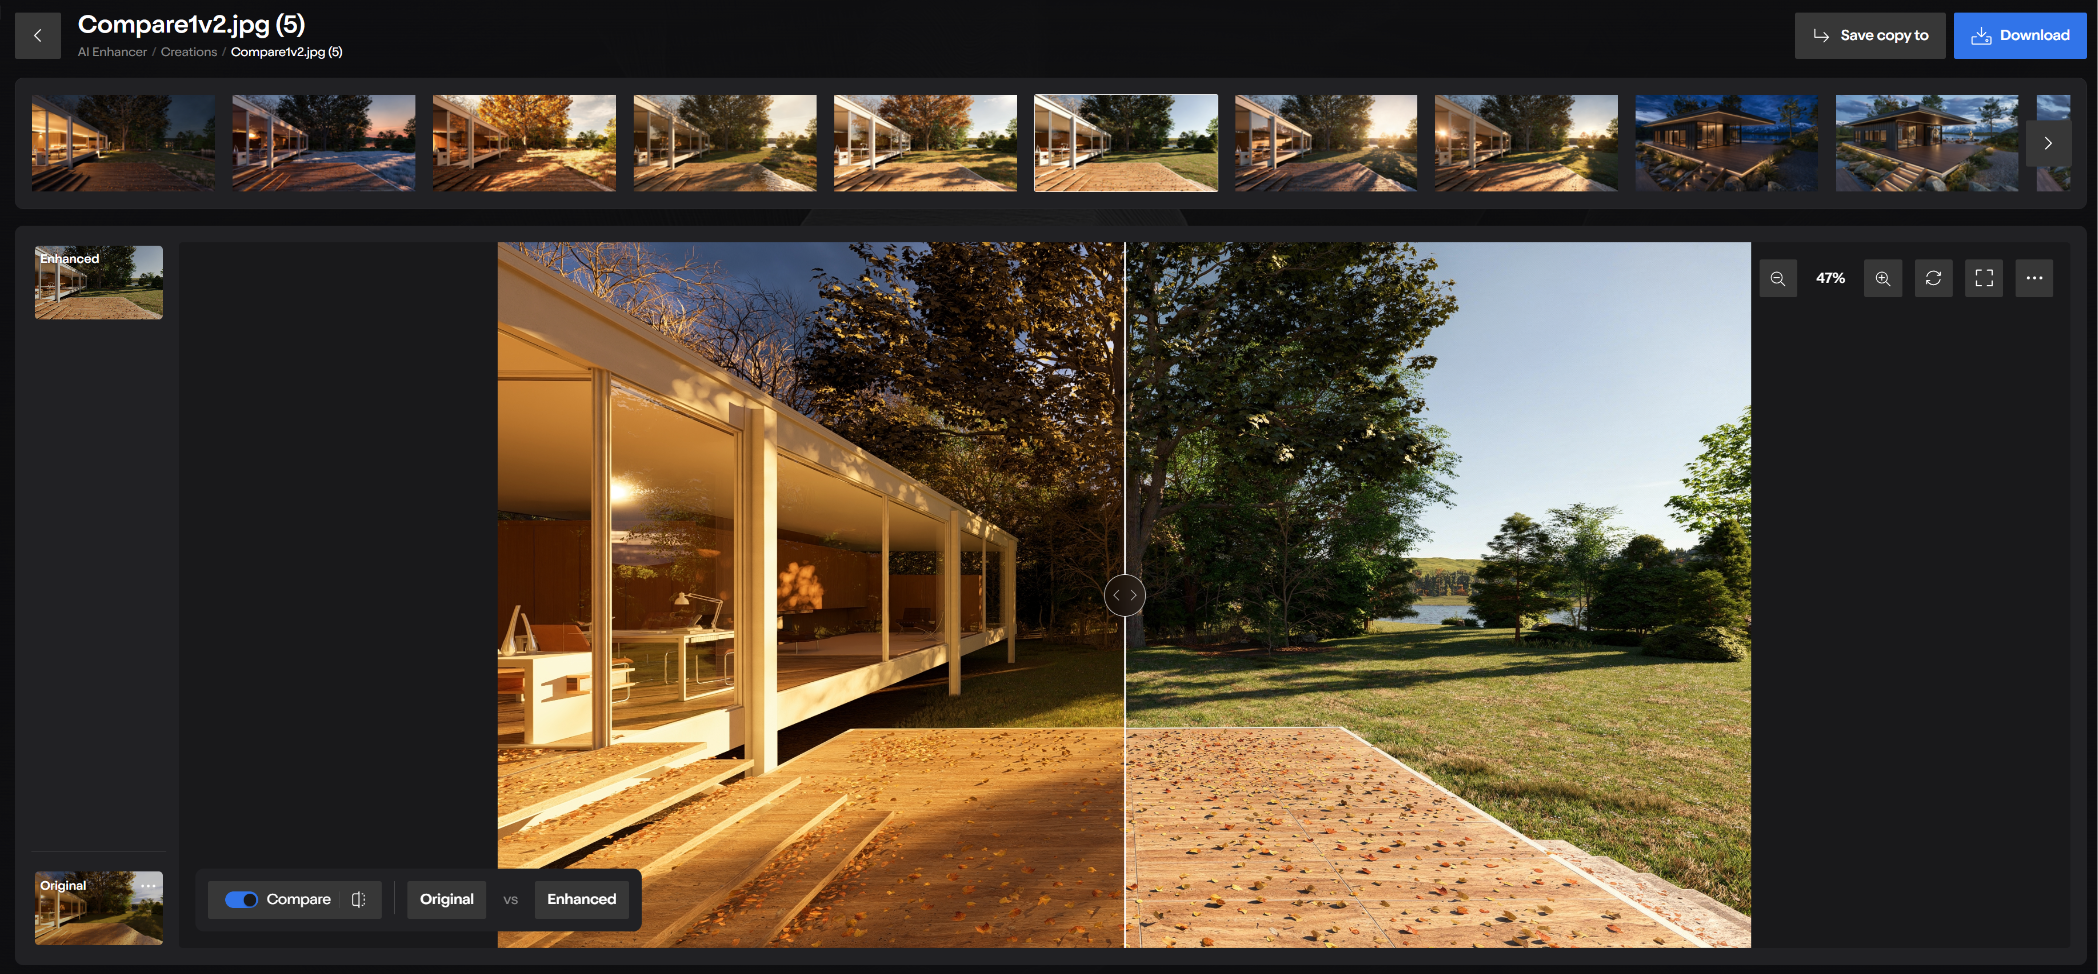
From the detailed view, you can:
- Select another creation from the carousel.
- Switch between the ***Original*** and ***Enhanced*** images.
- Use ***Compare*** to inspect the differences between each image.
- Select ***Save copy to***, to save the selected creation to a ***Project*** or ***Renders*** folder.
- Select ***Download*** to save the selected image locally.
To enhance an existing creation again, first select **Save copy to** and save it to a ***Project*** or ***Renders*** folder. Open the saved image, select ***AI Edits***, and then choose ***Enhance***.
For more information on browsing and managing Projects in Lumion Cloud, see:
- **Knowledge Base:** [Lumion Cloud: Projects Screen](https://support.lumion.com/lumion-cloud/api/v2/help_center/en-us/articles/21308796481436.json?hsLang=en-us)
### 6. Current limitations
- This is built specifically for architectural visualization. Close-up subjects without architectural context (like personal portraits or pet photos) won't work well.
- Results and time to render may vary between models and generations.
- Generative AI may change details unexpectedly.
- Maximum output resolution is 4K.
- It will retain the original resolution rather than upscale every image.
- The selected model cannot be changed after compatibility is completed.
- Settings cannot currently be reopened after generating the result.
### **7. See Also**
- **Knowledge Base:** [How do you use Post-Processing in Lumion Cloud?](https://support.lumion.com/lumion-cloud/how-do-you-use-post-processing-styles-in-lumion-cloud?hsLang=en-us)
- **Knowledge Base:** [Lumion Cloud: Security and Privacy FAQ](https://support.lumion.com/lumion-cloud/lumion-cloud-security-and-privacy-faq?hs_preview=fjhFrLlI-263035701473&hsLang=en-us)
- **Knowledge Base:** [How do you use the AI Upscaler in Lumion Cloud?](https://support.lumion.com/lumion-cloud/how-do-you-use-the-ai-upscaler-in-lumion-cloud?hsLang=en-us)
- **Knowledge Base:** [How do you use the Lumion Cloud AI Material Generator](https://support.lumion.com/lumion-cloud/how-do-you-use-the-lumion-cloud-ai-material-generator?__hstc=212388875.5dc223ec0131f661c4d11691b0bb4e3b.1785789996347.1785789996347.1785789996347.1&__hssc=212388875.1.1785789996347&__hsfp=2c8692082fcae7b5a952ecf2e5562774&hsLang=en-us)
- **Knowledge Base:** [What is Lumion Cloud?](https://support.lumion.com/lumion-cloud/api/v2/help_center/en-us/articles/21308656717468.json?__hstc=212388875.5dc223ec0131f661c4d11691b0bb4e3b.1785789996347.1785789996347.1785789996347.1&__hssc=212388875.1.1785789996347&__hsfp=2c8692082fcae7b5a952ecf2e5562774&hsLang=en-us)
- **Knowledge Base:** [Lumion Cloud: Render Screen](https://support.lumion.com/lumion-cloud/api/v2/help_center/en-us/articles/21308818123164.json?__hstc=212388875.5dc223ec0131f661c4d11691b0bb4e3b.1785789996347.1785789996347.1785789996347.1&__hssc=212388875.1.1785789996347&__hsfp=2c8692082fcae7b5a952ecf2e5562774&hsLang=en-us)
- **Knowledge Base:** [Lumion Cloud Video Tutorial 1: Lumion Cloud Overview](https://support.lumion.com/lumion-cloud/api/v2/help_center/en-us/articles/21943857786524.json?hsLang=en-us)
- [Visit our other Sections](https://support.lumion.com/lumion-cloud/visit-our-other-sections?hsLang=en-us)
- [Lumion Cloud](https://support.lumion.com/lumion-cloud/lumion-cloud?hsLang=en-us#main-content)
- [Feature Guides](https://support.lumion.com/lumion-cloud/lumion-cloud?hsLang=en-us#feature-guides)
- [Video Tutorials](https://support.lumion.com/lumion-cloud/lumion-cloud?hsLang=en-us#video-tutorials)
[](https://lumion.com/)
[mailto:email@email.com](mailto:email@email.com)
Copyright © 2026, Lumion - Act3D B.V.
#### Product
[Plans and pricing](https://lumion.com/product/buy)
[Discover Lumion](https://lumion.com/product/discover-lumion)
[Compatibility](https://lumion.com/compatibility/)
[System Requirements](https://lumion.com/product/system-requirements)
[Find a reseller](https://lumion.com/about/find-reseller)
[Free trial](https://lumion.com/product/free-trial)
#### Solutions
[Architectural design](https://lumion.com/product/architectural-design)
[Interior design](https://lumion.com/product/interior-design)
[Landscape architecture](https://lumion.com/product/landscape-architecture)
[Urban planning](https://lumion.com/product/urban-planning)
[3D rendering](https://lumion.com/product/3d-rendering-software)
[Education](https://lumion.com/product/educational-licenses)
#### Compatibility
[Trimble SketchUp](https://lumion.com/compatibility/sketchup-rendering)
[Autodesk Revit](https://lumion.com/compatibility/revit-rendering)
[Graphisoft ArchiCAD](https://lumion.com/compatibility/archicad-rendering)
[Rhinoceros](https://lumion.com/compatibility/rhino-rendering)
[Autodesk Autocad](https://lumion.com/compatibility/autocad-rendering)
[Autodesk FormIt Pro](https://lumion.com/compatibility/lumion-for-autodesk-formit-pro)
[Nemetschek Allplan](https://lumion.com/compatibility/allplan-rendering)
[Nemetschek Vectorworks](https://lumion.com/compatibility/vectorworks-rendering)
[BricsCAD](https://lumion.com/compatibility/bricscad-rendering)
[3D Studio Max](https://lumion.com/compatibility/3ds-max-rendering)
#### Resources
[Made with Lumion](https://lumion.com/made-with-lumion)
[Tutorials](https://support.lumion.com/video-tutorials?hsLang=en-us)
[Support and learning](https://support.lumion.com/knowledge-base/api/v2/help_center/en-us/articles/360044608053.json?hsLang=en-us)
[Downloads](https://support.lumion.com/downloads?hsLang=en-us)
[Community](https://community.lumion.com/index.php)
#### About
[Our Story](https://lumion.com/about)
[We're hiring!](https://lumion.com/about/careers)
[News](https://lumion.com/news)
[Contact us](https://lumion.com/about/contact)
[Terms & conditions](https://lumion.com/legal/terms-of-service) [EULA](https://lumion.com/legal/eula) [Privacy statement](https://lumion.com/legal/privacy-statement) [CEIP](https://lumion.com/legal/ceip) [Disclaimer](https://lumion.com/legal/disclaimer) © 2026 Lumion
```json
{
"@context" : "https://schema.org",
"@type" : "VideoObject",
"contentUrl" : "https://25757866.fs1.hubspotusercontent-eu1.net/hubfs/25757866/video_assets/446897321181/inherited/web_optimized.mp4",
"dateModified" : "2026-08-03T00:31:59.601Z",
"description" : "See how Lumion Cloud’s AI Enhancer turns one simple architectural render into multiple polished styles, environments, and day-to-night variations.",
"duration" : "PT18.2S",
"height" : 1080,
"name" : "How_do_you_use_Lumiod_Cloud_Ai_Enhancer?",
"thumbnailUrl" : "https://25757866.fs1.hubspotusercontent-eu1.net/hubfs/25757866/howdoyouuselumiodcloudaienhancer.mp4/medium.jpg",
"uploadDate" : "2026-08-02T23:35:26.623Z",
"width" : 1920
}
```
```json
{
"@context" : "https://schema.org",
"@type" : "VideoObject",
"contentUrl" : "https://25757866.fs1.hubspotusercontent-eu1.net/hubfs/25757866/video_assets/450322513114/inherited/web_optimized.mp4",
"dateModified" : "2026-08-09T23:55:50.774Z",
"duration" : "PT17S",
"height" : 1616,
"name" : "Lumion_cloud-fix_it_cropping",
"thumbnailUrl" : "https://25757866.fs1.hubspotusercontent-eu1.net/hubfs/25757866/lumioncloud-fixitcropping.mp4/medium.jpg",
"uploadDate" : "2026-08-09T23:52:06.821Z",
"width" : 3354
}
```